Difference between revisions of "Export a Data Entry Form from the Summary Window"
From IMSMA Wiki
| Line 1: | Line 1: | ||
| − | <p>To export a | + | [[Image:Summary window toolbar.png|350px|center]] |
| + | <div align="center"> | ||
| + | '' Summary window toolbar'' | ||
| + | </div> | ||
| + | <p>To export a Data Entry Form:</p> | ||
<ol> | <ol> | ||
<li>Click the [[Image:FieldReportIcon.png | Data Entry Form]] button.</li> | <li>Click the [[Image:FieldReportIcon.png | Data Entry Form]] button.</li> | ||
| − | :The Data Entry Forms window lists the | + | [[Image:DEF pick window.png|500px|center]] |
| − | <li>Select the row associated with the | + | <div align="center"> |
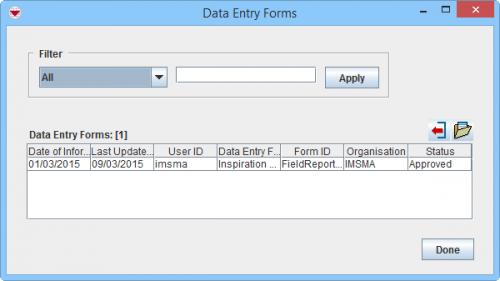
| + | '' Data Entry Forms window'' | ||
| + | </div> | ||
| + | |||
| + | <li>The Data Entry Forms window lists the Data Entry Forms associated with the item. | ||
| + | <li>Select the row associated with the Data Entry Form that you would like to export.</li> | ||
<li>Click the [[Image:FieldReportExportIcon.png | Export Data Entry Forms]] button.</li> | <li>Click the [[Image:FieldReportExportIcon.png | Export Data Entry Forms]] button.</li> | ||
| − | + | <li>The Data Entry Form Export window displays. | |
<li>Enter your name in the '''Exported by''' field or leave it blank.</li> | <li>Enter your name in the '''Exported by''' field or leave it blank.</li> | ||
<li>Click the '''Browse''' button and navigate to the directory where you would like to save the file.</li> | <li>Click the '''Browse''' button and navigate to the directory where you would like to save the file.</li> | ||
<li>In the Select window, enter the name of the file in the '''File Name''' field.</li> | <li>In the Select window, enter the name of the file in the '''File Name''' field.</li> | ||
<li>Click the '''Select''' button.</li> | <li>Click the '''Select''' button.</li> | ||
| − | <li>If you want to export the | + | <li>If you want to export the Data Entry Form without its attachments, check the '''Exclude Data Entry Form Attachment data''' checkbox.</li> |
<li>In the Data Entry Form Export window, click the '''Export''' button.</li> | <li>In the Data Entry Form Export window, click the '''Export''' button.</li> | ||
:The Export Complete window displays. | :The Export Complete window displays. | ||
Revision as of 18:38, 9 March 2015
Summary window toolbar
To export a Data Entry Form:
- Click the
 button.
 - The Data Entry Forms window lists the Data Entry Forms associated with the item.
- Select the row associated with the Data Entry Form that you would like to export.
- Click the
 button.
 - The Data Entry Form Export window displays.
- Enter your name in the Exported by field or leave it blank.
- Click the Browse button and navigate to the directory where you would like to save the file.
- In the Select window, enter the name of the file in the File Name field.
- Click the Select button.
- If you want to export the Data Entry Form without its attachments, check the Exclude Data Entry Form Attachment data checkbox.
- In the Data Entry Form Export window, click the Export button.
- The Export Complete window displays.
- Click the OK button.
Data Entry Forms window
