Difference between revisions of "Import an IMSMA Map"
From IMSMA Wiki
| Line 2: | Line 2: | ||
To import a base map into {{IMSMANG}}: | To import a base map into {{IMSMANG}}: | ||
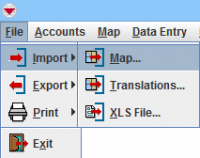
| − | <ol><li> | + | <ol><li>In the '''File''' menu rarr; '''Import'''rarr ;'''Map'''. |
[[Image:Import menu.png|200px|center]]</li> | [[Image:Import menu.png|200px|center]]</li> | ||
| − | + | ||
[[Image:Map import.png|500px|center]]</li> | [[Image:Map import.png|500px|center]]</li> | ||
<li>Navigate to the location of the .mxd file that you would like to import. </li> | <li>Navigate to the location of the .mxd file that you would like to import. </li> | ||
Revision as of 14:06, 16 June 2017
| |
The .mxd of the map file and corresponding shapefiles should be located on a local drive on your computer. The .mxd should have a unique name and have never been imported into IMSMANG before. Recommended size of the file should not exceed 2 GB. If you would need a clean background map then you may download it from Downloads. |
To import a base map into IMSMANG:
- In the File menu rarr; Importrarr ;Map.
- Navigate to the location of the .mxd file that you would like to import.
- Select the .mxd file.
- Click the Import button.
- A message stating that the Map Import Successfully Completed displays.
| |||||||||||||


