Difference between revisions of "Customise Sub-Themes"
From IMSMA Wiki
| (26 intermediate revisions by 3 users not shown) | |||
| Line 1: | Line 1: | ||
| − | + | {{Note | The steps below describe what needs to be done in {{IMSMANG}}. The sub-theme needs also to be defined in the '''[[IMSMA.mxd]]''' and the map should be imported again. These steps are described in [[How to work with Sub-Themes in IMSMA.mxd]].}} | |
| − | |||
| − | |||
| − | |||
| − | |||
| − | |||
| − | |||
| − | [[IMSMA | ||
| − | |||
| − | |||
| − | |||
| − | |||
| − | |||
| − | |||
| − | |||
| − | |||
| − | |||
| − | |||
| − | |||
| − | |||
| − | |||
| − | |||
| − | [[ | ||
| − | |||
| − | |||
| − | |||
| − | |||
| + | IMSMA allows you to add up to five customised themes, called Sub-themes, to each of the IMSMA themes. Sub-themes can be created based on '''single-select''' {{IMSMANG}} system fields or Custom-Defined Fields for that theme. | ||
| − | + | [[Image:Customise Subtheme0.png|400px|center]] | |
| + | <div align="center"> | ||
| + | '' IMSMA Themes window'' | ||
| + | </div> | ||
| − | + | ==Steps==__NOEDITSECTION__ | |
| − | <ol> | + | As an example, Victim by Gender theme will be used. To add sub-themes: |
| − | <li> | + | <ol>' |
| − | + | <li>In the '''Customisation''' menu → '''Sub-Themes Manager'''.</li> | |
| + | <li>Each theme contains five blank rows for adding a sub-theme. These are labelled ''UserDefined1'', ''UserDefined2'', ''UserDefined3'', ''UserDefined4'', and ''UserDefined5''. | ||
| + | [[Image:Customise Subtheme1.png|400px|center]] | ||
| + | <div align="center"> | ||
| + | '' Customise Sub-Themes window'' | ||
| + | </div></li> | ||
<li>Select the row of the sub-theme that you want to assign or reassign.</li> | <li>Select the row of the sub-theme that you want to assign or reassign.</li> | ||
| − | <li>Click the [[ | + | <li>Click the [[File:FieldViewIcon.png]] button.</li> |
| − | : | + | [[Image:Custom Sub-theme picker.png|400px|center]] |
| − | <li>Select a | + | <div align="center"> |
| + | '' Customise Sub-Themes window'' | ||
| + | </div> | ||
| + | <li>Select a field from the Sub-Theme drop-down list.</li> | ||
<li>Click the '''Save''' button.</li> | <li>Click the '''Save''' button.</li> | ||
| − | + | <li>The sub-theme displays in the Source column on the Customise Sub-Theme window. | |
| + | [[Image:Customise Subtheme2.png|400px|center]] | ||
| + | <div align="center"> | ||
| + | '' Updated Customise Sub-Themes window '' | ||
| + | </div></li> | ||
| + | <li>The sub-theme is automatically added to the IMSMA Themes tab of the [[Map Display Window]]. | ||
| + | [[Image:MapDisplaySubtheme.png|400px|center]] | ||
| + | <div align="center"> | ||
| + | '' Updated IMSMA Themes window'' | ||
| + | </div> | ||
| − | + | {{note| Once a sub-theme has been assigned to a blank row, that row cannot be unassigned (made blank) again. It can only be reassigned to another sub-theme. }} | |
| + | {{Warning | The sub-theme assignments are '''not''' stored in the IMSMA database. They are stored in the file ''C:\IMSMAng\client\conf\UserPrefs.props''. The file is included in the ''Map Data'' option of backup and restore.}}</li> | ||
| − | { | + | <li>You have now done the definition steps in {{IMSMANG}}.</li> |
| − | + | <li>You now should proceed with the [[How to work with Sub-Themes in IMSMA.mxd | definition steps in ArcGIS]].</li> | |
| − | + | </ol> | |
| − | + | ||
| + | |||
| + | {{NavBox HowTo Setting up Maps}} | ||
| + | |||
| + | [[Category:CRI]] | ||
Latest revision as of 19:08, 17 June 2017
| |
The steps below describe what needs to be done in IMSMANG. The sub-theme needs also to be defined in the IMSMA.mxd and the map should be imported again. These steps are described in How to work with Sub-Themes in IMSMA.mxd. |
IMSMA allows you to add up to five customised themes, called Sub-themes, to each of the IMSMA themes. Sub-themes can be created based on single-select IMSMANG system fields or Custom-Defined Fields for that theme.
IMSMA Themes window
Steps
As an example, Victim by Gender theme will be used. To add sub-themes:
- '
- In the Customisation menu → Sub-Themes Manager.
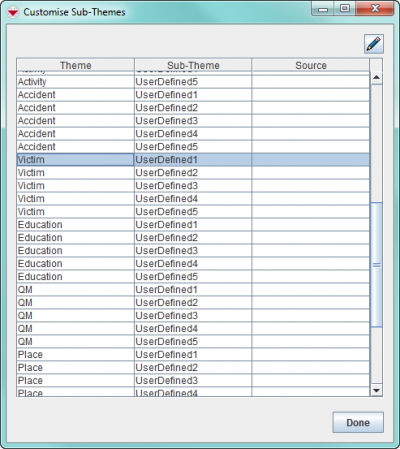
- Each theme contains five blank rows for adding a sub-theme. These are labelled UserDefined1, UserDefined2, UserDefined3, UserDefined4, and UserDefined5.
Customise Sub-Themes window
- Select the row of the sub-theme that you want to assign or reassign.
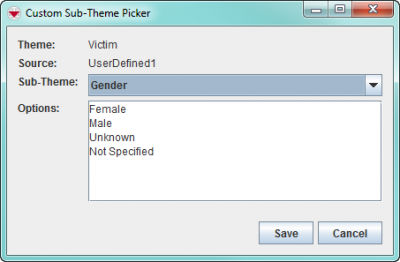
- Click the
 button.
 - Select a field from the Sub-Theme drop-down list.
- Click the Save button.
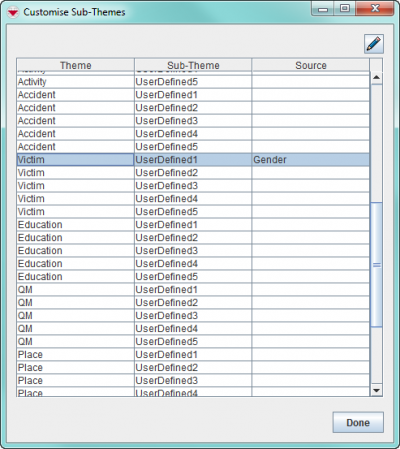
- The sub-theme displays in the Source column on the Customise Sub-Theme window.
Updated Customise Sub-Themes window
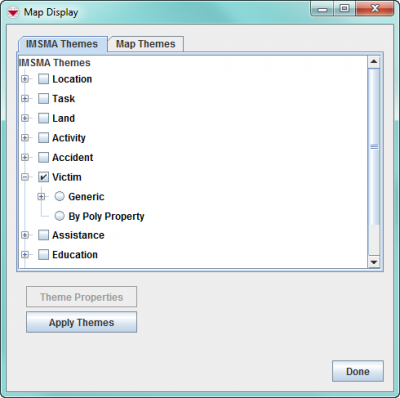
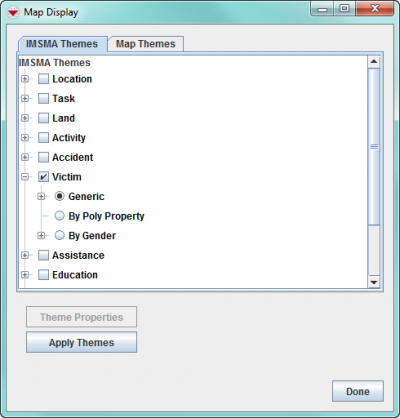
- The sub-theme is automatically added to the IMSMA Themes tab of the Map Display Window.
Updated IMSMA Themes window

Once a sub-theme has been assigned to a blank row, that row cannot be unassigned (made blank) again. It can only be reassigned to another sub-theme. 
The sub-theme assignments are not stored in the IMSMA database. They are stored in the file C:\IMSMAng\client\conf\UserPrefs.props. The file is included in the Map Data option of backup and restore. - You have now done the definition steps in IMSMANG.
- You now should proceed with the definition steps in ArcGIS.
Customise Sub-Themes window
| |||||||||||||
