Difference between revisions of "Add a new symbol to IMSMA.mxd"
From IMSMA Wiki
| (9 intermediate revisions by 2 users not shown) | |||
| Line 1: | Line 1: | ||
| − | + | When the Mine Action Programme has added values to an enumeration list that is used in Map Display then a symnbol has to be designed and added to the IMSMA.mxd. You need to use [http://desktop.arcgis.com/en/desktop/ ArcGIS software] to update '''[[IMSMA.mxd]]''' which is located in ''C:\IMSMAng\server\gis\maps'' folder. | |
| − | As example Place by Type will be used | + | ==Steps== __NOEDITSECTION__ |
| + | As an example, Place by Type theme will be used and in this example a symbol for Office needs to be added to Place Type. | ||
<ol> | <ol> | ||
| − | [[Image:Add_new_symbol1.png| | + | <li>This is how the [[Map Display Window]] inside IMSMA looks like before any changes on the .mxd file: |
| + | [[Image:Add_new_symbol0.png|350px|center]] | ||
| + | <div align="center"> | ||
| + | '' IMSMA layer Place - Symbol missing '' | ||
| + | </div></li> | ||
| + | <li>Open IMSMA.mxd with ArcMap and right-click on the specified layer and choose Properties in the menu. | ||
| + | [[Image:Add_new_symbol1.png|300px|center]] | ||
<div align="center"> | <div align="center"> | ||
'' IMSMA layer Place - by Type '' | '' IMSMA layer Place - by Type '' | ||
| − | </div> | + | </div></li> |
| − | + | <li>The following window displays. | |
| − | <li>The following window displays. | ||
[[Image:Add_new_symbol2.png|500px|center]] | [[Image:Add_new_symbol2.png|500px|center]] | ||
<div align="center"> | <div align="center"> | ||
| − | '' | + | '' Layer Property window - Symbology tab '' |
| − | </div> | + | </div></li> |
<li>Go to the Symbology tab. Note how the Value is written and the difference between Value and Label. | <li>Go to the Symbology tab. Note how the Value is written and the difference between Value and Label. | ||
| − | You need to write exactly like the Value is written for the existing symbols (including spaces) for the new symbol.</li> | + | You need to write '''exactly''' like the Value is written for the existing symbols (including spaces) for the new symbol.</li> |
| − | {{Note | The syntax is different for different types of symbols. It is not possible to edit the Value so if you | + | {{Note | The syntax is different for different types of symbols. It is not possible to edit the Value so if you do a mistake then delete the Value row and start over with Add Values.}} |
| − | <li>You will find the Value in the Data Inventory Manager.</li> | + | <li>You will find the Value in the Data Inventory Manager. Double click on the ''Type'' row.</li> |
[[Image:Add_new_symbol3.png|500px|center]] | [[Image:Add_new_symbol3.png|500px|center]] | ||
<div align="center"> | <div align="center"> | ||
'' Data Inventory Manager - Place node '' | '' Data Inventory Manager - Place node '' | ||
| − | </div> | + | </div></li> |
| − | <li> | + | <li>Click on the Translate button. |
[[Image:Add_new_symbol4.png|500px|center]] | [[Image:Add_new_symbol4.png|500px|center]] | ||
<div align="center"> | <div align="center"> | ||
'' Option list window '' | '' Option list window '' | ||
| − | </div> | + | </div></li> |
| − | <li> | + | <li>The Value that you will use in the IMSMA.mxd is listed in the '''Base Term''' column. You need to write '''exactly''' as it is written here including spaces. |
[[Image:Add_new_symbol5.png|500px|center]] | [[Image:Add_new_symbol5.png|500px|center]] | ||
<div align="center"> | <div align="center"> | ||
'' Translation window '' | '' Translation window '' | ||
| − | </div> | + | </div></li> |
| − | + | <li>Switch back to ArcMap and click on the Add Values button. Fill in the new Value using the syntax from Step 3 and the Base Term found in the Data Inventory Manager. Click on Add to List button. Click on OK. | |
| − | <li>Switch back to ArcMap and click on the Add Values button. | ||
[[Image:Add_new_symbol6.png|500px|center]] | [[Image:Add_new_symbol6.png|500px|center]] | ||
<div align="center"> | <div align="center"> | ||
'' Add Values '' | '' Add Values '' | ||
| − | </div> | + | </div></li> |
| − | + | <li>Set Label for the new Value. | |
| − | <li> | ||
[[Image:Add_new_symbol7.png|500px|center]] | [[Image:Add_new_symbol7.png|500px|center]] | ||
<div align="center"> | <div align="center"> | ||
| − | '' | + | '' Label & Symbol '' |
| − | </div> | + | </div></li> |
| − | + | <li>Click on the symbol and set the symbol. If you need guidance on how to work with symbols, see [[Change existing symbol in IMSMA.mxd]]. </li> | |
| − | <li>Click on the symbol and see | ||
<li>When you are done, click on OK. </li> | <li>When you are done, click on OK. </li> | ||
| − | [[Image:Add_new_symbol8.png| | + | <li>Verify your symbol in the legend. |
| + | [[Image:Add_new_symbol8.png|150px|center]] | ||
| + | <div align="center"> | ||
| + | '' Legend '' | ||
| + | </div></li> | ||
| + | <li>Apply the same change to the other layers in the same group. | ||
| + | [[Image:Add_new_symbol10.png|300px|center]] | ||
| + | <div align="center"> | ||
| + | '' IMSMA layer Place - by Type '' | ||
| + | </div></li> | ||
| + | <li>Rename your background mxd. This mxd must '''not''' previously been merged/imported into {{IMSMANG}}. </li> | ||
| + | <li>In the IMSMA client (if your configuration is client/server then start the IMSMA client on the server computer) go to File → Import → Map. </li> | ||
| + | <li>Import the background map which will be merged with the updated IMSMA.mxd. </li> | ||
| + | <li>Close the IMSMA client and open it again in order to be sure that the Map pane is refreshed. </li> | ||
| + | <li>Verify in Map Display that the changes are applied. Apply the new theme and verify that it looks OK in the Map Pane. | ||
| + | [[Image:Add_new_symbol9.png|400px|center]] | ||
<div align="center"> | <div align="center"> | ||
| − | '' | + | '' New symbol is added in Map Display '' |
| − | </div> | + | </div></li></ol> |
| − | + | ||
| − | </ol> | ||
{{NavBox HowTo Setting up Maps}} | {{NavBox HowTo Setting up Maps}} | ||
[[Category:CRI]] | [[Category:CRI]] | ||
Latest revision as of 14:12, 5 August 2016
When the Mine Action Programme has added values to an enumeration list that is used in Map Display then a symnbol has to be designed and added to the IMSMA.mxd. You need to use ArcGIS software to update IMSMA.mxd which is located in C:\IMSMAng\server\gis\maps folder.
Steps
As an example, Place by Type theme will be used and in this example a symbol for Office needs to be added to Place Type.
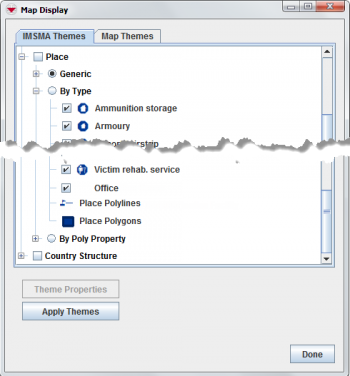
- This is how the Map Display Window inside IMSMA looks like before any changes on the .mxd file:
IMSMA layer Place - Symbol missing
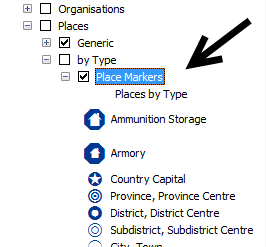
- Open IMSMA.mxd with ArcMap and right-click on the specified layer and choose Properties in the menu.
IMSMA layer Place - by Type
- The following window displays.
Layer Property window - Symbology tab
- Go to the Symbology tab. Note how the Value is written and the difference between Value and Label. You need to write exactly like the Value is written for the existing symbols (including spaces) for the new symbol.
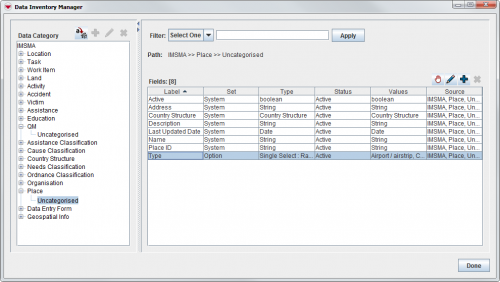
- You will find the Value in the Data Inventory Manager. Double click on the Type row.
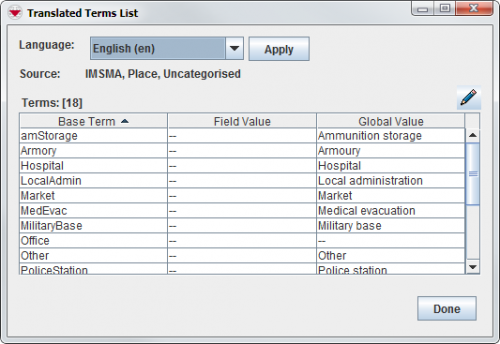
- Click on the Translate button.
Option list window
- The Value that you will use in the IMSMA.mxd is listed in the Base Term column. You need to write exactly as it is written here including spaces.
Translation window
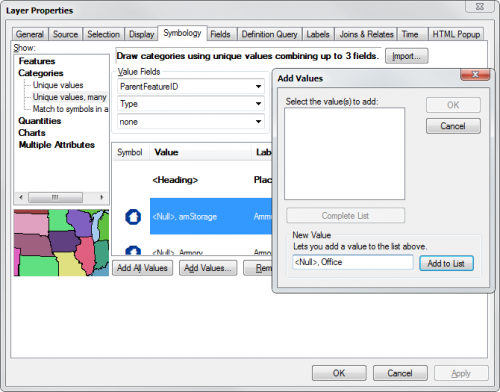
- Switch back to ArcMap and click on the Add Values button. Fill in the new Value using the syntax from Step 3 and the Base Term found in the Data Inventory Manager. Click on Add to List button. Click on OK.
Add Values
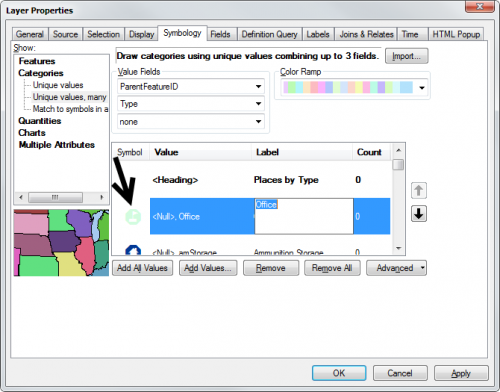
- Set Label for the new Value.
Label & Symbol
- Click on the symbol and set the symbol. If you need guidance on how to work with symbols, see Change existing symbol in IMSMA.mxd.
- When you are done, click on OK.
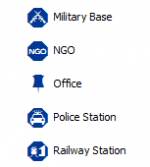
- Verify your symbol in the legend.
Legend
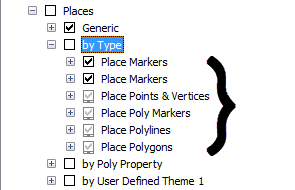
- Apply the same change to the other layers in the same group.
IMSMA layer Place - by Type
- Rename your background mxd. This mxd must not previously been merged/imported into IMSMANG.
- In the IMSMA client (if your configuration is client/server then start the IMSMA client on the server computer) go to File → Import → Map.
- Import the background map which will be merged with the updated IMSMA.mxd.
- Close the IMSMA client and open it again in order to be sure that the Map pane is refreshed.
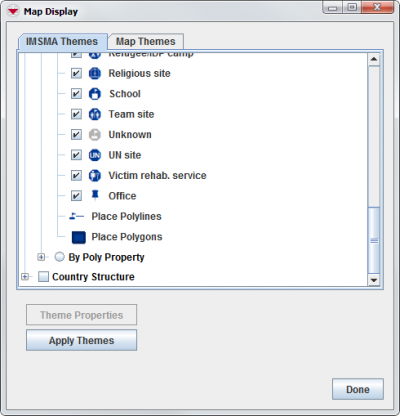
- Verify in Map Display that the changes are applied. Apply the new theme and verify that it looks OK in the Map Pane.
New symbol is added in Map Display
| |
The syntax is different for different types of symbols. It is not possible to edit the Value so if you do a mistake then delete the Value row and start over with Add Values. |
Data Inventory Manager - Place node
| |||||||||||||
