Difference between revisions of "Setting-up Maps and Coordinate Systems"
| Line 11: | Line 11: | ||
| [[How to work with Sub-Themes in IMSMA.mxd]] | | [[How to work with Sub-Themes in IMSMA.mxd]] | ||
}} | }} | ||
| − | {{IMSMANG}} comes with several symbology options for displaying the Mine action data in the Map pane. For example, Land can be displayed in the Map pane with different symbols for priority, status and type. These symbols are stored in the IMSMA.mxd file and can be customised by information managers as desired. Additionally, {{IMSMANG}} allows information managers to create new sub-themes for each item. Using the Sub-Themes Manager, information managers can display the different attributes of any item that are collected using single-select option lists on Data Entry Form templates. For example, information managers can display the different symbols for the “Slope” values of Land including “0-5%,” “5-10%,” “10-15%” and “15-20%.” The example is shown in the figure below. | + | {{IMSMANG}} comes with several symbology options for displaying the Mine action data in the Map pane. For example, Land can be displayed in the Map pane with different symbols for priority, status and type. These symbols are stored in the '''[[IMSMA.mxd]]''' file and can be customised by information managers as desired. Additionally, {{IMSMANG}} allows information managers to create new sub-themes for each item. Using the Sub-Themes Manager, information managers can display the different attributes of any item that are collected using single-select option lists on Data Entry Form templates. For example, information managers can display the different symbols for the “Slope” values of Land including “0-5%,” “5-10%,” “10-15%” and “15-20%.” The example is shown in the figure below. |
[[Image:AdminGuide_ExampleDisplayDifferentSymbols.png|center|500px|''Example of Displaying Different Symbols for Different Attributes'']] | [[Image:AdminGuide_ExampleDisplayDifferentSymbols.png|center|500px|''Example of Displaying Different Symbols for Different Attributes'']] | ||
Revision as of 18:09, 31 July 2016
IMSMANG includes an embedded GIS component, the Map Pane, based on ESRI’s ArcEngine 10.1 that allows users to visualise mine action information on an integrated map without moving to another application. While IMSMANG includes many standard GIS features, information managers should consider to use an external GIS applications such as ArcGIS Desktop in order to perform GIS analysis of the data in IMSMANG. The map used in IMSMANG Map Pane (the background map) should be customised so it fits the needs of the Mine Action Programme. Since the customisations of the background map will have an impact on the performance and usability of IMSMANG, it is important to test the implementation before sending the new background map to end-users.
IMSMA Themes and Symbology
| How To |
|---|
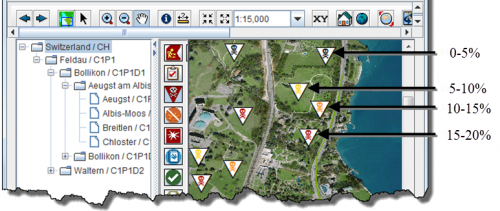
IMSMANG comes with several symbology options for displaying the Mine action data in the Map pane. For example, Land can be displayed in the Map pane with different symbols for priority, status and type. These symbols are stored in the IMSMA.mxd file and can be customised by information managers as desired. Additionally, IMSMANG allows information managers to create new sub-themes for each item. Using the Sub-Themes Manager, information managers can display the different attributes of any item that are collected using single-select option lists on Data Entry Form templates. For example, information managers can display the different symbols for the “Slope” values of Land including “0-5%,” “5-10%,” “10-15%” and “15-20%.” The example is shown in the figure below.
Example of Displaying Different Symbols for Different Attributes
Changing the symbology used to display data in IMSMANG is a multi-step process (as shown in the figure below) that should only be undertaken by advanced users with an understanding of GIS. Further, as with all map customisation activities, this process requires the use of an external GIS application.
Process for Changing IMSMANG Map Symbology
Map Background
| How To |
|---|
IMSMANG is designed to support a variety of users from information managers to operations users. Recognising that each user or group of users may require a different set of maps, IMSMANG allows users to visualise data on maps individually tailored for their needs. For example, users in a regional Mine Action Programme office may need only maps of their region to display data while education coordinators may need only vector map layers to visualise education activity data.
Using an external GIS application, information managers can create custom .MXD files for each user, allowing users to visualise data on different background maps in the Map Pane. Customisations of .MXD files can include adding and modifying raster and vector layers, label display, scale management and many other layer properties.
Following the guidelines below, information managers can build easy-to-use, sustainable maps for visualising data in IMSMANG:
| Guidelines for Designing Map Backgrounds | |
| Guideline | Explanation |
| Use only the layers you need | When creating or customising maps, include only the layers necessary for map visualisation. Extra layers take up space and present users with unnecessary, confusing options. Consider tailoring specific maps for each user group, for example, building one map for education activity users and a separate map for operations staff. |
| Limit raster layers | Raster images take up a large amount of space compared to vector layers, causing slower system performance. Limiting the use of raster layers to one or two background images or turning them off by default can improve performance of the map display and IMSMANG overall. |
| Tile maps | Breaking up a map into multiple images, or tiling them, allows users to turn individual sections on and off as needed, which results in improved performance. |
| Back up the .MXD files | Keep backups of map(s) in their state prior to importing them into IMSMANG. This makes later map customisation easier and speeds up the process of importing the maps again. |
| |
Any changes made to IMSMANG maps apply only to the computer on which the changes were made. On other computers the updated background maps must be imported. |
Projection and Coordinate Systems
| |
To add, change, or delete coordinate systems, your IMSMANG user account must belong to a role that have the Reference System Manager permission. Contact your IMSMANG administrator if you have questions on permissions. |
| How To |
|---|
All geospatial data in IMSMANG is stored in latitude/longitude, but IMSMANG can display data in virtually any coordinate system. IMSMANG comes with all the coordinate systems available to ESRI's products like WGS1984 and MGRS, yet information managers can add other custom coordinate systems. Using the Coordinate System manager, information managers can add coordinate system and projection (or .PRJ) files to IMSMANG and establish a set of relevant systems that can be used for coordinate data entry and visualisation.
In addition to customised coordinate systems and projections, IMSMANG supports the use of localised number formats for coordinate entry, for example 73.233 or 73,233. IMSMANG validates all numeric coordinate data based on the computer's locale/regional settings so users running in a locale that uses a comma as a decimal separator can enter 72,333 while users running in a locale where a period is the decimal separator can enter 72.233.
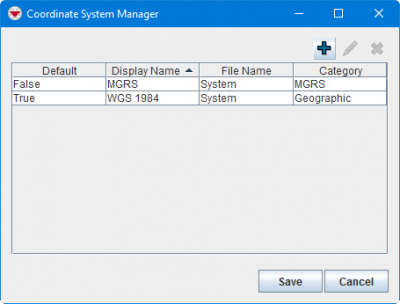
The coordinate systems available for use in IMSMA are managed using the Coordinate System Manager window. The available coordinate systems from installation are the standard ESRI's projections. Copy custom coordinate system projection files to appropriate folder in C:\IMSMAng\server\gis\coordinate systems.
From the Customisation menu, select Coordinate System Manager to display the window.
Coordinate System Manager Window
Coordinate systems and formats are used for four different functions in IMSMANG:
- limit which coordinate systems/formats are allowed for data entry in the Mine Action Programme;
- re-project the map on the fly
- show coordinates of cursor position
- go to coordinates / drop pin in the map


