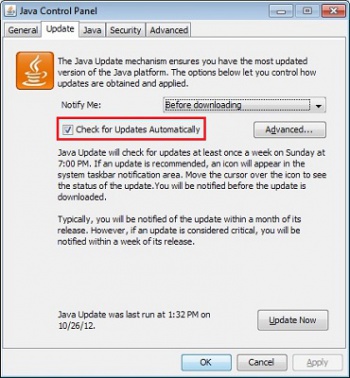
Java has the standard configuration to check for updates automatically. If higher version of Java is installed then the Java version that IMSMANG is using might get uninstalled. The environment variable JAVA_HOME will also get updated. It is possible to have both Java 7 and Java 8 installed. This page explains how to stop Java from automatically check for updates which will prevent users from installing a version that might affect IMSMANG.
Contents
Start the Java control panel
How to find it depends on Java version and operating system.
Find the Java Control Panel - Versions below 7u40
Windows XP
- Click on the Start button and then click on the Control Panel option.
- Double click on the Java icon to open the Java Control Panel.
Windows 7 and Vista
- Click on the Start button and then click on the Control Panel option.
- In the Control Panel Search enter Java Control Panel.
- Click on the Java icon to open the Java Control Panel.
Windows 8
- Use search to find the Control Panel 1. Press Windows logo key + W to open the Search charm to search settings
OR
Drag the Mouse pointer to the bottom-right corner of the screen, then click on the Search icon.
- In the search box enter Java Control Panel
- Click on Java icon to open the Java Control Panel.
Windows 10
- Right-click on the Start button and select the Control Panel option.
- In the Windows Control Panel, click on Programs.
- Click on the Java icon to open the Java Control Panel.
Find the Java Control Panel - Java 7 Update 40 (7u40) and later versions
Starting with Java 7 Update 40, you can find the Java Control Panel through the Windows Start menu.
- Launch the Windows Start menu
- Click on Programs (All Apps on Windows 10)
- Find the Java program listing
- Click Configure Java to launch the Java Control Panel
Alternative method
If you did not find Java control panel with the above methods then try with:
- Click Windows Start button.
- In the Start Search box, type:
Windows 32-bit OS: c:\Program Files\Java\jre7\bin\javacpl.exe
Windows 64-bit OS: c:\Program Files (x86)\Java\jre7\bin\javacpl.exe
Change Automatic Update Settings
- Click the Update tab.
- To disable Java Update, deselect the Check for Updates Automatically check box.
- Click OK.
![]()
Now this message should not be shown again.
