Difference between revisions of "Add Country Structure"
| (28 intermediate revisions by 4 users not shown) | |||
| Line 1: | Line 1: | ||
| − | {{note| The | + | {{Note | To add to the Country structure, your {{IMSMANG}} user account must belong to a User Role that has permission ''Country structure'' with ''Read and Write'' level. Contact your {{IMSMANG}} Administrator if you have questions on permissions. }} |
| + | |||
| + | {{note| The Country structure Levels must be created before you can add Country structure nodes to {{IMSMANG}}. For information on adding Levels, see [[Hierarchy Manager#Add levels | Add levels]]. | ||
| + | If you have not yet defined the top-level Country structure, the following message displays | ||
| + | :No Country Structure levels are defined. Please create them with the [[Hierarchy Manager]] in the Customisation menu. }} | ||
To add a country structure: | To add a country structure: | ||
<ol> | <ol> | ||
| − | <li> | + | <li> In the '''Data Entry menu''' → '''Country Structure'''.<br /> |
| − | + | [[Image:CS_Manager.png|center|400px]]<br /> | |
| − | |||
| − | |||
| − | <li> | + | <li> Select the node of the parent to the Country structure that you would like to add.</li> |
| + | <li> Click the [[Image:FieldTemplateIcon.png | 22px | Add ]] button.<br />[[Image:CS_Editor.png|center|600px]]<br /> | ||
| − | {{ | + | <li> Enter the name in the primary language of the Mine Action Programme in the Name field.</li> |
| + | {{Note | The label associated with the field will depend on the level of the Country structure that you are adding e.g. Province or Commune}} | ||
| + | {{New_6.0 | The field ''Country structure ID'' has been added to the Editor window}} | ||
| + | <li> Enter the official Country structure ID e.g. the Pcode. </li> | ||
| + | {{Note | Setting the Country structure ID will facilitate future updates of the Country structure e.g. when Municipalities are merged or moved to another District}} | ||
| − | <li> | + | <li> Alternative names may be used and common reasons are: |
| − | + | * more than one language in the country | |
| + | * the Mine Action Programme would like to use English and one or more local languages | ||
| + | * an alternative way of referring to the nodes exists | ||
| − | + | The alternative names will also be displayed in the IMSMA Navigation window’s country structure pane.<br /> | |
| − | + | The order is Country Structure name / Alternative name 1 / Alternative name 2. <br /> | |
| − | + | There is no limitation of number of alternative names.<br /> | |
| − | |||
| − | |||
| − | + | To Add the alternate names: | |
| − | + | <ol> | |
| − | |||
| − | <ol | ||
<li>Click the [[Image:FieldTemplateIcon.png | 22px | Create an alternative name]] button in the Alternative Names section of the Country Structure Editor window.</li> | <li>Click the [[Image:FieldTemplateIcon.png | 22px | Create an alternative name]] button in the Alternative Names section of the Country Structure Editor window.</li> | ||
| − | + | <li>Enter the alternative name in the '''Alternative Name''' field. </li> | |
| − | <li>Enter the alternative name in the '''Alternative Name''' field | ||
<li>Click the '''OK''' button.</li> | <li>Click the '''OK''' button.</li> | ||
| − | + | The Add Alternative Name window closes. | |
| + | |||
| + | [[Image:Alt names order.png]] | ||
| + | {{Note| The order in which the alternative names are entered is important}} | ||
| + | </li> | ||
</ol> | </ol> | ||
| − | + | <li>Select the coordinate reference system that you would like to use from the '''Coordinate System''' list.</li> | |
| − | <li> | + | <li>Select the coordinate format from the '''Coordinate Format''' list.</li> |
| − | <li>Select the coordinate format from the Coordinate Format list.</li> | + | <li>There are several options for entering geospatial data: |
| − | <li>There are several options for entering geospatial data: | ||
{| class="wikitable" | {| class="wikitable" | ||
| − | ! colspan="2" | | + | ! colspan="2" | Entering Geospatial Data |
|- | |- | ||
! If you want to… | ! If you want to… | ||
! Refer to… | ! Refer to… | ||
|- | |- | ||
| − | | Manually add geospatial points | + | | Manually add geospatial points or polygon/polyline points |
| − | | ''[[Geospatial Data | + | | ''[[Manual Geospatial Data Entry | Manual Geospatial Data Entry]].'' |
|- | |- | ||
| − | | | + | | Draw on the map to specify point, polygon, and polyline coordinates |
| − | | ''[[ | + | | ''[[Draw on the Map to Specify Geographic Coordinates| Draw on the Map to Specify Geographic Coordinates]].'' |
|- | |- | ||
| − | | | + | | Import geospatial data from Excel |
| − | | ''[[Geospatial Data | + | | ''[[Import Geospatial Data from Excel | Import Geospatial Data from Excel]].'' |
|- | |- | ||
| − | | Import geospatial data | + | | Import geospatial data from shapefile |
| − | | ''[[Geospatial Data | + | | ''[[Import Geospatial Data from Shapefile| Import Geospatial Data from Shapefile]].'' |
|} | |} | ||
{{note|You can preview the points that you have entered on a map by clicking the [[Image:PreviewPoints.png]] button.}} | {{note|You can preview the points that you have entered on a map by clicking the [[Image:PreviewPoints.png]] button.}} | ||
| − | <li>Set the preferred map extent. The preferred map extent displays whenever you select the country structure | + | <li>Set the preferred '''map extent'''. The preferred map extent displays whenever you select the country structure from the country structure pane. To set the preferred map extent:</li> |
| − | + | <ol> | |
| − | <ol | + | <li>In the IMSMA Navigation window, set the map extent for the country structure. For example, use the [[Image:ZoomInIcon.png|Zoom In]] or [[Image:ZoomOutIcon.png|Zoom Out]] icons on the toolbar to set the extent.</li> |
| − | <li>In the IMSMA Navigation window, set the map extent for the country structure | + | <li>From the Country Structure Editor window, click the [[Image:Capture.png]] button.</li> |
| − | <li>From the | + | <li>Follow the instructions in the Map Extent window.</li> |
| − | + | <li>When the extent of the Map pane is the desired, click the '''Capture''' button.</li> | |
| − | + | The Country Structure Editor window’s Preferred Map Extent field changes to ''Captured''.</li> | |
| + | </ol> | ||
| + | {{Note | If a map extent has been specified for the Country structure then the map will be centered based on the map extent. If there is no map extent set then the geopoint number 1 is used}} | ||
| − | <li> | + | <li>Click the '''Save''' button. |
| − | |||
| − | |||
| − | |||
| − | |||
| − | |||
| − | |||
| − | |||
</ol> | </ol> | ||
| + | {{NavBox HowTo Standardizing Auxiliary Data}} | ||
| − | + | [[Category:NAA]] | |
Latest revision as of 18:49, 17 June 2017
| |
The Country structure Levels must be created before you can add Country structure nodes to IMSMANG. For information on adding Levels, see Add levels.
If you have not yet defined the top-level Country structure, the following message displays
|
To add a country structure:
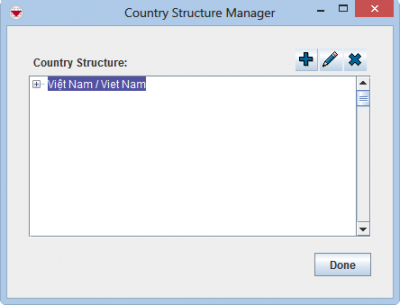
- In the Data Entry menu → Country Structure.
- Select the node of the parent to the Country structure that you would like to add.
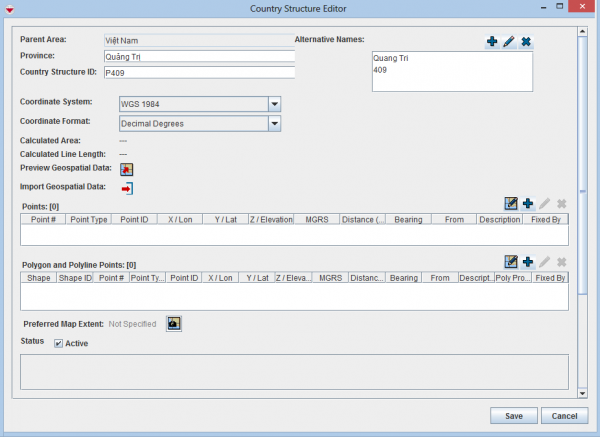
- Click the
 button.
 - Enter the name in the primary language of the Mine Action Programme in the Name field.
- Enter the official Country structure ID e.g. the Pcode.
- Alternative names may be used and common reasons are:
- more than one language in the country
- the Mine Action Programme would like to use English and one or more local languages
- an alternative way of referring to the nodes exists
The order is Country Structure name / Alternative name 1 / Alternative name 2.
There is no limitation of number of alternative names.
To Add the alternate names:
| |
The label associated with the field will depend on the level of the Country structure that you are adding e.g. Province or Commune |
| |
The field Country structure ID has been added to the Editor window |
| |
Setting the Country structure ID will facilitate future updates of the Country structure e.g. when Municipalities are merged or moved to another District |
| Entering Geospatial Data | |
|---|---|
| If you want to… | Refer to… |
| Manually add geospatial points or polygon/polyline points | Manual Geospatial Data Entry. |
| Draw on the map to specify point, polygon, and polyline coordinates | Draw on the Map to Specify Geographic Coordinates. |
| Import geospatial data from Excel | Import Geospatial Data from Excel. |
| Import geospatial data from shapefile | Import Geospatial Data from Shapefile. |
| |
You can preview the points that you have entered on a map by clicking the |
- In the IMSMA Navigation window, set the map extent for the country structure. For example, use the
 or
or  icons on the toolbar to set the extent.
 - From the Country Structure Editor window, click the
 button.
 - Follow the instructions in the Map Extent window.
- When the extent of the Map pane is the desired, click the Capture button. The Country Structure Editor window’s Preferred Map Extent field changes to Captured.
| |
If a map extent has been specified for the Country structure then the map will be centered based on the map extent. If there is no map extent set then the geopoint number 1 is used |
| |||||||||||||||||||||||


