Manual Geospatial Data Entry
There are two different types of coordinates:
- absolute i.e. you know the coordinates
- relative means that instead of entering coordinates, you use the distance and bearing from an absolute point.
Contents
How to Manually Add coordinates for Point data
To manually add geospatial data for a point:
- Click the
 button above the Points table of the Point and Polygon/Polyline List window.
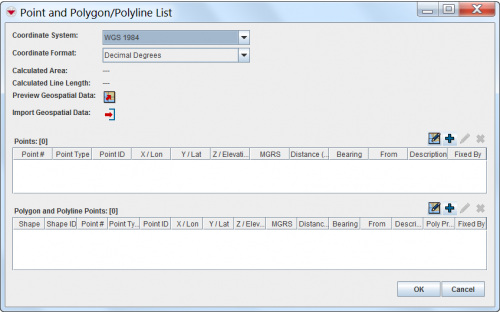
- From the Point window, enter the point number in the Point No. field. Note that this is a required field.

The fields available in the Points window will depend on the coordinate reference system that you selected. 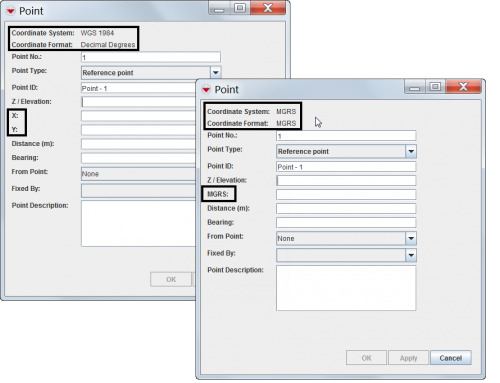
Different Point Windows
- Select the type of point that you are defining in the Point Type field.
- Enter the local identifier for the point in the Point ID field. Note that this is a required field.
- Do one of the following:


- To enter an absolute point, enter the coordinates in either the X/Longitude and Y/Latitude fields, or the MGRS field.
- To enter a relative point:
- Enter the distance of the point from the absolute point in the Distance field.
- Enter the bearing of the point relative to the absolute point in the Bearing field.
- Select the point from which the distance and bearing are defined from the From Point list.
OK button will save the point and close the Point window.
Apply button will save the point, keep the Point window open and update the contents which is convenient when you would like to add more points.
Cancel button will close the Point window without saving the point data.
If you entered a relative point, the coordinates for the point are calculated based on the distance and bearing that you entered.
When you have finished entering geospatial data, click the ![]() button and preview on the background map that the coordinates are in the correct part of the country, on the correct side of the road, etc.
button and preview on the background map that the coordinates are in the correct part of the country, on the correct side of the road, etc.
How to Manually Add Polygon and Polyline Points
| |
It is very important to enter points of polygons or polylines in the order they should be drawn in. |
To manually add geospatial data for a polygon or polyline:
- Click the button above the Polygon and Polyline Points table of the Point and Polygon/Polyline List window.
- The Polygon/Polyline Editor window displays.
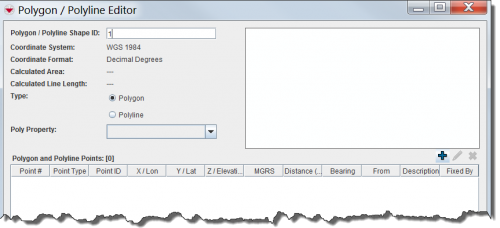
- Enter the identifier for the polygon or polyline in the Polygon/Polyline Shape ID field.
- Select either the Polygon or Polyline option from the Type field.
- Select Poly Property
- Click the button.
- The Point window displays.
The fields available in the Points window will depend on the coordinate reference system that you selected. Different Point Windows
- From the Point window, enter the point number in the Point No. field. Note that this is a required field.
- Select the type of point that you are defining in the Point Type field.
- Enter the local identifier for the point in the Point ID field. Note that this is a required field.
- Do one of the following:

- To enter an absolute point, enter the coordinates in either the X/Longitude and Y/Latitude fields, or the MGRS field.
- To enter a relative point:
- Enter the distance of the point from the absolute point in the Distance field.
- Enter the bearing of the point relative to the absolute point in the Bearing field.
- Select the point from which the distance and bearing are defined from the From Point list.
OK button will save the point and close the Point window.
Apply button will save the point, keep the Point window open and update the contents which is convenient when you would like to add more points.
Cancel button will close the Point window without saving the point data.
If you entered a relative point, the coordinates for the point are calculated based on the distance and bearing that you entered.
When you have finished entering geospatial data, click the ![]() button and preview on the background map that the coordinates are in the correct part of the country, on the correct side of the road, etc.
button and preview on the background map that the coordinates are in the correct part of the country, on the correct side of the road, etc.