Difference between revisions of "Add Place"
From IMSMA Wiki
m (moved HowTo:Add a Place to Add a Place) |
|||
| Line 36: | Line 36: | ||
{| class="wikitable" | {| class="wikitable" | ||
| − | ! colspan="2" | Entering Geospatial Data for a Place | + | ! colspan="2" | Table 43. Entering Geospatial Data for a Place |
|- | |- | ||
! If you want to… | ! If you want to… | ||
| Line 42: | Line 42: | ||
|- | |- | ||
| Manually add geospatial points | | Manually add geospatial points | ||
| − | | How to manually add a geospatial point | + | | ''[[Geospatial Data#How To Manually Add a Geospatial Point | How to manually add a geospatial point]].'' |
|- | |- | ||
| Manually add polygon and polyline points | | Manually add polygon and polyline points | ||
| − | | How to manually add polygon and polyline points | + | | ''[[Geospatial Data#How To Manually Add Polygon and Polyline Points | How to manually add polygon and polyline points]].'' |
|- | |- | ||
| Draw on the map to specify point, polygon, and polyline coordinates | | Draw on the map to specify point, polygon, and polyline coordinates | ||
| − | | How to draw on the map to specify point coordinates | + | | ''[[Geospatial Data#How To Draw On The Map To Specify Point Coordinates | How to draw on the map to specify point coordinates]].'' |
|- | |- | ||
| Import geospatial data | | Import geospatial data | ||
| − | | Importing geospatial data for a polyline or polygon | + | | ''[[Geospatial Data#How To Import Geospatial Data | Importing geospatial data for a polyline or polygon]].'' |
|} | |} | ||
| − | |||
{{note|You can preview the points that you have entered on a map by clicking the [[Image:PreviewPoints.png]] button.}} | {{note|You can preview the points that you have entered on a map by clicking the [[Image:PreviewPoints.png]] button.}} | ||
Revision as of 23:59, 13 June 2013
| |
To add a place, you must have read and write (File:Check.png) access to the Places permission. |
To add a place to IMSMA:
- From the Data Entry menu, select Places.
- The Place List window displays.
- Click the
 button.
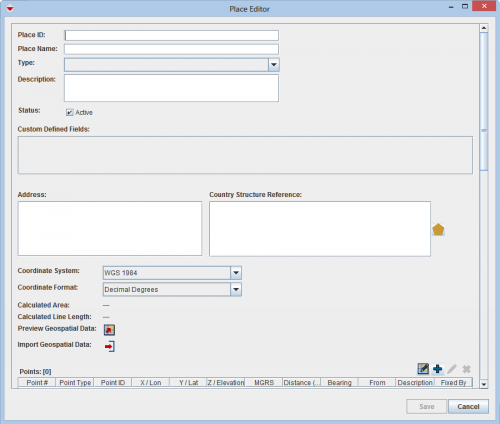
 - The Place Editor window displays.
Place Editor Window
- Enter the unique identifier for the place in the Place Local ID field.
- Enter the name of the place in the Place Name field.
- Select the general category of the place from the Type drop-down list. Note that a type value must be selected.
- Enter a description of the place in the Description field.
- If the place is active, check the Active checkbox. Only active places are listed in the Place Selection window.
- If there are any fields in the Custom Defined Fields section, enter data in those fields.
- Enter the place address in the Address field.
- To select a country structure area, click the File:SelectCountryStructureArea.png button to select the country structure area. If the Country Structure Reference field is not displayed, click the File:DisplayCountryStructureReferenceField.png button to display the field.
- The Country Structure Selection window displays.
- From the Country Structure Selection window:
- Select the country structure.
- Click the Select button.
- The Country Structure Selection window closes.
- Select the coordinate reference system that you would like to use from the Coordinate Reference System list.
- Select the coordinate format from the Coordinate Format list.
- There are several options for entering geospatial data. These options and the page on which you can find additional information are listed in the table below.
| Table 43. Entering Geospatial Data for a Place | |
|---|---|
| If you want to… | Refer to… |
| Manually add geospatial points | How to manually add a geospatial point. |
| Manually add polygon and polyline points | How to manually add polygon and polyline points. |
| Draw on the map to specify point, polygon, and polyline coordinates | How to draw on the map to specify point coordinates. |
| Import geospatial data | Importing geospatial data for a polyline or polygon. |
| |
You can preview the points that you have entered on a map by clicking the |
- Do one of the following:
- To add the new place, click the Save button.
- If the place is added successfully, the place displays in the Place List window.
- To discard the place and close the Place Editor window, click Cancel.
| |||||||||||||||||||||||
