Difference between revisions of "Enter Needs Assessment Data in the Data Entry Form"
From IMSMA Wiki
| Line 1: | Line 1: | ||
| + | You will find more information about the Needs assessment classification [[Auxiliary Data#Assistance, Cause and Needs classifications | here]]. | ||
| + | |||
| + | Needs Assessment is entered in a table format (a.k.a. table widget) in the Data Entry Form. | ||
| + | |||
[[Image:Select Need Assessment 2.png|center|500px|''Data Entry Form Editor Window – Needs Assessment Table '']] | [[Image:Select Need Assessment 2.png|center|500px|''Data Entry Form Editor Window – Needs Assessment Table '']] | ||
<div align="center"> | <div align="center"> | ||
''Data Entry Form Editor Window – Needs Assessment Table '' | ''Data Entry Form Editor Window – Needs Assessment Table '' | ||
</div> | </div> | ||
| − | |||
| − | |||
| − | |||
To enter Needs Assessment data: | To enter Needs Assessment data: | ||
<ol> | <ol> | ||
| − | <li>Click [[Image:FieldTemplateIcon.png|25px|Add]] to open the Needs Classification window. | + | <li>Click [[Image:FieldTemplateIcon.png|25px|Add]] to open the Needs Classification window. |
| − | |||
| − | |||
| − | < | + | [[Image:Select Needs Classification 2.png|450px|center]]</li> |
| − | <li>Select one or more Needs Assessment that you want to add, then click '''Submit'''. | + | <li>Select one or more Needs Assessment that you want to add, then click '''Submit'''. |
{{note| If you click [[Image:FieldTemplateIcon.png|25px|Add]] to add another of the same Needs Assessment to the table, a separate row is created. (The quantity of the original row does not change.)}} | {{note| If you click [[Image:FieldTemplateIcon.png|25px|Add]] to add another of the same Needs Assessment to the table, a separate row is created. (The quantity of the original row does not change.)}} | ||
| − | [[File:More fields Needs Assessment.png|500px|center]] | + | [[File:More fields Needs Assessment.png|500px|center]] </li> |
<li>Quality is automatically set to 1.</li> | <li>Quality is automatically set to 1.</li> | ||
| − | <li>Specify Priority by selecting in the combo box. | + | <li>Specify Priority by selecting in the combo box.</li> |
| − | <li>Specify Status by selecting in the combo box. | + | <li>Specify Status by selecting in the combo box.</li> |
</ol> | </ol> | ||
Revision as of 11:20, 16 February 2015
You will find more information about the Needs assessment classification here.
Needs Assessment is entered in a table format (a.k.a. table widget) in the Data Entry Form.

Data Entry Form Editor Window – Needs Assessment Table
To enter Needs Assessment data:
- Click
 to open the Needs Classification window.
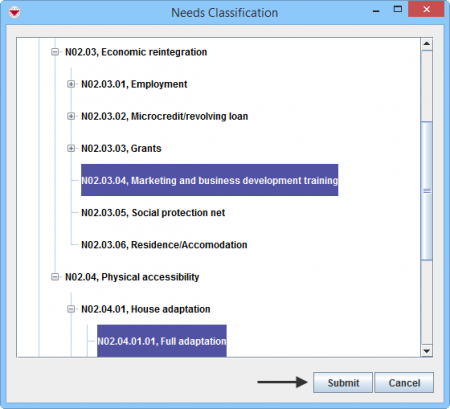
- Select one or more Needs Assessment that you want to add, then click Submit.

If you click to add another of the same Needs Assessment to the table, a separate row is created. (The quantity of the original row does not change.)
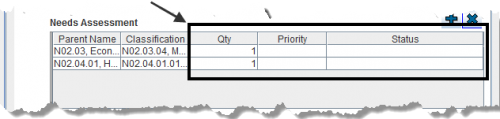
- Quality is automatically set to 1.
- Specify Priority by selecting in the combo box.
- Specify Status by selecting in the combo box.


| |
To remove a Needs Assessment from your Data Entry Form, select the row and click |