Difference between revisions of "Restore IMSMA Backup on Server"
From IMSMA Wiki
(Created page with "{{note| If you are restoring your IMSMA data due to a system crash, you will first want to reinstall IMSMA and its supporting applications. For more information, see the IMSMA...") |
|||
| (47 intermediate revisions by 5 users not shown) | |||
| Line 1: | Line 1: | ||
| − | {{note| If you are | + | {{TOC right}} |
| − | + | {{note| If you are running IMSMA in a client/server configuration, the following procedures should be performed on the IMSMA '''server'''. }} | |
| + | |||
| + | To restore IMSMA data on the server: | ||
| + | <ol> | ||
| + | <li>Are your '''really''' sure that you would like to write over the existing database on the server?</li> | ||
| + | <li>Do you have backup that contains all '''attachments'''?</li> | ||
| + | <li>Before beginning the restoration process, verify that the {{IMSMANG}} server, all IMSMA clients and all connections to the {{IMSMANG}} database from e.g. Navicat have been disconnected.</li> | ||
| + | <li>If the IMSMA Control Centre icon is not already displayed in the lower, right corner of your Window’s desktop, double-click the IMSMA Tray Launcher icon on your computer’s desktop.</li> | ||
| + | <li>Right-click the IMSMA Control Centre icon that is displayed in the lower, right corner of your Window’s desktop.</li> | ||
| + | [[Image:Backup Restore menu.png|center]] | ||
| + | <li>Select '''Restore'''.</li> | ||
| − | + | [[Image:Restore.png|center|400px|''IMSMA Restore window'']] | |
| − | + | <div align="center"> | |
| + | ''IMSMA Restore window'' | ||
| + | </div> | ||
| − | + | <li>In the IMSMA Restore window, click the [[Image:DestDir.png]] button.</li> | |
| − | + | <li>The Open window displays.</li> | |
| − | + | <li>Navigate to the directory from which you would like to restore your IMSMA data.</li> | |
| − | + | <li>Click the '''Open''' button.</li> | |
| − | + | <li>The path of the folder displays in the ''Select the directory you want to restore from'' field.</li> | |
| − | |||
| − | |||
| − | |||
| − | + | [[Image:Restore2.png|center|400px|''IMSMA Restore window'']] | |
| + | <div align="center"> | ||
| + | ''IMSMA Restore window'' | ||
| + | </div> | ||
| + | |||
| + | <li>In the '''Include the Following''' section, each available component in the backup folder is marked with [[Image:CheckedBoxIcon.png]]. Uncheck the checkbox next to each component you do not want to restore.</li> | ||
| − | + | {{Note | Components that are disabled were not included in the IMSMA backup that you selected to restore. If you do not check any components, only the IMSMA database and any attachments will be restored. }} | |
| − | The | + | {{Warning | If the backup folder that you are about to restore contains the folder Backup_YYYY_MM_DD_HH_MM_SS\server\attachments then all your existing '''attachments''' on the server will be '''deleted''' and replaced with what is in Backup_YYYY_MM_DD_HH_MM_SS\server\attachments. This behaviour also applies when Backup_YYYY_MM_DD_HH_MM_SS\server\attachments is empty.}} |
| − | + | <li>Click the '''Restore''' button.</li> | |
| − | + | <li>First the files outside of the database will be restored and at 20% the IMSMA Restore will ask for the password.</li> | |
| + | {{Note| It is possible to change the database password with SQL software. Note that ''C:\IMSMAng\trayLauncher\TrayLauncher.properties'' also needs to be updated.}} | ||
| + | <li>Enter the database password. | ||
| + | [[Image:Imsma pwd2.png|center|400px]]</li> | ||
| + | <li>Click the '''OK''' button.</li> | ||
| + | <li>The IMSMA Restore will continue and now the database is restored from the backup.</li> | ||
| + | [[Image:Restore3.png|center|400px]]</li> | ||
| + | <li>The attachments will be restored at 90%.</li> | ||
| + | [[Image:Restore4.png|center|400px]]</li> | ||
| + | <li>Click the '''OK''' button. | ||
| + | [[Image:Restore confirm.png|center|250px]]</li> | ||
| + | <li>The IMSMA Control Centre closes. The IMSMA Control Centre needs to be closed because the IMSMA database restored may be of an earlier version than the current version of the IMSMA application and therefore needs to be upgraded to the same version as the IMSMA application.</li> | ||
| + | </ol> | ||
| − | {{ | + | {{Warning | It is not possible to upgrade a database of version 1 - 5.08.04 by restoring it with version 6.0. Contact your [[Information Management Team | GICHD IM advisor]] if you would like to upgrade a database of version 1 - 5.08.04 to version 6.0.}} |
| − | }} | ||
| − | |||
| − | |||
| − | |||
| − | |||
| − | |||
| − | |||
| − | |||
| − | If you see | + | If you see these messages, your computer is configured as an IMSMA client and it is not possible to restore the database. |
| − | + | {| class="wikitable" | |
| − | + | |- | |
| − | + | | [[Image:Client restore database error.png|center|400px]] | |
| − | + | | [[Image:Client restore confirm.png|center|400px]] | |
| − | + | |} | |
| − | + | ==SQL Views after restore==__NOEDITSECTION__ | |
| − | + | Since the views may build on other views it is not possible to know in which order they should be restored. Therefore the Restore functionality restores the SQL views as tables and after the restore is complete convert them to SQL views. If you still see any of your SQL views as tables after the restore, there is something wrong with your SQL views. The most common errors are: | |
| + | * the SQL views are created / owned by another user than imsma | ||
| + | * the SQL syntax is not correct | ||
| + | * the SQL view is referring to another SQL view that does not exist anymore. | ||
| + | {{NavBox Manage Information}} | ||
| − | + | [[Category:NAA]] | |
| − | |||
| − | |||
| − | |||
| − | |||
Latest revision as of 09:34, 17 December 2017
Contents |
| |
If you are running IMSMA in a client/server configuration, the following procedures should be performed on the IMSMA server. |
To restore IMSMA data on the server:
- Are your really sure that you would like to write over the existing database on the server?
- Do you have backup that contains all attachments?
- Before beginning the restoration process, verify that the IMSMANG server, all IMSMA clients and all connections to the IMSMANG database from e.g. Navicat have been disconnected.
- If the IMSMA Control Centre icon is not already displayed in the lower, right corner of your Window’s desktop, double-click the IMSMA Tray Launcher icon on your computer’s desktop.
- Right-click the IMSMA Control Centre icon that is displayed in the lower, right corner of your Window’s desktop.
- Select Restore.
- In the IMSMA Restore window, click the
 button.
 - The Open window displays.
- Navigate to the directory from which you would like to restore your IMSMA data.
- Click the Open button.
- The path of the folder displays in the Select the directory you want to restore from field.
- In the Include the Following section, each available component in the backup folder is marked with
 . Uncheck the checkbox next to each component you do not want to restore.
 - Click the Restore button.
- First the files outside of the database will be restored and at 20% the IMSMA Restore will ask for the password.
- Enter the database password.
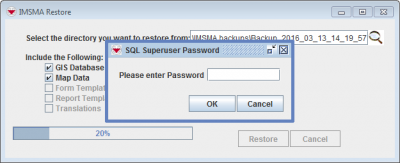
- Click the OK button.
- The IMSMA Restore will continue and now the database is restored from the backup.
- The attachments will be restored at 90%.
- Click the OK button.
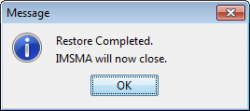
- The IMSMA Control Centre closes. The IMSMA Control Centre needs to be closed because the IMSMA database restored may be of an earlier version than the current version of the IMSMA application and therefore needs to be upgraded to the same version as the IMSMA application.


IMSMA Restore window

IMSMA Restore window
| |
Components that are disabled were not included in the IMSMA backup that you selected to restore. If you do not check any components, only the IMSMA database and any attachments will be restored. |
| |
If the backup folder that you are about to restore contains the folder Backup_YYYY_MM_DD_HH_MM_SS\server\attachments then all your existing attachments on the server will be deleted and replaced with what is in Backup_YYYY_MM_DD_HH_MM_SS\server\attachments. This behaviour also applies when Backup_YYYY_MM_DD_HH_MM_SS\server\attachments is empty. |
| |
It is possible to change the database password with SQL software. Note that C:\IMSMAng\trayLauncher\TrayLauncher.properties also needs to be updated. |


| |
It is not possible to upgrade a database of version 1 - 5.08.04 by restoring it with version 6.0. Contact your GICHD IM advisor if you would like to upgrade a database of version 1 - 5.08.04 to version 6.0. |
If you see these messages, your computer is configured as an IMSMA client and it is not possible to restore the database.
 |
 |
SQL Views after restore
Since the views may build on other views it is not possible to know in which order they should be restored. Therefore the Restore functionality restores the SQL views as tables and after the restore is complete convert them to SQL views. If you still see any of your SQL views as tables after the restore, there is something wrong with your SQL views. The most common errors are:
- the SQL views are created / owned by another user than imsma
- the SQL syntax is not correct
- the SQL view is referring to another SQL view that does not exist anymore.
| |||||||||||