Difference between revisions of "Translate Custom Defined Fields"
From IMSMA Wiki
| Line 1: | Line 1: | ||
| − | + | {{Note|You can also translate CDF labels and CDF multi- and single-select values a [[Export the Translations | translation file]].}} | |
| − | |||
| − | |||
| − | |||
<ol> | <ol> | ||
| − | <li>From the '''Customisation''' menu, select '''Data Inventory Manager''' | + | <li>From the '''Customisation''' menu, select '''Data Inventory Manager'''.</li> |
| − | + | [[Image:DIM category.png|600px|center]] | |
| − | <li> | + | <li>In the left pane of the Data Inventory Manager window, select the data category that contains the CDF you would like to translate.</li> |
| − | <li> | + | <li>In the right pane of the Data Inventory Manager, click the row of the custom defined field that you would like to translate.</li> |
| − | <li>Click the [[Image:FieldViewIcon.png]] button. | + | <li>Click the [[Image:FieldViewIcon.png]] button.</li> |
| − | :The CDF | + | <center> |
| − | <li> | + | {| class="wikitable" |
| − | + | |- | |
| + | | [[Image:CDF editor3.png|400px]] | ||
| + | | width="10pt" | | ||
| + | | [[Image:CDF editor2.png|600px]] | ||
| + | |} | ||
| + | </center> | ||
| + | <li>The CDF editor looks different depending on data type.</li> | ||
| + | <li>Click the '''Translate''' button.</li> | ||
<li>Select the language for which you would like to provide a translation from the list. | <li>Select the language for which you would like to provide a translation from the list. | ||
| − | + | [[Image:DIM CDF translate.png|center|400px|''Translated Terms List Window'']] | |
| − | [[Image: | ||
<div align="center"> | <div align="center"> | ||
''Translated Terms List Window'' | ''Translated Terms List Window'' | ||
| Line 21: | Line 24: | ||
<li>Click the row of the term that you would like to translate.</li> | <li>Click the row of the term that you would like to translate.</li> | ||
<li>Click the [[Image:FieldViewIcon.png]] button. | <li>Click the [[Image:FieldViewIcon.png]] button. | ||
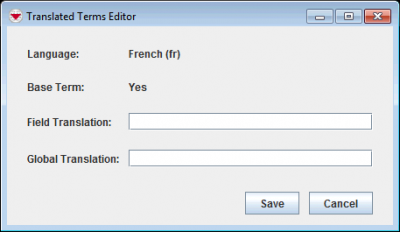
| − | + | [[Image:DIM CDF translate2.png|center|400px|''Translated Terms Editor'']] | |
| − | |||
| − | [[Image: | ||
<div align="center"> | <div align="center"> | ||
''Translated Terms Editor'' | ''Translated Terms Editor'' | ||
</div></li> | </div></li> | ||
| − | <li> | + | <li>If you would like the translation to be used for all fields that have the enumeration value, enter the translation in '''Global Translation''' field.</li> |
| − | <li> | + | <li>If you would like the translation to be used for only this field, enter the translation in '''Field Translation''' field.</li> |
| − | + | <li>Click the '''Save''' button.</li> | |
| − | |||
</ol> | </ol> | ||
{{NavBox HowTo Data Elements}} | {{NavBox HowTo Data Elements}} | ||
[[Category:NAA]] | [[Category:NAA]] | ||
Revision as of 23:37, 11 June 2017
| |
You can also translate CDF labels and CDF multi- and single-select values a translation file. |
- From the Customisation menu, select Data Inventory Manager.
- In the left pane of the Data Inventory Manager window, select the data category that contains the CDF you would like to translate.
- In the right pane of the Data Inventory Manager, click the row of the custom defined field that you would like to translate.
- Click the
 button.
 - The CDF editor looks different depending on data type.
- Click the Translate button.
- Select the language for which you would like to provide a translation from the list.

Translated Terms List Window
- Click the row of the term that you would like to translate.
- Click the button.
Translated Terms Editor
- If you would like the translation to be used for all fields that have the enumeration value, enter the translation in Global Translation field.
- If you would like the translation to be used for only this field, enter the translation in Field Translation field.
- Click the Save button.


|

|


| ||||||||||||||||