Difference between revisions of "Add Subobject Custom Defined Fields to the Design Pane"
From IMSMA Wiki
| Line 3: | Line 3: | ||
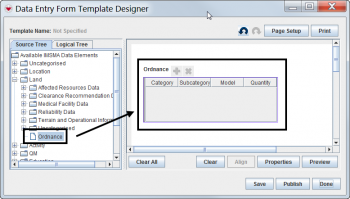
<li>In the Data Entry Form Template Designer window, select a subobject table from the data tree and drag it to the design pane.</li> | <li>In the Data Entry Form Template Designer window, select a subobject table from the data tree and drag it to the design pane.</li> | ||
</ol> | </ol> | ||
| − | {{Note|See [[ | + | {{Note|See [[Add Subobject Custom Defined Fields|How To Add Custom Defined Fields]] for examples of subobject tables that you can choose from.}} |
[[Image:DragSubobjectCDFtoDesignPane.png||350px|Dragging a subobject table to the design pane]] | [[Image:DragSubobjectCDFtoDesignPane.png||350px|Dragging a subobject table to the design pane]] | ||
| Line 17: | Line 17: | ||
</ol> | </ol> | ||
| − | {{Note|You must [[ | + | {{Note|You must [[Save a Data Entry Form Template|save]] and [[Publish a Data Entry Form Template|publish]] the data entry form template in order to display the new subobject CDFs.}} |
{{NavBox HowTo Data Elements}} | {{NavBox HowTo Data Elements}} | ||
Revision as of 15:27, 6 June 2013
To add subobject custom defined fields (CDF) to a data entry form template:
- In the Data Entry Form Template Designer window, select a subobject table from the data tree and drag it to the design pane.
| |
See How To Add Custom Defined Fields for examples of subobject tables that you can choose from. |
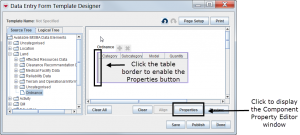
- Click the left border of the subobject table in the design pane, and then click Properties to open the Component Property Editor window.
- Select subobject CDFs the same way you would select display columns, then click OK to close the Component Property Editor window.
| |
You must save and publish the data entry form template in order to display the new subobject CDFs. |
| ||||||||||||||||

