Difference between revisions of "View and/or Change Custom Defined Fields"
From IMSMA Wiki
| (12 intermediate revisions by 4 users not shown) | |||
| Line 1: | Line 1: | ||
| + | {{TOC right}} | ||
You can change the label, description, and active status of CDFs. You can also change the values for multiple selection or single selection CDFs. To view and/or change custom defined fields: | You can change the label, description, and active status of CDFs. You can also change the values for multiple selection or single selection CDFs. To view and/or change custom defined fields: | ||
<ol> | <ol> | ||
| − | <li> | + | <li>In the '''Customisation''' menu → '''Data Inventory Manager'''.</li> |
| − | : | + | [[Image:DIM category.png|600px|center]] |
| − | <li> | + | <li>In the left pane of the Data Inventory Manager window, select the data category where the CDF is.</li> |
| − | <li> | + | <li>In the right pane of the Data Inventory Manager window, select the CDF and click the [[Image:FieldViewIcon.png]] button.</li> |
| − | :The CDF | + | <center> |
| − | <li>Change the information as needed. | + | {| class="wikitable" |
| + | |- | ||
| + | | [[Image:CDF editor3.png|400px]] | ||
| + | | width="10pt" | | ||
| + | | [[Image:CDF editor2.png|600px]] | ||
| + | |} | ||
| + | </center> | ||
| + | <li>The CDF editor looks different depending on data type.</li> | ||
| + | <li>Change the information as needed.</li> | ||
| + | <li>Click the Save button.</li> | ||
</ol> | </ol> | ||
| − | {{ | + | {{Note|Changing a CDF will not automatically update existing Data Entry Form Templates that use the CDF.}} |
| − | |||
| − | |||
| − | |||
| − | |||
| − | |||
| − | |||
| − | |||
| − | |||
| − | }} | ||
| + | ==Copy button==__NOEDITSECTION__ | ||
| + | [[Image:DIM copy button1.png|600px|center]] | ||
| + | This button allows copying the different value options of a CDF to another software e.g. Word and Excel, which can be useful for documentation. | ||
<ol> | <ol> | ||
| − | + | <li>Click on the '''Copy''' button which copies all the values in the left column. </li> | |
| + | <li>Switch to the other software. </li> | ||
| + | [[Image:DIM copy button2.png|600px|center]] | ||
| + | <li>Paste in values by using e.g. Ctrl+V. </li> | ||
</ol> | </ol> | ||
| − | |||
{{NavBox HowTo Data Elements}} | {{NavBox HowTo Data Elements}} | ||
| + | [[Category:NAA]] | ||
Latest revision as of 20:14, 17 June 2017
Contents |
You can change the label, description, and active status of CDFs. You can also change the values for multiple selection or single selection CDFs. To view and/or change custom defined fields:
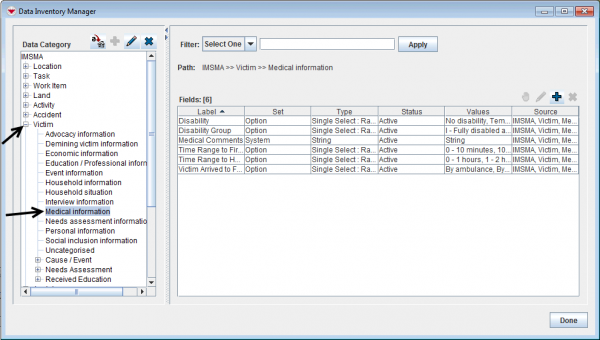
- In the Customisation menu → Data Inventory Manager.
- In the left pane of the Data Inventory Manager window, select the data category where the CDF is.
- In the right pane of the Data Inventory Manager window, select the CDF and click the
 button.
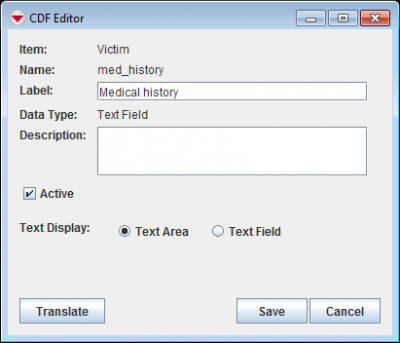
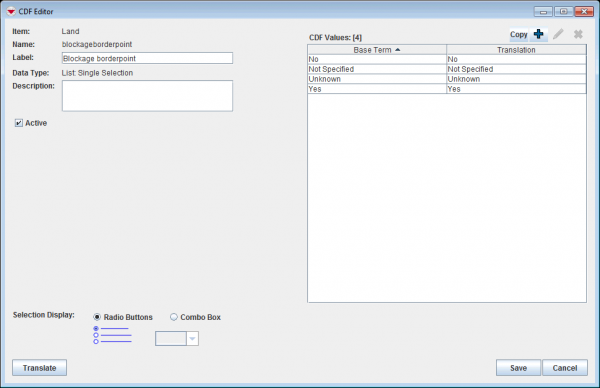
 - The CDF editor looks different depending on data type.
- Change the information as needed.
- Click the Save button.

|

|
| |
Changing a CDF will not automatically update existing Data Entry Form Templates that use the CDF. |
Copy button
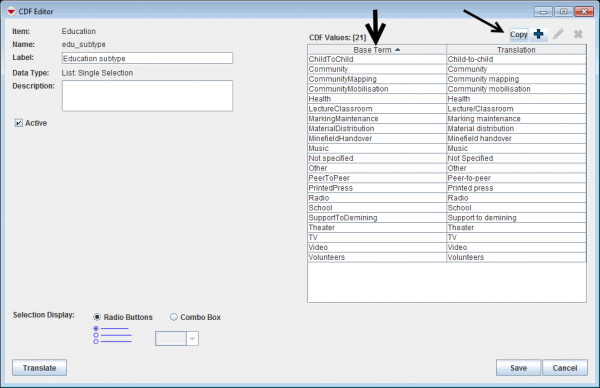
This button allows copying the different value options of a CDF to another software e.g. Word and Excel, which can be useful for documentation.
- Click on the Copy button which copies all the values in the left column.
- Switch to the other software.
- Paste in values by using e.g. Ctrl+V.
| ||||||||||||||||


