Difference between revisions of "Starting and Stopping IMSMANG"
From IMSMA Wiki
(Created page with "__FORCETOC__ {{TOC right}} ===STANDALONE INSTALLATIONS=== ====Starting the IMSMA<sup>NG</sup> server==== <ol> <li>Double-click the '''IMSMA Tray Launcher''' on the computer's ...") |
|||
| Line 16: | Line 16: | ||
<li>Right-click the IMSMA Control Centre and choose IMSMA Server > Start Server.</li> | <li>Right-click the IMSMA Control Centre and choose IMSMA Server > Start Server.</li> | ||
| − | :[[Image:saS01.png | + | :[[Image:saS01.png] |
{| style="border:2px solid lightgray; float:center; margin:10px;" | {| style="border:2px solid lightgray; float:center; margin:10px;" | ||
| Line 29: | Line 29: | ||
<li>Insert the IMSMANG dongle into the computer's USB port.</li> | <li>Insert the IMSMANG dongle into the computer's USB port.</li> | ||
| − | [[Image:saS02.png | + | [[Image:saS02.png]] |
<li>Right-click the IMSMA Control Centre and choose Start Client.</li> | <li>Right-click the IMSMA Control Centre and choose Start Client.</li> | ||
| − | [[Image:saS03.png | + | [[Image:saS03.png] |
<li>Enter a user ID and password in the Login window and click OK.</li> | <li>Enter a user ID and password in the Login window and click OK.</li> | ||
| Line 49: | Line 49: | ||
<li>Choose '''File''' > '''Exit'''.</li> | <li>Choose '''File''' > '''Exit'''.</li> | ||
| − | [[Image:saS05.png | + | [[Image:saS05.png]] |
</ol> | </ol> | ||
| Line 56: | Line 56: | ||
<li>Right-click the '''IMSMA Control Centre''' and choose '''IMSMA Server''' > '''Stop Server'''.</li> | <li>Right-click the '''IMSMA Control Centre''' and choose '''IMSMA Server''' > '''Stop Server'''.</li> | ||
| − | [[Image:saS06.png | + | [[Image:saS06.png]] |
<li>Right-click the '''IMSMA Control Centre''' and choose '''Exit Control Centre'''.</li> | <li>Right-click the '''IMSMA Control Centre''' and choose '''Exit Control Centre'''.</li> | ||
| − | [[Image:saS07.png | + | [[Image:saS07.png]] |
</ol> | </ol> | ||
Revision as of 18:34, 12 July 2012
STANDALONE INSTALLATIONS
Starting the IMSMANG server
| Represents a tip or note for using IMSMA Mobile. | Or, choose Start Menu > Programs > IMSMA Tray Launcher. |
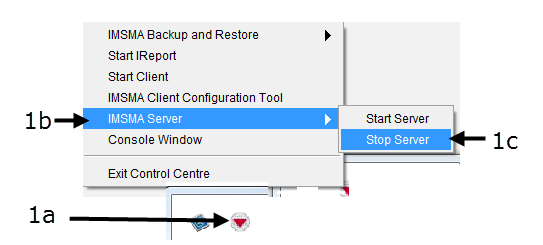
- Right-click the IMSMA Control Centre and choose IMSMA Server > Start Server.
- [[Image:saS01.png]
- The Server Progress window closes when the server is started.
- Insert the IMSMANG dongle into the computer's USB port.
- Right-click the IMSMA Control Centre and choose Start Client.
- Enter a user ID and password in the Login window and click OK.
- Choose File > Exit.
- Right-click the IMSMA Control Centre and choose IMSMA Server > Stop Server.
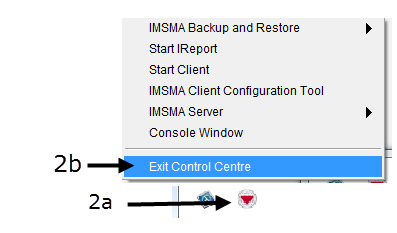
- Right-click the IMSMA Control Centre and choose Exit Control Centre.
- Follow the instructions for “Starting the IMSMANG server” in the Standalone Installations section of this guide.
- Follow the instructions for “Stopping the IMSMANG server” in the Standalone Installations section of this guide.
- Follow the instructions for “Starting the IMSMANG client” in the Standalone Installations section of this guide.
- Follow the instructions for “Stopping the IMSMANG client” in the Standalone Installations section of this guide.
| Represents a tip or note for using IMSMA Mobile. | If a Windows Security Alert window appears, click the Unblock button. |
Starting the IMSMANG client
[[Image:saS03.png]
| Represents a tip or note for using IMSMA Mobile. | The user ID and password are case-sensitive. |
Stopping the IMSMANG client
Stopping the IMSMANG server
CLIENT/SERVER INSTALLATIONS
Starting the IMSMANG server
| Represents a tip or note for using IMSMA Mobile. | The instructions in this section are performed on a computer that is a dedicated server for IMSMANG. |
Stopping the IMSMANG server
Starting the IMSMANG client
| Represents a tip or note for using IMSMA Mobile. | The instructions in this section are performed on each computer that is running IMSMANG as a shared application. |
Stopping the IMSMANG client
| Represents a tip or note for using IMSMA Mobile. | Before stopping the IMSMANG server, ensure that all IMSMANG client computers are disconnected from the server to prevent the loss of data or inconsistent data. |


