Difference between revisions of "Customise Tables"
From IMSMA Wiki
| (2 intermediate revisions by the same user not shown) | |||
| Line 8: | Line 8: | ||
|} | |} | ||
| + | {{TOC right}} | ||
==Renaming a Table==__NOEDITSECTION__ | ==Renaming a Table==__NOEDITSECTION__ | ||
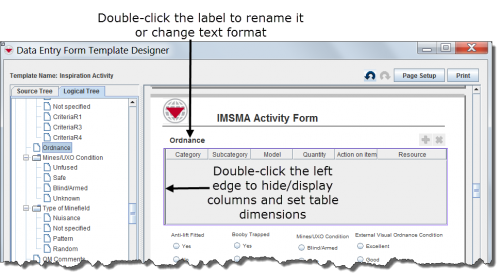
#Double-click the label text above the table. | #Double-click the label text above the table. | ||
| Line 13: | Line 14: | ||
##Rename the table by editing the '''Text''' field. | ##Rename the table by editing the '''Text''' field. | ||
##Change the label’s display format by editing the '''Font''', '''Style''', and '''Size''' fields. | ##Change the label’s display format by editing the '''Font''', '''Style''', and '''Size''' fields. | ||
| − | |||
| + | ==Renaming a Column==__NOEDITSECTION__ | ||
| + | <ol> | ||
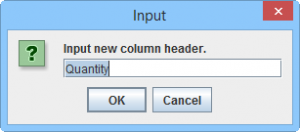
| + | <li> Double-click the column's heading. | ||
| + | [[Image:Rename column table widget.png|300px|center]] | ||
| + | <li> In the Input window, edit the heading. | ||
| + | </ol> | ||
| − | ==Editing | + | ==Editing Properties of the Table==__NOEDITSECTION__ |
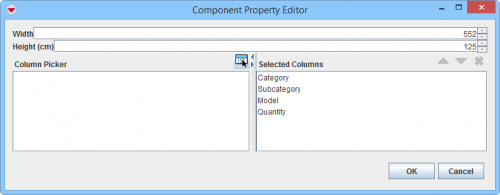
| − | # | + | # Click the left border of the table. |
| − | # | + | # The Component Property Editor window opens. |
| − | |||
| − | == | + | ===Editing Width and Height===__NOEDITSECTION__ |
| − | + | Enter new values into the '''Width''' and/or '''Height''' fields. | |
| − | + | ||
| − | + | ===Editing Columns===__NOEDITSECTION__ | |
| + | * To add columns, select the column you would like to display in the left pane. and click the [[Image:ColumnsIcon.png]] button. The selected column displays in the Selected Columns pane. | ||
| + | |||
| + | * To change the display order of the selected columns, select the column and click the [[Image:UpBlueArrow.png]] button to move it up in the list, or click the [[Image:DownBlueArrow.png]] button to move it down in the list. | ||
| + | * To delete a column from the display, select the column from the right pane and click the [[Image:EcksButton.png]] button. | ||
{{NavBox HowTo Data Entry Forms}} | {{NavBox HowTo Data Entry Forms}} | ||
| − | [[Category: | + | [[Category:NAA]] |
Latest revision as of 20:15, 19 June 2017
Renaming a Table
Renaming a Column
Editing Properties of the Table
Editing Width and HeightEnter new values into the Width and/or Height fields. Editing Columns
|
|||||||||||||||||||||||||||||


