Difference between revisions of "Add Organisation"
From IMSMA Wiki
m (moved HowTo:Add an Organization to Add an Organization) |
|||
| (30 intermediate revisions by 6 users not shown) | |||
| Line 1: | Line 1: | ||
| − | {{ | + | {{Note | To add an Organisation, your {{IMSMANG}} user account must belong to a User Role that has permission ''Organisation'' with ''Read and Write'' level. Contact your {{IMSMANG}} Administrator if you have questions on permissions. }} |
| − | }} | ||
| − | To add an | + | To add an Organisation to {{IMSMANG}}: |
<ol> | <ol> | ||
| − | <li> | + | <li>In the '''Data Entry''' menu → '''Organisations'''.</li> |
| − | + | <li>Click the [[Image:FieldTemplateIcon.png]] button.</li> | |
| − | <li>Click the [[Image: | ||
| − | |||
| − | |||
| − | [[Image: | + | [[Image:OrganisationEditorWindow.png|center|500px|''Organisation Editor Window'']] |
<div align="center"> | <div align="center"> | ||
| − | |||
</div> | </div> | ||
| + | <br> | ||
| − | + | <li>Enter a unique identifier for the Organisation in the '''Organisation ID''' field. Examples of identifiers: | |
| − | <li>Enter | + | <ol type="a"> |
| − | <li>Enter the | + | <li> Short name of the Organisation e.g. MAG and NPA team 1</li> |
| − | <li>Select the | + | <li> Identifier assigned in accreditation process</li> |
| − | <li> | + | <li> Org-1</li> |
| + | </ol> | ||
| + | </li> | ||
| + | <li>Enter the long / full name of the Organisation in the '''Organisation Name''' field e.g. HALO Trust - Mozambique.</li> | ||
| + | <li>If the Organisation has a parent Organisation, click the [[Image:Select and Organisation.png]] button to select the parent Organisation.</li> | ||
| + | <li>Select the Organisation type from the '''Category''' list.</li> | ||
<li>If there are any fields in the Custom Defined Fields section, enter data in those fields.</li> | <li>If there are any fields in the Custom Defined Fields section, enter data in those fields.</li> | ||
<li>Click the '''Location''' tab.</li> | <li>Click the '''Location''' tab.</li> | ||
| − | <li>Enter the address of the | + | <li>Enter the address of the Organisation in the '''Address''' field.</li> |
| − | <li>Select the operational area of the | + | <li>Select the operational area of the Organisation:</li> |
<ol type="a"> | <ol type="a"> | ||
| − | <li>Click the | + | <li>Click the [[Image:CSA.png]] button beside the '''Country Structure Reference''' field.</li> |
| − | + | The Country Structure Selection window displays. | |
| − | <li>Click the country structure area that is the operational area of the | + | <li>Click the country structure area that is the operational area of the Organisation.</li> |
| − | <li>Click the ''' | + | <li>Click the '''Ok''' button.</li> |
| − | + | The name of the country structure that you selected displays in the Country Structure Reference field. | |
</ol> | </ol> | ||
| − | <li>Select the coordinate reference system that you would like to use from the '''Coordinate | + | <li>Select the coordinate reference system that you would like to use from the '''Coordinate System''' list.</li> |
<li>Select the coordinate format from the '''Coordinate Format''' list.</li> | <li>Select the coordinate format from the '''Coordinate Format''' list.</li> | ||
| − | <li>There are several options for entering geospatial data. These options and the page on which you can find additional information are listed in | + | <li>There are several options for entering geospatial data. These options and the page on which you can find additional information are listed in the following table.</li> |
</ol> | </ol> | ||
{| class="wikitable" | {| class="wikitable" | ||
| − | ! colspan="2" | | + | ! colspan="2" | Entering Geospatial Data for an Organisation |
|- | |- | ||
! If you want to… | ! If you want to… | ||
! Refer to… | ! Refer to… | ||
|- | |- | ||
| − | | Manually add geospatial points | + | | Manually add geospatial points and polygon/polyline points |
| − | | '' | + | | ''[[Manual Geospatial Data Entry |Manual Geospatial Data Entry]].'' |
|- | |- | ||
| − | | | + | | Draw on the map to specify point, polygon, and polyline coordinates |
| − | | '' | + | | ''[[Draw on the Map to Specify Geographic Coordinates| Draw on the Map to Specify Geographic Coordinates]].'' |
|- | |- | ||
| − | | | + | | Import geospatial data from Excel |
| − | | '' | + | | ''[[Import Geospatial Data from Excel| Import Geospatial Data from Excel]].'' |
|- | |- | ||
| − | | Import geospatial data | + | | Import geospatial data from shapefile |
| − | | '' | + | | ''[[Import Geospatial Data from Shapefile| Import Geospatial Data from Shapefile]].'' |
|} | |} | ||
| − | <ol start=" | + | <ol start="14"> |
| − | <li>Click the '''Contact''' tab and enter | + | <li>Click the '''Contact''' tab and enter contact information for the Organisation:</li> |
</ol> | </ol> | ||
| − | [[Image:UserManual_OrganisationEditorContactTab.png|center| | + | [[Image:UserManual_OrganisationEditorContactTab.png|center|400px|''Organisation Editor – Contact Tab'']] |
<div align="center"> | <div align="center"> | ||
''Organisation Editor – Contact Tab'' | ''Organisation Editor – Contact Tab'' | ||
</div> | </div> | ||
| − | <ol start=" | + | <ol start="15"> |
<ol type="a"> | <ol type="a"> | ||
| − | <li>Enter the name of the contact in the Name field.</li> | + | <li>Enter the name of the contact in the Contact Name field.</li> |
<li>Enter the phone number for the contact in the Phone field.</li> | <li>Enter the phone number for the contact in the Phone field.</li> | ||
<li>Enter the fax number for the contact in the Fax field.</li> | <li>Enter the fax number for the contact in the Fax field.</li> | ||
| − | <li>Enter the mobile number for the contact in the Mobile field.</li> | + | <li>Enter the mobile phone number for the contact in the Mobile field.</li> |
<li>Enter any other number for the contact in the Other field.</li> | <li>Enter any other number for the contact in the Other field.</li> | ||
| − | <li>Enter the radio | + | <li>Enter the radio call sign and frequency for the contact in the Radio field.</li> |
<li>Enter an e-mail address for the contact in the Email field.</li> | <li>Enter an e-mail address for the contact in the Email field.</li> | ||
| − | <li> | + | <li>If the Organisation has a website, enter a URL for the website in the URL field.</li> |
</ol> | </ol> | ||
<li>Click the '''Competencies''' tab and enter the competencies data:</li> | <li>Click the '''Competencies''' tab and enter the competencies data:</li> | ||
<ol type="a"> | <ol type="a"> | ||
| − | + | <li>Click the [[Image:FieldTemplateIcon.png]] button.</li> | |
| − | <li>Click the [[Image: | + | A new row is added to the Competencies table. |
| − | |||
<li>Click the '''Type''' column of the new row that was added.</li> | <li>Click the '''Type''' column of the new row that was added.</li> | ||
| − | + | A list of competencies displays. | |
</ol> | </ol> | ||
</ol> | </ol> | ||
| Line 96: | Line 96: | ||
<li>Select the status from the list.</li> | <li>Select the status from the list.</li> | ||
</ol> | </ol> | ||
| − | <li> | + | <li>Click the '''Save''' button. </li> |
| − | |||
| − | |||
| − | </li> | ||
</ol> | </ol> | ||
| + | {{NavBox HowTo Standardizing Auxiliary Data}} | ||
| − | + | [[Category:NAA]] | |
Latest revision as of 19:10, 17 June 2017
To add an Organisation to IMSMANG:
- In the Data Entry menu → Organisations.
- Click the
 button.
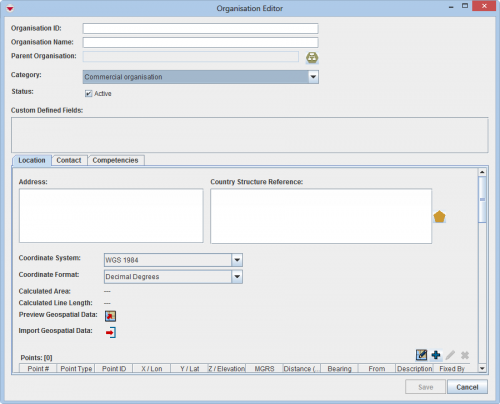
 - Enter a unique identifier for the Organisation in the Organisation ID field. Examples of identifiers:
- Short name of the Organisation e.g. MAG and NPA team 1
- Identifier assigned in accreditation process
- Org-1
- Enter the long / full name of the Organisation in the Organisation Name field e.g. HALO Trust - Mozambique.
- If the Organisation has a parent Organisation, click the
 button to select the parent Organisation.
 - Select the Organisation type from the Category list.
- If there are any fields in the Custom Defined Fields section, enter data in those fields.
- Click the Location tab.
- Enter the address of the Organisation in the Address field.
- Select the operational area of the Organisation:
- Click the
 button beside the Country Structure Reference field.
 - Click the country structure area that is the operational area of the Organisation.
- Click the Ok button.
- Select the coordinate reference system that you would like to use from the Coordinate System list.
- Select the coordinate format from the Coordinate Format list.
- There are several options for entering geospatial data. These options and the page on which you can find additional information are listed in the following table.
The Country Structure Selection window displays.
The name of the country structure that you selected displays in the Country Structure Reference field.
| Entering Geospatial Data for an Organisation | |
|---|---|
| If you want to… | Refer to… |
| Manually add geospatial points and polygon/polyline points | Manual Geospatial Data Entry. |
| Draw on the map to specify point, polygon, and polyline coordinates | Draw on the Map to Specify Geographic Coordinates. |
| Import geospatial data from Excel | Import Geospatial Data from Excel. |
| Import geospatial data from shapefile | Import Geospatial Data from Shapefile. |
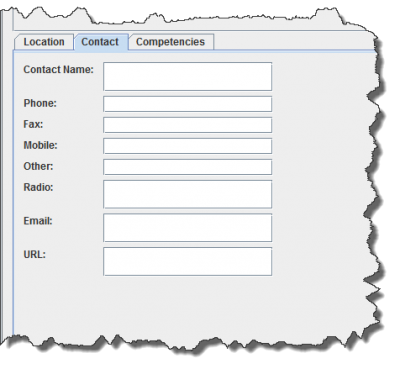
- Click the Contact tab and enter contact information for the Organisation:
Organisation Editor – Contact Tab
- Enter the name of the contact in the Contact Name field.
- Enter the phone number for the contact in the Phone field.
- Enter the fax number for the contact in the Fax field.
- Enter the mobile phone number for the contact in the Mobile field.
- Enter any other number for the contact in the Other field.
- Enter the radio call sign and frequency for the contact in the Radio field.
- Enter an e-mail address for the contact in the Email field.
- If the Organisation has a website, enter a URL for the website in the URL field.
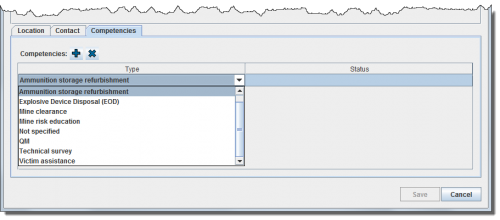
- Click the Competencies tab and enter the competencies data:
Organisation Editor Selecting a Competency Type
- Select the competency type from the list.
- Click the Status column of the new row that was added.
- Select the status from the list.
- Click the Save button.
| |||||||||||||||||||||||


