Difference between revisions of "Add Reports in IMSMA"
From IMSMA Wiki
| Line 1: | Line 1: | ||
[[File:Choose Reports.png|440px|center]] | [[File:Choose Reports.png|440px|center]] | ||
<ol> | <ol> | ||
| − | <li> | + | <li>In the '''Reports''' menu → '''Run Reports'''. |
[[Image:Reports for printing.png|500px|center|''Reports Window'']] | [[Image:Reports for printing.png|500px|center|''Reports Window'']] | ||
<div align="center"> | <div align="center"> | ||
''Reports Window'' | ''Reports Window'' | ||
</div></li> | </div></li> | ||
| − | <li>Click the [[Image:FieldTemplateIcon.png]] button | + | <li>Click the [[Image:FieldTemplateIcon.png]] button. |
[[Image:fig86.png|400px|center|''Add Report Window'']] | [[Image:fig86.png|400px|center|''Add Report Window'']] | ||
Revision as of 20:13, 14 June 2017
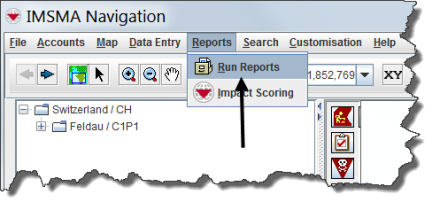
- In the Reports menu → Run Reports.
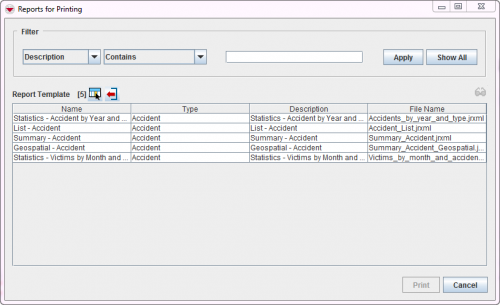
Reports Window
- Click the
 button.
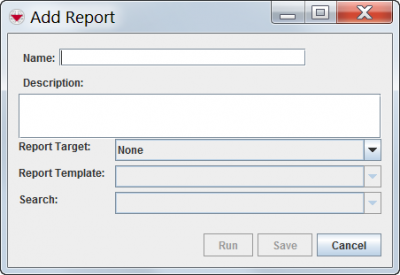
Add Report Window
- Enter a name for the report in the Name field.
- Enter a description for the report in the Description field.
- From the Report Target list, select the item for which you would like to create a report.
- Select the template that you would like to use for the report from the Report Template list.
- Select the search that you would like to use for the report from the Search list.
- Click the Save button.
- Verify that the report has been added to the Reports window.
The Report Template and Search lists are updated to show only those report templates and search definitions for the selected item.
| ||||||||||


