Difference between revisions of "Enter Place Data in the Data Entry Form"
From IMSMA Wiki
| (16 intermediate revisions by 5 users not shown) | |||
| Line 1: | Line 1: | ||
| − | + | You will find more information about Places [[Auxiliary Data#Places | here]]. | |
<ol> | <ol> | ||
| − | <li>Click the [[Image: | + | <li>Click the [[Image:Select a Place.png]] button. |
| − | + | ||
| − | + | [[Image:Place widget NG empty.png|500px|center]]</li> | |
| + | <li>The Place Selection window displays. | ||
| − | [[Image: | + | [[Image:Select a Place 2.png|center|500px|''Place Selection Window'']] |
<div align="center"> | <div align="center"> | ||
| − | '' | + | ''Place Selection Window'' |
| − | </div> | + | </div></li> |
| − | + | <li>If you would like to limit the Places displayed in the Place Selection window you can do so by applying a filter. To apply a filter to the Places:</li> | |
| − | |||
| − | |||
| − | |||
| − | |||
| − | |||
| − | < | ||
| − | <li>If you would like to limit the | ||
<ol type="a"> | <ol type="a"> | ||
| − | <li>Select the attribute on which you would like to apply the filter from the '''Filter''' list. Filter options for | + | <li>Select the attribute on which you would like to apply the filter from the '''Filter''' list. Filter options for Places include:</li> |
<ul> | <ul> | ||
| − | <li>'' | + | <li>''Active'' – returns all active Places.</li> |
| − | <li>'' | + | <li>''City'' – returns Places with the specified city.</li> |
| − | <li>'' | + | <li>''Name'' – returns Places with a name that is either similar to or contains the specified value.</li> |
| + | <li>''Place ID'' – returns Places with an ID that is either similar to or contains the specified value.</li> | ||
| + | <li>''Type'' – returns Places with a type that is either similar to or contains the specified value.</li> | ||
</ul> | </ul> | ||
<li>Enter a value that the selected attribute must match.</li> | <li>Enter a value that the selected attribute must match.</li> | ||
<li>Click the '''Apply''' button.</li> | <li>Click the '''Apply''' button.</li> | ||
| + | {{note|You can also click the '''Show All''' button to see all Places.}} | ||
</ol> | </ol> | ||
| − | <li>Click the row for the | + | <li>Click the row for the Place that you would like to select.</li> |
| − | <li>Click the '''OK''' button. | + | <li>Click the '''OK''' button. The Place name displays in the Data Entry Form Editor window. |
| − | + | ||
| − | </ol> | + | {{New_6.0 | To clear a previously-made selection from a Data Entry Form, click the [[Image:Select a Place.png]] button, check the '''No Selection''' checkbox, and click '''OK'''.}}</li></ol> |
{{NavBox HowTo Enter Data}} | {{NavBox HowTo Enter Data}} | ||
| + | |||
| + | [[Category:CRI]] | ||
Latest revision as of 11:24, 16 February 2015
You will find more information about Places here.
- Click the
 button.

- The Place Selection window displays.
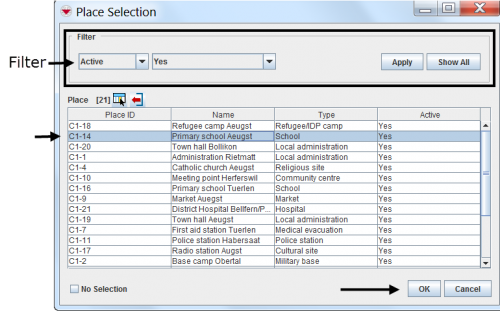
Place Selection Window
- If you would like to limit the Places displayed in the Place Selection window you can do so by applying a filter. To apply a filter to the Places:
- Select the attribute on which you would like to apply the filter from the Filter list. Filter options for Places include:
- Active – returns all active Places.
- City – returns Places with the specified city.
- Name – returns Places with a name that is either similar to or contains the specified value.
- Place ID – returns Places with an ID that is either similar to or contains the specified value.
- Type – returns Places with a type that is either similar to or contains the specified value.
- Enter a value that the selected attribute must match.
- Click the Apply button.
- Click the row for the Place that you would like to select.
- Click the OK button. The Place name displays in the Data Entry Form Editor window.

To clear a previously-made selection from a Data Entry Form, click the button, check the No Selection checkbox, and click OK.

| |
You can also click the Show All button to see all Places. |