Difference between revisions of "Data Entry Forms"
| Line 11: | Line 11: | ||
* [[Victim Summary Window | Victims]] | * [[Victim Summary Window | Victims]] | ||
| + | There are three possible steps in the reconciliation process: | ||
| + | # Save | ||
| + | # Submit | ||
| + | # [[Reconciling and Approving Data in IMSMANG | Approve]] | ||
| + | |||
| + | For data quality purposes, it is important that the data is adequately checked. With multiple permission levels for the Reconciliation, different users can be assigned different permissions, allowing Mine Action Programmes to implement a data-entry workflow that distinguishes between data '''entry''' and data '''verification''' roles. | ||
| + | |||
| + | Until a Data Entry Form is approved, it exists only in the Workbench and does not update any Summaries. The report can still be modified or deleted. When a Data Entry Form is approved, it becomes part of the Summaries and will be visible on the map. | ||
The figure below illustrates the typical progression of a data entry form in IMSMA. | The figure below illustrates the typical progression of a data entry form in IMSMA. | ||
Revision as of 22:33, 16 January 2015
| |
To view and add Data Entry Forms, your IMSMANG user account must belong to a User Role that has permission Data Entry Form. Contact your IMSMANG Administrator if you have questions on permissions. |
Data entry forms are used to collect mine action data for:
There are three possible steps in the reconciliation process:
- Save
- Submit
- Approve
For data quality purposes, it is important that the data is adequately checked. With multiple permission levels for the Reconciliation, different users can be assigned different permissions, allowing Mine Action Programmes to implement a data-entry workflow that distinguishes between data entry and data verification roles.
Until a Data Entry Form is approved, it exists only in the Workbench and does not update any Summaries. The report can still be modified or deleted. When a Data Entry Form is approved, it becomes part of the Summaries and will be visible on the map. The figure below illustrates the typical progression of a data entry form in IMSMA.
Data Entry Form Process
Data Entry Form Templates window
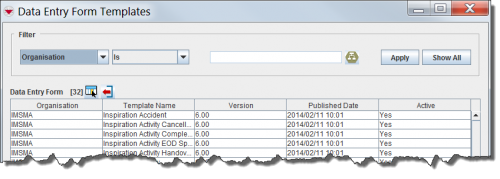
The Data Entry Form Templates window is the first window to display when you add a data entry form. The window allows you to select the type of data entry form that you would like to add.
Data Entry Form Templates Window
The Data Entry Form Templates window contains two sections:
- A filter section for limiting the list of data displayed – You can filter the data displayed in the table by selecting a filter from the list and entering a filter value. Data entry form templates passing the filter are listed in the table. Click the Show All button to see all templates.
- A table for the data – By default, the table displays all data entry form templates in IMSMA. To change the sort order of the data, click the column header associated with the attribute on which you would like to sort the data.
Filter the Data Entry Form Templates Displayed
By default, all data entry forms templates are listed in the table when the Data Entry Form Templates window is opened. You can limit the data entry form templates displayed in the table by selecting specific filter attributes.
Data Entry Form Templates Filter
To filter the data entry form templates displayed in the table:
- Select the attribute on which you would like to apply the filter from the Filter list. Filter options for data entry form templates include:
- Active – returns all active data entry forms.
- Organisation – returns data entry forms with an organisation name that contains the specified value.
- Published Date – returns data entry forms with a published date that contains the specified value.
- Template Name – returns data entry form templates with a name that contains the specified value.
- Version – returns data entry forms with a version that contains the specified value.
- Enter a value that the selected attribute filter must either be similar to or contain. Note that the filter is not case-sensitive.
- Click the Apply button.
- The data entry form templates passing your criteria are listed in the table.
| |
There are fields that have been renamed in version 6.0. |


