Difference between revisions of "Map Display Window"
| Line 1: | Line 1: | ||
| − | + | The IMSMA themes toolbar allows you to control which themes are displayed on the map. The IMSMA Themes tab in the Map Display window is another way of controlling which themes are displayed on the map and also to specify which subcategory of the theme that you would like to use. You can also control the display of the themes of the background map e.g. topography, political boundaries, and raster files via the Map Themes tab. | |
| − | |||
| − | |||
| − | |||
To view the Map Display window, click the [[Image:MapDisplayIcon.png|Map Display]] button, or open the '''Map''' menu and select '''Map Display'''. The Map Display window has two tabs. The IMSMA Themes tab contains the themes that are included with IMSMA. The Map Themes tab reflects the layers of the .mxd map file. | To view the Map Display window, click the [[Image:MapDisplayIcon.png|Map Display]] button, or open the '''Map''' menu and select '''Map Display'''. The Map Display window has two tabs. The IMSMA Themes tab contains the themes that are included with IMSMA. The Map Themes tab reflects the layers of the .mxd map file. | ||
| Line 20: | Line 17: | ||
| '''Perform these steps…''' | | '''Perform these steps…''' | ||
|- | |- | ||
| − | | Expand a map theme || Click the [[Image:PlusIcon.png]] button. The | + | | Expand a map theme || Click the [[Image:PlusIcon.png]] button. The node symbol will change to [[Image:MinusIcon.png]] when the level is expended. |
|- | |- | ||
| Add a theme on the map || Click the checkbox that is to the left of the theme name. | | Add a theme on the map || Click the checkbox that is to the left of the theme name. | ||
| Line 27: | Line 24: | ||
|} | |} | ||
| − | Read more about [[Symbology| | + | When you have select which map themes should be visible on the map, the next step is to decide if you would like to ''Show all'' or ''Show selected'' rows in the Item pane, read more [[Display the Icons of Item Records on the Map | here]]. |
| + | |||
| + | Read more about Symbology [[Symbology | here]]. | ||
{{NavBox HowTo Viewing and Browsing}} | {{NavBox HowTo Viewing and Browsing}} | ||
[[Category:CRI]] | [[Category:CRI]] | ||
Revision as of 18:58, 31 May 2014
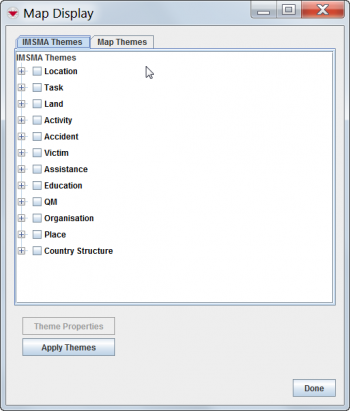
The IMSMA themes toolbar allows you to control which themes are displayed on the map. The IMSMA Themes tab in the Map Display window is another way of controlling which themes are displayed on the map and also to specify which subcategory of the theme that you would like to use. You can also control the display of the themes of the background map e.g. topography, political boundaries, and raster files via the Map Themes tab.
To view the Map Display window, click the ![]() button, or open the Map menu and select Map Display. The Map Display window has two tabs. The IMSMA Themes tab contains the themes that are included with IMSMA. The Map Themes tab reflects the layers of the .mxd map file.
button, or open the Map menu and select Map Display. The Map Display window has two tabs. The IMSMA Themes tab contains the themes that are included with IMSMA. The Map Themes tab reflects the layers of the .mxd map file.
Map Display Window
The themes are organized in a tree format. If the checkbox to the left of the theme name is checked (![]() ), the theme displays on the map. If the checkbox to the left of the theme name is unchecked (
), the theme displays on the map. If the checkbox to the left of the theme name is unchecked (![]() ), the theme will not display on the map.
), the theme will not display on the map.
When you have select which map themes should be visible on the map, the next step is to decide if you would like to Show all or Show selected rows in the Item pane, read more here.
Read more about Symbology here.
