Difference between revisions of "Manual Geospatial Data Entry"
From IMSMA Wiki
| Line 1: | Line 1: | ||
| − | ==How | + | ==How Manually Add coordinates for Point data ==__NOEDITSECTION__ |
To manually add geospatial data for a point: | To manually add geospatial data for a point: | ||
<ol> | <ol> | ||
| − | <li>Click the [[Image:FieldTemplateIcon.png]] button in the Points | + | <li>Click the [[Image:FieldTemplateIcon.png]] button in the Points table.</li> |
<li>From the Point window, enter the point number in the Point No. field. Note that this is a required field.</li> | <li>From the Point window, enter the point number in the Point No. field. Note that this is a required field.</li> | ||
</ol> | </ol> | ||
Revision as of 16:36, 16 October 2013
How Manually Add coordinates for Point data
To manually add geospatial data for a point:
- Click the
 button in the Points table.
 - From the Point window, enter the point number in the Point No. field. Note that this is a required field.
| |
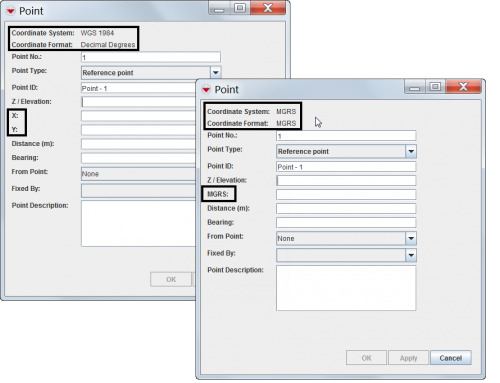
The fields available in the Points window will depend on the coordinate reference system that you selected. |
Different Point Windows
- Select the type of point that you are defining from the Point Type field.
- Enter the local identifier for the point in the Point ID field. Note that this is a required field.
- Do one of the following:
- To enter an absolute point, enter the coordinates in either the X/Longitude and Y/Latitude fields, or the MGRS field.
- To enter a relative point:
- Enter the distance of the point from the absolute point in the Distance field.
- Enter the bearing of the point relative to the absolute point in the Bearing field.
- Select the point from which the distance and bearing are defined from the From Point list.
- Enter a description for the point in the Point Description field.
- Do one of the following:
- To save the point and close the Point window, click the OK button.
- If you entered a relative point, the coordinates for the point are calculated based on the distance and bearing that you entered.
- To close the Point window without saving the point data, click the Cancel button.
How To Manually Add Polygon and Polyline Points
To manually add geospatial data for a polygon or polyline:
- Click the
 button in the Polygon and Polyline Points section.
 - The Polygon/Polyline Editor window displays.
- Enter the identifier for the polygon or polyline in the Polygon/Polyline Shape Id field.
- Select either the Polygon or Polyline option from the Type field.
- Click the
 button.
 - The Point window displays.
- From the Point window, enter the point number in the Point No. field. Note that this is a required field.
- Select the type of point that you are defining from the Point Type field.
- Enter the local identifier for the point in the Point ID field. Note that this is a required field.
- Do one of the following:
- To enter an absolute point, enter the coordinates in either the X/Longitude and Y/Latitude fields, or the MGRS field.
- To enter a relative point:
- Enter the distance of the point from the absolute point in the Distance field.
- Enter the bearing of the point relative to the absolute point in the Bearing field.
- Select the point from which the distance and bearing are defined from the From Point list.
- Enter a description for the point in the Point Description field.
- Do one of the following:
- To save the point and close the Point window, click the OK button.
- If you entered a relative point, the coordinates for the point are calculated based on the distance and bearing that you entered.
- To close the Point window without saving the point data, click the Cancel button.
| |
The fields available in the Points window will depend on the coordinate reference system that you selected. |
