Administrating MINT: Difference between revisions
No edit summary |
No edit summary |
||
| Line 65: | Line 65: | ||
=== Changing a Password ===__NOEDITSECTION__ | === Changing a Password ===__NOEDITSECTION__ | ||
{{Note|Administrators can change/reset all user's passwords, and every user can change his/her password. In '''lightMINT'', the prerequisite is that the '''Change password''' link on the login page has been enabled - see [[Install_and_Configure_lightMINT|Install and Configure lightMINT]] for details.}} | {{Note|Administrators can change/reset all user's passwords, and every user can change his/her password. In '''lightMINT''', the prerequisite is that the '''Change password''' link on the login page has been enabled - see [[Install_and_Configure_lightMINT|Install and Configure lightMINT]] for details.}} | ||
Users can change their password by clicking on the '''Change password''' link under the login box on the login page. | Users can change their password by clicking on the '''Change password''' link under the login box on the login page. | ||
Revision as of 10:19, 6 October 2014
| This page is under construction |
Managing organisations
| Organisations only exist in MINT, there is no equivalent in lightMINT. |
The organisation concept
The organisation concept in MINT is a way to have separate, private spaces for each mine action programme, operator, or any other actor using MINT. Each organisation has its own data sources, reports, dashboards, etc. that only users belonging to that organisation can access (depending on their specific permissions). For example, users from the organisation MAC1 cannot access objects from the organisation MAC2. An exception to this are organisations in parent-child relationships. For example, the organisation MAC1 could have a sub-organisation named Regional MAC1. In this case, users from the parent organisation MAC1 can access the objects of the child organisation Regional MAC1, but not the other way round.
The organisation name needs to be provided when logging into MINT. There is no drop-down list of organisations, so users need to know the exact spelling of their organisation.

| Before creating a multitude of nested organisations, it is recommended to make a stakeholders (future MINT user groups) mapping and think about the requirements of each group. Based on that, it can be decided whether it is best to create several sub-organisations or manage the different groups through specific permissions. Contact your GICHD IM focal point for advise. |
Adding sub-organisations
| Administrators of an organisation can create sub-organisations. The initial parent organisation has to be created by the global MINT administrator though. This is done when a programme / actor decides to get started on MINT. |
Administrators of a parent organisation can create sub-organisations. To do so, the following steps are required:
- On the top menu, select Manage → Organizations
- In the left-hand pane named Organizations, select/highlight the organisation for which a sub-organisation should be created (there can be a hierarchy of organisations)
- Click on Add Organization...
- Provide a name, an ID and an alias for the new organisation. The name is displayed in the folder structure; the ID is a unique identifier that cannot be changed; the alias is the name to be used on the login page, and hence the one to communicate to users of that organisation.
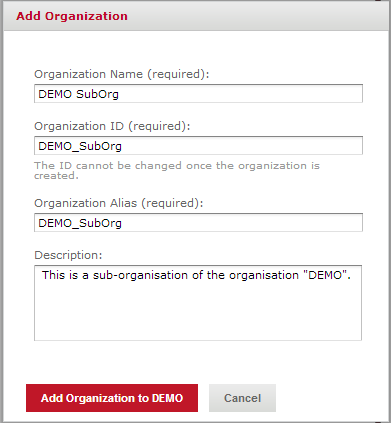
- Click on Add Organization to <Parent Organisation Name>


| When a new organisation is created, by default it has two users: jasperadmin (an administrator) and joeuser (a user) with the respective passwords jasperadmin and joeuser. It is recommended to immediately change the password of jasperadmin, and delete the joeuser user. |
Managing roles
| Only Administrators can manage roles. |
The page to manage roles can be accessed via Manage → Roles in the top menu. The following roles exist by default after the installation:
- ROLE_ADMINISTRATOR: User assigned to this role are administrators of the system, i.e. they can manage the server setting, users and roles, as well as create/rename/delete folders in the repository and assign permissions.
- ROLE_ANONYMOUS: Users assigned to this role do not have any permission to view any objects or perform any actions in the system, unless explicitly defined.
- ROLE_USER: Users assigned to this role can view and schedule reports, i.e. use the system as end users, but not perform any administrative tasks such as managing the server, users and roles, and manipulating folders.
To add a role, click on the Add Role button in the top left corner of the role management interface. Only a name needs to be provided. There are two ways of assigning users to roles:
- From the role management interface, by selecting a role and clicking on Edit in the right-hand pane: users from the list of available users can be dragged to the list of assigned users, or removed from that list.
- From the user management interface, by selecting a user and clicking on Edit in the right-hand pane: roles from the list of available roles can be dragged to the list of assigned roles , or removed from that list.
Managing users
| Only Administrators can manage users. |
The page to manage users can be accessed via Manage → Users in the top menu.
Adding a User
In order to add a user, click on the Add User button in the top left corner of the users interface. A pop-up window appears in which the following information is prompted:
- User name: user name assigned to the new user. This name will be displayed in the application and can be displayed on reports.
- User ID: this is the actual ID that needs to be provided in the login window.
- Password: password for the user ID. This can and should be changed later by the actual user, when he or she first logs in.
- Optional - Email: if an email notification system is set up, an email address can be provided for automatic notifications.
The user is finally added by clicking on the Add User button on the pop-up window.

A user can later by edited by clicking on the Edit User button on the main user management interface. The following properties can be changed:
- Password - this is how an administrator can reset a user's password.
- Email address
- Enable/disable a user - if a user is disabled, it will not be able to log in to the system anymore.
- Assign and remove roles (see the section below on managing roles)
Changes need to be saved before they are taken into account.

Changing a Password
| Administrators can change/reset all user's passwords, and every user can change his/her password. In lightMINT, the prerequisite is that the Change password link on the login page has been enabled - see Install and Configure lightMINT for details. |
Users can change their password by clicking on the Change password link under the login box on the login page.
Managing the folder structure
Managing permissions on objects
{{#switch:|subgroup|child=|none=|#default=
}}{{#if:Business Intelligence|{{#if:|<th scope="col" style="border-left:2px solid #fdfdfd;width:100%;|}}{{#if:|{{#if:Business Intelligence|}}}}{{#if:Install Staging Area Generator · Using Staging Area Generator · Post Processing SQL Scripts · SAG Spatial reference system · Name Rules Staging Area · Scheduling the Staging Area creation|{{#if:Business Intelligence|}}{{#if:|}}{{#if:Staging Area Generator|<td style="text-align:left;border-left-width:2px;border-left-style:solid;|{{#if:|}}}}{{#if: IMSMA Staging Area Database · Connecting to IMSMA Staging area from ArcGIS · Connecting to IMSMA Staging area from Excel · Sharing an IMSMA Staging Area|{{#if:Business IntelligenceInstall Staging Area Generator · Using Staging Area Generator · Post Processing SQL Scripts · SAG Spatial reference system · Name Rules Staging Area · Scheduling the Staging Area creation|}}{{#if:IMSMA Staging Area|<td style="text-align:left;border-left-width:2px;border-left-style:solid;|}}{{#if:|{{#if:Business IntelligenceInstall Staging Area Generator · Using Staging Area Generator · Post Processing SQL Scripts · SAG Spatial reference system · Name Rules Staging Area · Scheduling the Staging Area creation IMSMA Staging Area Database · Connecting to IMSMA Staging area from ArcGIS · Connecting to IMSMA Staging area from Excel · Sharing an IMSMA Staging Area|}}{{#if:|<td style="text-align:left;border-left-width:2px;border-left-style:solid;|}}{{#if:Other Reporting Tools|{{#if:Other Reporting Tools|<td style="text-align:left;border-left-width:2px;border-left-style:solid;|}}{{#if: Introduction to indicators|{{#if:Indicators|<td style="text-align:left;border-left-width:2px;border-left-style:solid;|}}{{#if:|{{#if:|<td style="text-align:left;border-left-width:2px;border-left-style:solid;|}}{{#if:|{{#if:|<td style="text-align:left;border-left-width:2px;border-left-style:solid;|}}{{#if:|{{#if:|<td style="text-align:left;border-left-width:2px;border-left-style:solid;|}}{{#if:|{{#if:|<td style="text-align:left;border-left-width:2px;border-left-style:solid;|}}{{#if:|{{#if:|<td style="text-align:left;border-left-width:2px;border-left-style:solid;|}}{{#if:|{{#if:|<td style="text-align:left;border-left-width:2px;border-left-style:solid;|}}{{#if:|{{#if:|<td style="text-align:left;border-left-width:2px;border-left-style:solid;|}}{{#if:|{{#if:|<td style="text-align:left;border-left-width:2px;border-left-style:solid;|}}{{#if:|{{#if:|<td style="text-align:left;border-left-width:2px;border-left-style:solid;|}}{{#if:|{{#if:|<td style="text-align:left;border-left-width:2px;border-left-style:solid;|}}{{#if:|{{#if:|<td style="text-align:left;border-left-width:2px;border-left-style:solid;|}}{{#if:|{{#if:|<td style="text-align:left;border-left-width:2px;border-left-style:solid;|}}{{#if:|{{#if:|<td style="text-align:left;border-left-width:2px;border-left-style:solid;|}}{{#if:|{{#if:|<td style="text-align:left;border-left-width:2px;border-left-style:solid;|}}{{#if:|{{#if:|<td style="text-align:left;border-left-width:2px;border-left-style:solid;|}}{{#if:|{{#if:Business IntelligenceInstall Staging Area Generator · Using Staging Area Generator · Post Processing SQL Scripts · SAG Spatial reference system · Name Rules Staging Area · Scheduling the Staging Area creation IMSMA Staging Area Database · Connecting to IMSMA Staging area from ArcGIS · Connecting to IMSMA Staging area from Excel · Sharing an IMSMA Staging Area|}}}}
|none=|#default= | ||||||||||||||||||||||||||||||||||||||||||||||||||||||||||||||||||||||||||||||||||||||||
}}{{#ifeq:|Template|{{#ifeq:|child||{{#ifeq:|subgroup||{{#switch:administrating mint
|doc
|sandbox
|testcases =
|#default = {{#switch:hlist
 |plainlist
 |hlist
 |hlist hnum
 |hlist vcard
 |vcard hlist =
 |#default =
 }}
}}
}}}}}}