|
|
| (26 intermediate revisions by 4 users not shown) |
| Line 1: |
Line 1: |
| − | To view or change a field report from the Workbench:
| + | {{Note | Contact your {{IMSMANG}} Administrator if you have questions on permissions. }} |
| | <ol> | | <ol> |
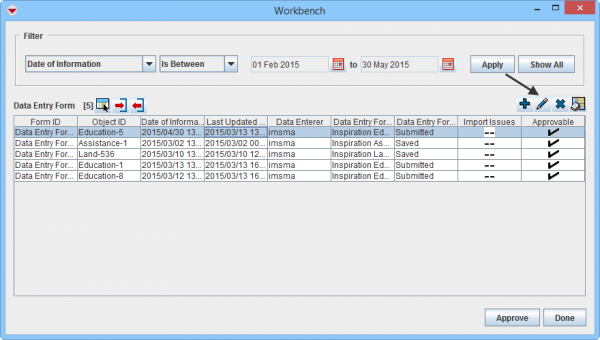
| − | <li>From the '''Data Entry''' menu, select '''Field Reports'''.</li> | + | <li>Select a Data Entry Form and click the [[Image:FieldViewIcon.png]] button. |
| − | <li>From the '''Field Reports''' menu, select '''Workbench'''.</li> | + | [[Image:WB Edit.png|600px|center]] |
| − | :The Workbench window displays.
| + | <div align="center"> '' Workbench window''</div></li> |
| − | <li>Click the row associated with the field report you would like to view or change.</li> | + | <li>Enter the data into the Data Entry Form. For more information on how to do data entry, see [[Use the Data Entry Form Editor Window]]. </li> |
| − | <li>Click the [[Image:FieldViewIcon.png]] button.</li> | + | <li>Verify that the Date of Information is correct. It should reflect the age of the information.</li> |
| − | :The Field Report Editor window displays the selected field report. For information on using the Field Report Editor window, refer to ''[[Field Reports Editor Window]]''.
| + | <li>Save, Submit or Approve the Data Entry Form.</li></ol> |
| − | <li>After you have entered data into the field report, do one of the following:</li> | |
| − | </ol> | |
| | | | |
| − | {| class="wikitable" width="600" | + | {{NavBox HowTo Reconcile and Approve}} |
| − | |-
| |
| − | | align="center" colspan="2" | '''Table 28. Field Report Actions'''
| |
| − | |-
| |
| − | | width="200pt" | '''If…'''
| |
| − | | width="400pt" | '''Do this…'''
| |
| − | |-
| |
| − | | If you want to add, download, or remove attachments || Click the [[Image:AttachIcon.png]] button and refer to [[Field Report Attachments]] for more information.
| |
| − | |-
| |
| − | | If you want to export the field report to an MaXML file || Click the [[Image:EditorWinIcon.png]] button and refer to [[HowTo:Export a Field Report to an MaXML File]] for more information.
| |
| − | |-
| |
| − | | You want to print the field report || Click the [[Image:PrinterIcon.png]] button.
| |
| − | |-
| |
| − | | You are a manager and would like to approve the field report || Click the '''Approve''' button. After the field report is approved, it can no longer be changed and becomes an item in IMSMA. The approved field report can be viewed from the Location View window. You must have access to the Field Report Approve permission.
| |
| − | |-
| |
| − | | You are a manager and find that the field report is missing information || Click the '''Reject''' button. This sets the field report’s status in the Workbench to Needs Revision. You must have access to the Field Report Reject permission.
| |
| − | |-
| |
| − | | You want to save the field report and continue updating its information later || Click the '''Save''' button. This sets the field report’s status in the Workbench to Needs Completion. You must have access to the Field Report permission.
| |
| − | |-
| |
| − | | You have completed entering the field report’s information and would like a manager to review the field report || Click the '''Submit''' button. This sets the field report’s status in the Workbench to Needs Approval. You must have access to the Field Report permission.
| |
| − | |-
| |
| − | | You would like to discard any changes to the field report || Click the '''Cancel''' button.
| |
| − | |}
| |
| | | | |
| − | | + | [[Category:NAA]] |
| − | {{NavBox HowTo Workbench}}
| |
 button.
 Workbench window