Difference between revisions of "Using Data Entry Forms"
| Line 12: | Line 12: | ||
{{HowTo's | {{HowTo's | ||
| − | |[[HowTo:Add a Field Report|Add a | + | |[[HowTo:Add a Field Report|Add a Data Entry Form]] |
| − | |[[HowTo:Display the Field Report Templates Window and Filter Templates|Display the | + | |[[HowTo:Display the Field Report Templates Window and Filter Templates|Display the Data Entry Form Templates Window and Filter Templates]] |
| − | |[[HowTo:Use the Field Report Editor Window|Use the | + | |[[HowTo:Use the Field Report Editor Window|Use the Data Entry Form Editor Window]] |
| − | |[[HowTo:Enter an Object ID in the Field Report|Enter an Object ID in the | + | |[[HowTo:Enter an Object ID in the Field Report|Enter an Object ID in the Data Entry Form]] |
| − | |[[HowTo:Enter Date Information in the Field Report|Enter Date Information in the | + | |[[HowTo:Enter Date Information in the Field Report|Enter Date Information in the Data Entry Form]] |
| − | |[[HowTo:Enter Country Structure Data in the Field Report|Enter Country Structure Data in the | + | |[[HowTo:Enter Country Structure Data in the Field Report|Enter Country Structure Data in the Data Entry Form]] |
| − | |[[HowTo:Enter Organisation Data in the Field Report|Enter Organisation Data in the | + | |[[HowTo:Enter Organisation Data in the Field Report|Enter Organisation Data in the Data Entry Form]] |
| − | |[[HowTo:Enter Place Data in the Field Report|Enter Place Data in the | + | |[[HowTo:Enter Place Data in the Field Report|Enter Place Data in the Data Entry Form]] |
| − | |[[HowTo:Enter Explosive Ordnance Data in the Field Report|Enter Explosive Data in the | + | |[[HowTo:Enter Explosive Ordnance Data in the Field Report|Enter Explosive Data in the Data Entry Form]] |
| − | |[[HowTo:Enter Geospatial Data in the Field Report|Enter Geospatial Data in the | + | |[[HowTo:Enter Geospatial Data in the Field Report|Enter Geospatial Data in the Data Entry Form]] |
| − | |[[HowTo:Enter Single Geospatial Points in the Field Report|Enter Single Geospatial Points in the | + | |[[HowTo:Enter Single Geospatial Points in the Field Report|Enter Single Geospatial Points in the Data Entry Form]] |
| − | |[[HowTo:Enter Polygone/Polyline Points in the Field Report|Enter Polygone/Polyline Points in the | + | |[[HowTo:Enter Polygone/Polyline Points in the Field Report|Enter Polygone/Polyline Points in the Data Entry Form]] |
| − | |[[HowTo:Retrieve Geographic Coordinates from the Map in the Field Report|Retrieve Geographic Coordinates from the Map in the | + | |[[HowTo:Retrieve Geographic Coordinates from the Map in the Field Report|Retrieve Geographic Coordinates from the Map in the Data Entry Form]] |
| − | |[[HowTo:Import Polygone/Polyline Points from an Excel Spreadsheet in the Field Report|Import Polygone/Polyline Points from an Excel Spreadsheet in the | + | |[[HowTo:Import Polygone/Polyline Points from an Excel Spreadsheet in the Field Report|Import Polygone/Polyline Points from an Excel Spreadsheet in the Data Entry Form ]] |
| − | |[[HowTo:Manage Field Report Attachments|Manage | + | |[[HowTo:Manage Field Report Attachments|Manage Data Entry Form Attachments]] |
| − | |[[HowTo:Submit Field Reports|Submit | + | |[[HowTo:Submit Field Reports|Submit Data Entry Forms]] |
| − | |[[HowTo:Save Field Reports to the Workbench|Save | + | |[[HowTo:Save Field Reports to the Workbench|Save Data Entry Forms to the Workbench]] |
}} | }} | ||
| Line 157: | Line 157: | ||
[[File:Legend Title.png|400px|]] | [[File:Legend Title.png|400px|]] | ||
| − | For more information see [[HowTo:Manage Field Report Attachments]]. | + | For more information see [[HowTo:Manage Field Report Attachments|HowTo:Manage Data Entry Form Attachments]]. |
</ol> | </ol> | ||
Revision as of 21:15, 21 May 2013
Data entry form templates can present different data entry formats: alphanumeric or numeric-only fields, multiple or single-select lists and widgets, which contain standardised information that can automatically be displayed on the data entry form template.
Once completed, a data entry form is ready to be saved or submitted for approval.
Your data entry form templates have been designed by your local system administrator. Follow your local SOP or contact your local system administrator for guidance on data entry formats.
Open a Data Entry Form Template
- Choose Data Entry > Data Entry Forms > Add Data Entry Form...
- Select the data entry form template of your choice and click OK.
- To add polygon/polyline points click File:Select an Explosive.png.
>Click ![]() to select an organisation.
to select an organisation.

>Click ![]() to select a place.
to select a place.

>Click File:Select an Explosive.png to select explosive ordnance.

| File:LightBulb.png To add a quantity, enter the value in the Quantity column. |


Locate the spreadsheet in your directory and click Open.
Entering Data into the Data Entry Form Template
| File:LightBulb.png Text fields take alphanumeric values. Numeric fields take numeric values only. |
>Click ![]() to generate an ID number.
to generate an ID number.
>Click ![]() to select a date.
to select a date.

>Click ![]() to select a country structure area.
to select a country structure area.
|
File:LightBulb.png To remove explosive ordnance from your data entry form template, select the row and click. File:Remove.png |
|
File:LightBulb.png To remove explosive ordnance from your data entry form template, select the row and click File:Remove.png. On activity templates, the explosive ordnance widget presents additional fields. |
>Click File:Pencil.png to enter geographic coordinates.
File:Geographic Coordinates.png
- To add single points, click File:Select an Explosive.png.
| File:LightBulb.png See the Point window on this page for help entering information in the window. |
| File:Error Message.png Enter points of polygons or polylines in the order they should be drawn in. Indicate the sequence in the Point No. field. |
- To retrieve geographic coordinates from your map, click File:Retrieve.png

| File:Error Message.png Geographic coordinates that are retrieved from the map are stored in WGS84 decimal degrees format. |
- To import polygons and polylines from an Excel spreadsheet, click
 .
.
- To import polygons and polylines from an Excel spreadsheet, click
| File:LightBulb.png Ensure that the spreadsheet displays the following columns and data. |
Adding Attachments to the Data Entry Form Template
- Click File:Click Add.png
- Click
 to upload a new attachment
For more information see HowTo:Manage Data Entry Form Attachments.
Saving the Data Entry Form Template
- Click Save.
File:LightBulb.png The data entry form is added to The Workbench with a status of Needs Completion.  and click File:Pencil.png. and click File:Pencil.png.
|
Submitting the Data Entry Form Template
- Click Submit.
File:Submit.png
File:LightBulb.png The data entry form is added to The Workbench with a status of Needs Approval. 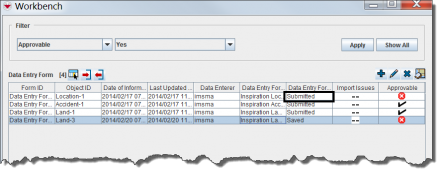
