Difference between revisions of "Summary Templates"
| Line 1: | Line 1: | ||
__FORCETOC__ | __FORCETOC__ | ||
{{TOC right}} | {{TOC right}} | ||
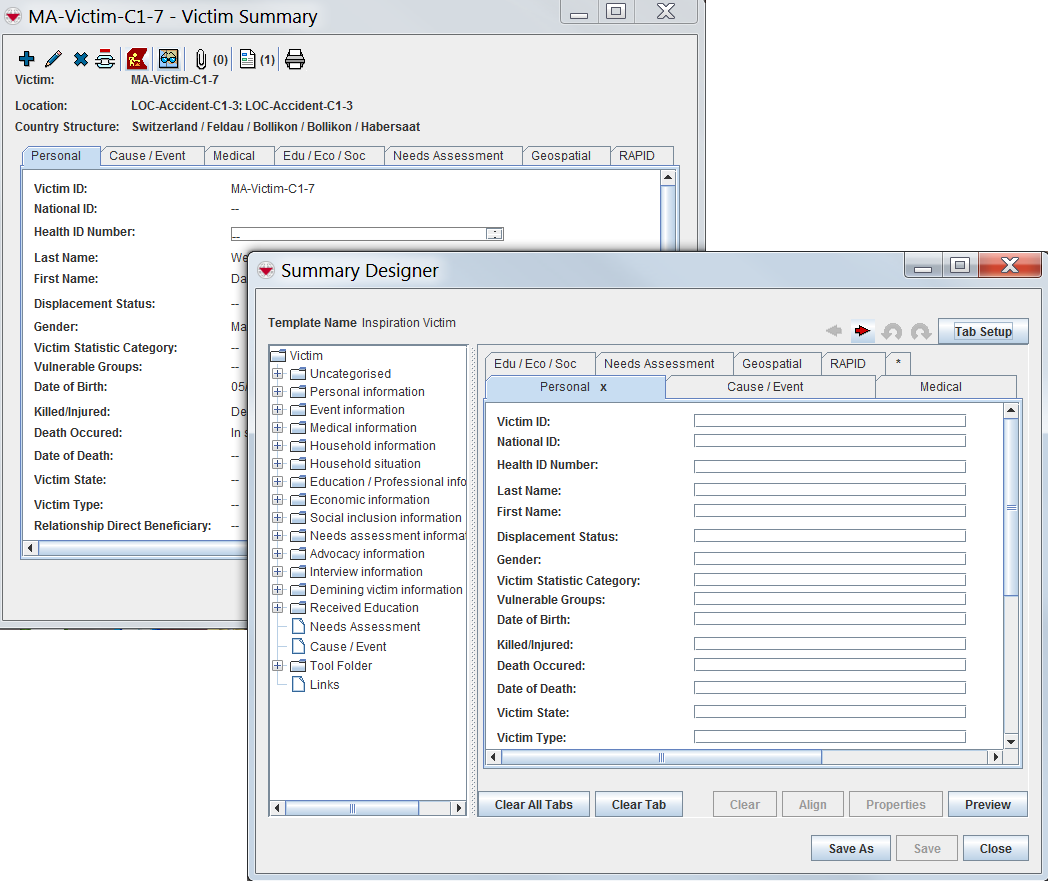
| − | [[File:ViewDesignerAndVictimView.png|thumb|left|200px|alt=The Victim | + | [[File:ViewDesignerAndVictimView.png|thumb|left|200px|alt=The Victim Summary and Summary Designer - side by side.|The Victim Summary - as displayed in the both Summary and Summary Designer Windows]] |
| − | The | + | The Summary Designer window lets you modify how an item's data displays in the [[Current View Window]]. When you edit an existing summary, the Summary Designer window presents you with a graphical representation of the selected summary; all of the elements are in exactly the same positions. The [[Media:ViewDesignerAndVictimView.png | figure]] to the left shows an example. |
| − | There are two panes in the | + | There are two panes in the Summary Designer window. On the right is the design pane, where you can add, remove, and modify elements. Above the design pane is a series of tabs that let you switch between pages. The pane on the left displays a data tree of elements available for the selected item. You can drag elements to and from the data tree to populate your summary. |
| − | When you have finished customising the | + | When you have finished customising the summary, you can either save it with a new name or overwrite an existing summary. Whatever file you save is placed in the Summary Manager window with a [[HowTo:Publish and Archive Views#View Status | status]] of ''draft''. You still have to [[HowTo:Publish and Archive Views#Publishing a View | publish]] it before it is visible to IMSMA users. |
| − | The following sections describe how to complete common tasks in the | + | The following sections describe how to complete common tasks in the Summary Designer window. For a complete list of the available functions, refer to [[HowTo:Customise Views#View Designer User Interface Buttons | Summary Designer User Interface Buttons]]. |
| − | ==Customising a | + | ==Customising a Summary== |
| − | #From the [[IMSMA Navigation Window]], click '''Customisation > | + | #From the [[IMSMA Navigation Window]], click '''Customisation > Summary Manager'''. |
#Select an item from the '''Object''' menu to display its complete list of views. | #Select an item from the '''Object''' menu to display its complete list of views. | ||
| − | #Select one of the item's existing | + | #Select one of the item's existing summaries from the list. |
| − | #Click the [[Image:EditIcon.png | 20px | Edit]] button to open the [[HowTo:Customise Views | | + | #Click the [[Image:EditIcon.png | 20px | Edit]] button to open the [[HowTo:Customise Views | Summary Designer]] window. |
===Adding Data Elements=== | ===Adding Data Elements=== | ||
---- | ---- | ||
| − | ''Data Elements'' are the relevant information (gathered during [[Entering Data into IMSMANG#Entering Data into the Field Report Template | | + | ''Data Elements'' are the relevant information (gathered during [[Entering Data into IMSMANG#Entering Data into the Field Report Template | data entry]]) that display on an item's summary. You can move existing data elements around in the design pane, and resize, relabel, or delete them. You can also add from a library of elements by dragging them from the data tree to the design pane. With certain exceptions, only one instance of the same data element can be added to each tab. |
# Click the tab on which you want to add the data element. | # Click the tab on which you want to add the data element. | ||
| Line 28: | Line 28: | ||
===Adding Graphic Elements=== | ===Adding Graphic Elements=== | ||
---- | ---- | ||
| − | ''Graphic Elements'' make up the visual layout of an item's | + | ''Graphic Elements'' make up the visual layout of an item's summary, and are unaffected by data entry. They are the [[HowTo:Customise Views#Lines | lines]] that border or separate sections, [[HowTo:Customise Views#Text Boxes | text boxes]] where messages can be written, and [[HowTo:Customise Views#Images | images]] (like photographs, maps, and diagrams) that add to the visual aesthetic. All graphic elements are located in the Summary Designer data tree, inside the '''Tool Folder'''. |
====Lines==== | ====Lines==== | ||
| Line 45: | Line 45: | ||
# Double-click the Icon Tool widget to resize its boundaries and choose an image file to import. Note that the Icon Tool borders will expand or contract to fit the imported file. | # Double-click the Icon Tool widget to resize its boundaries and choose an image file to import. Note that the Icon Tool borders will expand or contract to fit the imported file. | ||
| − | ===Saving a | + | ===Saving a Summary=== |
---- | ---- | ||
| − | When you have finished customizing your | + | When you have finished customizing your summary, do one of the following: |
| − | * Click '''Save As''' to save the custom | + | * Click '''Save As''' to save the custom summary as a separate entry in the Summary Manager Window. |
| − | * Click '''Save''' to overwrite the existing custom | + | * Click '''Save''' to overwrite the existing custom summary. |
| − | Remember to [[HowTo:Publish and Archive Views#Publishing a View | publish]] the | + | Remember to [[HowTo:Publish and Archive Views#Publishing a View| publish]] the summary if you want to activate it in IMSMA. Note that you can save separate summaries with the same name in the Summary Manager. |
| − | === | + | ===Summary Designer User Interface Buttons=== |
---- | ---- | ||
| − | The following table lists all of the GUI buttons avaiable in the | + | The following table lists all of the GUI buttons avaiable in the Summary Designer window and their purposes: |
{| class="wikitable" | {| class="wikitable" | ||
| − | |+ | + | |+ Summary Designer Interface |
! Desired Elements | ! Desired Elements | ||
! Steps to Achieve | ! Steps to Achieve | ||
| Line 101: | Line 101: | ||
| Click the [[Image:ViewDesignerUndo.png | Undo]] or [[Image:ViewDesignerRedo.png | Redo]] buttons. | | Click the [[Image:ViewDesignerUndo.png | Undo]] or [[Image:ViewDesignerRedo.png | Redo]] buttons. | ||
|- | |- | ||
| − | | style="padding-left: 2em" | Save your changes to the | + | | style="padding-left: 2em" | Save your changes to the summary |
| Click '''Save'''. | | Click '''Save'''. | ||
|- | |- | ||
| − | | style="padding-left: 2em" | Save your | + | | style="padding-left: 2em" | Save your summary as new |
| Click '''Save As'''. | | Click '''Save As'''. | ||
|- | |- | ||
| − | | style="padding-left: 2em" | Print and preview a | + | | style="padding-left: 2em" | Print and preview a summary |
| Click '''Preview'''. | | Click '''Preview'''. | ||
|- | |- | ||
| − | | style="padding-left: 2em" | Exit the | + | | style="padding-left: 2em" | Exit the Summary Designer |
| Click '''Close'''. | | Click '''Close'''. | ||
|- | |- | ||
Revision as of 21:11, 1 May 2013

The Summary Designer window lets you modify how an item's data displays in the Current View Window. When you edit an existing summary, the Summary Designer window presents you with a graphical representation of the selected summary; all of the elements are in exactly the same positions. The figure to the left shows an example.
There are two panes in the Summary Designer window. On the right is the design pane, where you can add, remove, and modify elements. Above the design pane is a series of tabs that let you switch between pages. The pane on the left displays a data tree of elements available for the selected item. You can drag elements to and from the data tree to populate your summary.
When you have finished customising the summary, you can either save it with a new name or overwrite an existing summary. Whatever file you save is placed in the Summary Manager window with a status of draft. You still have to publish it before it is visible to IMSMA users.
The following sections describe how to complete common tasks in the Summary Designer window. For a complete list of the available functions, refer to Summary Designer User Interface Buttons.
Customising a Summary
- From the IMSMA Navigation Window, click Customisation > Summary Manager.
- Select an item from the Object menu to display its complete list of views.
- Select one of the item's existing summaries from the list.
- Click the Edit button to open the Summary Designer window.
Adding Data Elements
Data Elements are the relevant information (gathered during data entry) that display on an item's summary. You can move existing data elements around in the design pane, and resize, relabel, or delete them. You can also add from a library of elements by dragging them from the data tree to the design pane. With certain exceptions, only one instance of the same data element can be added to each tab.
- Click the tab on which you want to add the data element.
- Drag an element from the data tree to the design pane.
- Double-click the element's graphic or label to edit its properties.
- If you are editing a table, refer to How To Customise Tables.
Adding Graphic Elements
Graphic Elements make up the visual layout of an item's summary, and are unaffected by data entry. They are the lines that border or separate sections, text boxes where messages can be written, and images (like photographs, maps, and diagrams) that add to the visual aesthetic. All graphic elements are located in the Summary Designer data tree, inside the Tool Folder.
Lines
- Click the tab on which you want to add the line.
- Drag the Line Tool from the Tool folder in the data tree to the design pane.
- Double-click the line to edit its width, length, and orientation.
Text Boxes
- Click the tab on which you want to add the text box.
- Drag the Text Tool from the Tool folder in the data tree to the design pallate.
- Double-click the text box to add the desired text (in place of the default "Text Tool") and edit the font style and size. Note that the text box borders will expand or contract to fit its contents.
Images
- Click the tab on which you want to add the image.
- Drag the Icon Tool from the Tool folder in the data tree to the design pane.
- Double-click the Icon Tool widget to resize its boundaries and choose an image file to import. Note that the Icon Tool borders will expand or contract to fit the imported file.
Saving a Summary
When you have finished customizing your summary, do one of the following:
- Click Save As to save the custom summary as a separate entry in the Summary Manager Window.
- Click Save to overwrite the existing custom summary.
Remember to publish the summary if you want to activate it in IMSMA. Note that you can save separate summaries with the same name in the Summary Manager.
Summary Designer User Interface Buttons
The following table lists all of the GUI buttons avaiable in the Summary Designer window and their purposes:
| Desired Elements | Steps to Achieve |
|---|---|
| Tabs | |
| Move a tab to the left or right of other tabs | Click a tab, and then click the |
| Add a new tab | Click the |
| Delete a selected tab | Click the x by the tab name ( |
| Set page layout and size | Click Tab Setup. |
| Clear all elements from a selected tab | Click Clear Tab. |
| Elements | |
| Delete selected elements from a selected tab | Click Clear. |
| Align selected elements | Click Align. |
| Modify the properties of a selected element | Click Properties. |
| Clear all elements from all tabs | Click Clear All Tabs. |
| General | |
| Undo or redo previous actions | Click the Undo or Redo buttons. |
| Save your changes to the summary | Click Save. |
| Save your summary as new | Click Save As. |
| Print and preview a summary | Click Preview. |
| Exit the Summary Designer | Click Close. |
| |||||