Difference between revisions of "Publish a Data Entry Form Template"
From IMSMA Wiki
| Line 47: | Line 47: | ||
# Data Entry Form name | # Data Entry Form name | ||
# Organisation }} | # Organisation }} | ||
| − | <li> The Publish Data Entry Form Template function will | + | <li> The Publish Data Entry Form Template function will continue with first checking if all multi-select options exist in the database.<br/> |
| − | <br/>[[Image:Missing MS options.png|600px|center]]<br/> | + | <br/>[[Image:Missing MS options.png|600px|center]] |
| + | <div align="center"> | ||
| + | ''Click on the button Show details and exactly which field is missing what will be shown</div><br/> | ||
| + | <li>The next check is if all the '''[[Reconcile CDFs When Publishing a Data Entry Form | CDFs in the template exists]]''' in the database. | ||
</ol> | </ol> | ||
{{NavBox HowTo Data Entry Forms}} | {{NavBox HowTo Data Entry Forms}} | ||
[[Category:NAA]] | [[Category:NAA]] | ||
Latest revision as of 16:37, 19 March 2019
Good practice
- By adding a Page header and Page footer on each page, fields are prevented from drifting upwards when editing a published template again.
- Verify in the Logical tree that only 1 item is used.
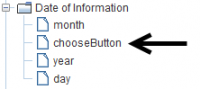
Choose button is an indication that the widget is old
- Verify in the Logical tree that no widgets are old which may cause problems.
- Save the template before Publishing.

Publish a Data Entry Form template
Publishing a Data Entry Form template makes the template available to other IMSMA users for data entry.
- Click the Publish button in the Data Entry Form template designer window.
- Enter a name for the report in the Data Entry Form Name field. The Data Entry Form Name is a required value. When entering a Data Entry Form name, note that:
- The name can be no longer than 38 characters.
- The name can contain special characters.


| |
If you enter a name used by an already published Data Entry Form template, the existing Data Entry Form template will be set to Inactive. |
- Enter the version number for the Data Entry Form in the Version field.
| |
The version number is not required. If you do not enter a version, IMSMA will assign a version of “1.0” to the Data Entry Form template. |
- Click the
 button to select an organisation. Note that in order to publish the Data Entry Form, it must be associated with an organisation.
 - The Organisation Selection window displays.
- From the Organisation Selection window:
- Click the row for the organisation that you would like to select as being the report owner.
- Click the OK button.
- The selected organisation’s name displays in the Organisation field.
- Click the Publish button.
- A message displays indicating the form was published successfully. If a Data Entry Form template exists with the same name, the existing template will be marked as inactive. Data Entry Forms using the now inactive template can still be viewed from the Location Summary or Item Summary windows.
- Data Entry Form name
- Organisation
- The Publish Data Entry Form Template function will continue with first checking if all multi-select options exist in the database.
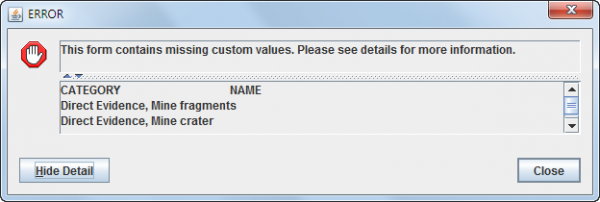 Click on the button Show details and exactly which field is missing what will be shown
- The next check is if all the CDFs in the template exists in the database.
| |
The Organisation IMSMA is normally used for indicating that the Data Entry Form template is general i.e. not a special made template for one organisation. |
| |
The following information is mandatory:
|

| |||||||||||||||||||||||||