Importing and Exporting Data with IMSMANG
IMSMA allows you to import and export various types of data, including map files, auxiliary data files, geospatial points, translations, and data entry forms. The sections below describe how and from where you can import/export data in IMSMA.
Map Data
Importing Map Data
To import an IMSMA map:
- From the File menu, select Import.
- From the Import menu, select Map.
- The Map Manager window displays.
- Navigate to the location of the .mxd file that you would like to import.
- Select the .mxd file.
- Click the Import button.
- A message stating that the map import was successful displays.
Exporting Map Data
The export map feature allows you to save a copy of the map extent either to an .apm format so that it can be imported into ArcPad for more advanced geoprocessing, or to a .pdf file as an un-editable visual snapshot.
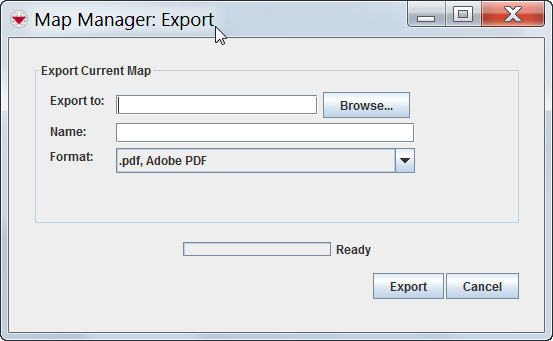
Map Manager Export window
Exporting Map Data For Use in ArcPad
To export the IMSMA map extent for use in ArcPad for more advanced geoprocessing:
- From the File menu, select Export.
- From the Export menu, select Map.
- The Map Manager: Export window displays.
- Enter the file name in the Name field.
- Select the .apm, ESRI Arc Pad Map option from the Format menu.
- Click the Browse button.
- Navigate to the directory where you would like to save a copy of the map.
- Click the Open button.
- Click the Export button.
- The map is saved in .apm format. The Map Export Complete window displays.
- Click the OK button.
- The Map Export window closes.
Exporting Map Data as a PDF File
To export the map in a .pdf format:
- From the File menu, select Export.
- From the Export menu, select Map.
- The Map Manager: Export window displays.
- Enter the file name in the Name field.
- Select the .pdf, Adobe PDF option from the Format menu.
- Click the Browse button.
- Navigate to the directory where you would like to save a copy of the map.
- Click the Open button.
- Click the Export button.
- The map is saved in the .pdf format. The Map Export Complete window displays.
- Click the OK button.
- The Map Export window closes.
Geospatial Data
| |
Find information on how to import geospatial data from excel and shapefile. |
Auxiliary Data
The XLS Import feature allows you to import field report data or auxiliary data (organisations, explosive ordnance, places, and country structure levels) into IMSMA using a Microsoft Excel file. This allows mine action personnel without IMSMA access to collect data in a format that can be entered into the system. The XLS Import feature also aids in data migration activities.
To import auxiliary data or field report data using an XLS file:
- From the File menu, select Import.
- From the Export menu, select XLS File.
- The XLS Import window displays (XLS Import window).
- Click the Browse button next to the Import Ordering File field.
- The Open window displays.
- From the Open window:
- Navigate to the directory where the file that you would like to import is located.
- Select the file name.
- Click the Open button.
- In the XLS Import window, the location of the XLS file is displayed in the Processing Directory section of the window. The location of the import mapping files is displayed in the Import Data Directory section.
- Click the Import button.
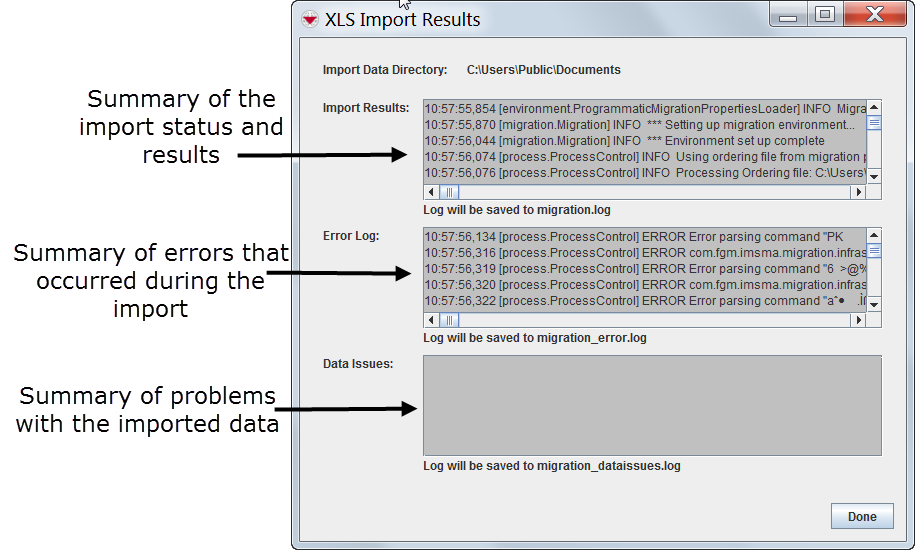
- The Import Results window displays with the contents of the migration.log, migration_errors.log, and migration_dataissues.log (XLS/CSV Import Results window). In addition, log files are generated and can be found in the IMSMA_HOME\migration directory.
- Verify that the import was successful, and click the Done button.
XLS Import window
XLS/CSV Import Results window
Translations
See Considerations for Language and Translations.
Field Reports
| How To |
|---|


