 |
To approve Data Entry Forms, your IMSMANG user account must belong to a User Role that has Data Entry Form Approval permission. Contact your IMSMANG Administrator if you have questions on permissions.
|
From the Workbench window, you can approve a single Data Entry Form or multiple Data Entry Forms at one time.
To approve Data Entry Forms from the Workbench:
- From the Data Entry menu, select Data Entry Forms.
- From the Data Entry Forms menu, select Workbench.
- The Workbench window displays.
- Locate the row associated with the Data Entry Form you want to approve and determine if the report is ready to be approved. See the following table for additional information.
| |
The Import Issues column is not being updated in version 6.0. It may be added again in version 6.1
|
| Determining if a Data Entry Form Can Be Approved
|
| If you see this…
|
It means…
|
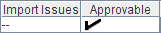 |
The Data Entry Form can be approved.
- Continue to step 4 in this section to approve the Data Entry Form.
|
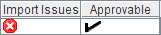
 |
The Data Entry Form cannot be approved.
- Resolve the incomplete reconciliation on the Reconciliation tab of the Data Entry Form Editor window. See the Data Entry Forms – Reconciling Items for instructions.
- Continue to step 4 in this section to approve the Data Entry Form.
|
 |
The Data Entry Form cannot be approved.
- Resolve the import issue on the Import Issues tab of the Data Entry Form Editor window.
- Check the All Import Issues have been resolved checkbox on the Import Issues tab and click the Save button.
- Continue to step 4 in this section to approve the Data Entry Form.
|
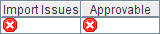 |
The Data Entry Form cannot be approved.
- Resolve the incomplete reconciliation on the Reconciliation tab of the Data Entry Form Editor window. See the Data Entry Forms – Reconciling Items for instructions.
- Resolve the import issue on the Import Issues tab of the Data Entry Form Editor window.
- Check the All Import Issues have been resolved checkbox on the Import Issues tab and click the Save button.
- Continue to step 4 in this section to approve the Data Entry Form.
|
- Click the row associated with the Data Entry Form you want to approve.
| |
To select multiple item records that are listed one after another, hold down the [Shift] key and click the range of rows for the records that you would like to select.
To select multiple item records that are not listed after another, hold down the [Ctrl] key and click the rows for the records that you would like to select.
To deselect an item record’s row, hold down the [Ctrl] key and click the row that you would like to deselect.
|
- Click the Approve button.
- The Approval Results window displays.
Reports that were not approved appear in the Non-Approved Data Entry Forms section of the Approval Results window. The Non-Approval column lists the reasons they were not approved. Possible reasons include Reconciliation Incomplete, Import Error, and Unknown Error.
| |
In order to approve a Data Entry Form, you should fill in the mandatory fields, which in case of Inspiration templates are Form ID, Object ID and Date of information
|
Data Entry Forms that were approved appear in the Approved Data Entry Forms section of window. The Approval Date column lists the date and time the reports were approved.
- Click the Done button.
- If a Data Entry Form was not approved,
- Double-click the row associated with the unapproved Data Entry Form in the Workbench window.
- The Data Entry Form Editor window displays.
- Resolve the error on the Reconciliation tab if applicable. See Data Entry Forms – Reconciling Items for additional information.
- Resolve the error on the Import Issues tab if applicable. When complete, check the All Import Issues have been resolved checkbox.
- Click the Approve button.
- The Information window displays confirming the Data Entry Form was approved.
