Difference between revisions of "Export Auxiliary Data"
From IMSMA Wiki
| Line 3: | Line 3: | ||
|} | |} | ||
| − | <p>Auxiliary data include country structure areas, ordnance, organisations, and places. By | + | <p>Auxiliary data include country structure areas, ordnance, organisations, and places. By exporting auxiliary data, users can transfer them between systems.</p> |
| − | <p>To export country structure areas, explosive ordnance, organisations, or places:</p> | + | <p>To export country structure areas, explosive ordnance, organisations, or places you must first create a [[Add a Search Definition|'''search''']] on the data you want to export. Once this is done:</p> |
<ol> | <ol> | ||
| − | <li>From the ''' | + | <li>From the '''Search Results''' window, click the '''Export''' button.</li> |
| − | <li> | + | <li>In the '''Export Options''' window:</li> |
| − | + | <ol type = "a"> | |
| − | <li> | + | <li>choose if you want to export as text or XML.</li> |
| + | <li>choose if you want to include colum headings.</li> | ||
| + | <li>pick the colums you want to include or exclude from the colum picker frame.</li> | ||
| + | </ol> | ||
</ol> | </ol> | ||
| Line 17: | Line 20: | ||
</div> | </div> | ||
| − | <ol start=" | + | <ol start="3"> |
| − | + | <li>Click OK.</li> | |
| − | |||
| − | |||
| − | |||
| − | <li>Click | ||
:The Save window displays. | :The Save window displays. | ||
<li>From the Save window:</li> | <li>From the Save window:</li> | ||
| Line 29: | Line 28: | ||
<li>Enter the name prefix for the files in the '''File Name''' field.</li> | <li>Enter the name prefix for the files in the '''File Name''' field.</li> | ||
<li>Click the '''Save''' button.</li> | <li>Click the '''Save''' button.</li> | ||
| − | :The .XML files for the auxiliary data are saved to the file and directory that you specified. When the export has completed, the Export Complete window displays. | + | :The .XML or .txt files for the auxiliary data are saved to the file and directory that you specified. When the export has completed, the Export Complete window displays. |
</ol> | </ol> | ||
<li>Click the '''OK''' button.</li> | <li>Click the '''OK''' button.</li> | ||
| − | :The Export Complete window closes | + | :The Export Complete window closes. |
</ol> | </ol> | ||
{{NavBox HowTo Import and Export}} | {{NavBox HowTo Import and Export}} | ||
Revision as of 13:12, 20 September 2013
| To export country structure areas, explosive ordnance, organisation, or place data, you must have the Auxiliary Data Export permission. |
Auxiliary data include country structure areas, ordnance, organisations, and places. By exporting auxiliary data, users can transfer them between systems.
To export country structure areas, explosive ordnance, organisations, or places you must first create a search on the data you want to export. Once this is done:
- From the Search Results window, click the Export button.
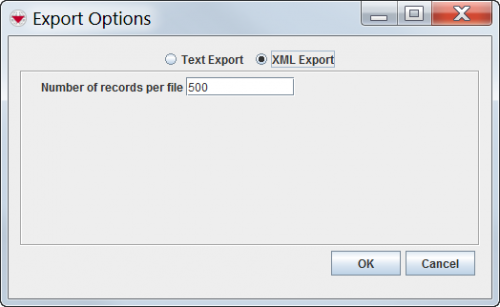
- In the Export Options window:
- choose if you want to export as text or XML.
- choose if you want to include colum headings.
- pick the colums you want to include or exclude from the colum picker frame.
Auxiliary Data Export Window
- Click OK.
- The Save window displays.
- From the Save window:
- Navigate to the directory where you would like to save the files.
- Enter the name prefix for the files in the File Name field.
- Click the Save button.
- The .XML or .txt files for the auxiliary data are saved to the file and directory that you specified. When the export has completed, the Export Complete window displays.
- Click the OK button.
- The Export Complete window closes.
