|
|
| (9 intermediate revisions by 4 users not shown) |
| Line 1: |
Line 1: |
| − | <table cellspacing="5" cellpadding="0" style="float: right; clear: right; color: black; background: #f9f9f9; border: 1px solid #aaa; width: 22em; margin: 0 0 1.0em 1.0em; padding: 0.2em; border-spacing: 0.4em 0; text-align: center; line-height: 1.4em; font-size: 88%; background-color: #f5faff; font-size: 90%; width: auto; line-height: 1.6em; width:150px;;;" class="vertical-navbox nowraplinks">
| + | The Data Inventory Manager window allows you to organise item attributes into meaningful groupings, or ''data categories''. |
| − | <th style="padding: 0.2em 0.4em 0.2em; font-size: 145%; line-height: 1.2em; font-weight: bold; background-color: #9aa8b5; font-size: 125%" class="">Related Topics</th>
| |
| − | <tr>
| |
| − | <td style="padding-top: 0.2em; font-weight: bold; background-color: #cee0f2" class="">How To information</td>
| |
| − | </tr>
| |
| − | <tr>
| |
| − | <td style="padding-bottom: 0.2em; text-align: left">
| |
| − | [[Data Categories]]<br />
| |
| − | [[HowTo: View Item Attributes within Data | View Item Attributes within Data ]]<br />
| |
| − | [[HowTo: Change a Data Category Name| Change an Item Category Name]]<br />
| |
| − | [[HowTo: Remove a Data Category| Remove a Data Category]]<br />
| |
| − | [[HowTo: Move Item Attributes into a Data Category| Move Item Attributes into a Data Category]]<br />
| |
| − | <br />
| |
| − | </td>
| |
| − | </tr>
| |
| − | <tr>
| |
| − | <td style="padding-top: 0.2em; font-weight: bold; background-color: #cee0f2" class="">IMSMA Topics</td>
| |
| − | </tr>
| |
| − | <tr>
| |
| − | <td style="padding-bottom: 0.2em; text-align: left">
| |
| − | [[HowTo:Filter Item Attributes| Filter Item Attributes]]<br />
| |
| − | [[Customed Defined Fields (CDF)]]<br />
| |
| − | [[Translating Data Elements]]<br />
| |
| − | </td>
| |
| − | </tr>
| |
| | | | |
| − | </table>
| + | The Data Inventory Manager window has two panes. The pane on the left displays a list of all items and data categories. |
| | + | The pane on the right displays the item attributes in the selected item or data category on the left. |
| | + | These data categories will also display in |
| | + | * [[Access the Data Entry Form Template Designer Window|Data Entry Form Template Designer window]] |
| | + | * [[Summary Templates | Summary Template Designer window]] |
| | + | * [[Select Display Columns | Column Picker windows]]. |
| | | | |
| − | The Data Inventory Manager window allows you to organise item attributes into meaningful groupings, or ''data categories''. These data categories will also display in the Field Report Template Designer window.
| + | [[Image:UserManual_DataInventoryManagerWindow.png|center|440px|''Data Inventory Manager Window'']] |
| | + | <div align="center"> |
| | + | ''Data Inventory Manager Window'' |
| | + | </div> |
| | | | |
| − | ===How To: Add a Data Category===
| + | {{NavBox HowTo Data Elements}} |
| − | To add a data category:
| + | [[Category:NAA]] |
| − | <ol>
| |
| − | <li>From the left pane of the Data Inventory Manager window, select the item to which you would like to add a category.</li>
| |
| − | <li>From the left pane of the Data Inventory Manager window, click the [[File:Add.png|20px|<span title=""></span>]] button.</li>
| |
| − | ::The Add Category window displays.
| |
| − | <li>Enter the name of the category in the '''Name''' field.</li>
| |
| − | <li>Click the '''Save''' button.</li>
| |
| − | | |
| − | | |
| − | {| class="wikitable"
| |
| − | |-
| |
| − | | [[File:LightBulb.png|20px|<span title=""></span>]] You can also add a new category by selecting the item attribute that you would like to move to a category from the right pane and clicking the [[File:Move.png|20px|<span title=""></span>]] button.
| |
| − | |}
| |
| − | | |
| − | | |
| − | [[Category: Administering IMSMA]] [[Category: Data Inventory Manager]] | |
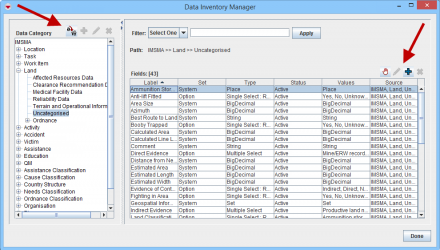
The Data Inventory Manager window allows you to organise item attributes into meaningful groupings, or data categories.
The Data Inventory Manager window has two panes. The pane on the left displays a list of all items and data categories.
The pane on the right displays the item attributes in the selected item or data category on the left.
These data categories will also display in
