Difference between revisions of "Import a Data Entry Form from a xml File"
(Created page with "<p>To import a field report from an MaXML file to the Workbench:</p> <ol> <li>From the File menu, select '''Import'''.</li> <li>From the Import menu, select '''Field Reports''...") |
|||
| Line 1: | Line 1: | ||
<p>To import a field report from an MaXML file to the Workbench:</p> | <p>To import a field report from an MaXML file to the Workbench:</p> | ||
<ol> | <ol> | ||
| − | <li>From the | + | <li>From the Workbench window, click the [[Image:ImportIcon.png]] button.</li> |
| − | |||
:The Import Options window displays ([[:Image:ImportOptions.png|Import Options]]). | :The Import Options window displays ([[:Image:ImportOptions.png|Import Options]]). | ||
</ol> | </ol> | ||
| Line 11: | Line 10: | ||
</div> | </div> | ||
| − | <ol start=" | + | <ol start="2"> |
<li>Select the '''Import MaXML (Standard Field Reports)''' option.</li> | <li>Select the '''Import MaXML (Standard Field Reports)''' option.</li> | ||
Revision as of 22:16, 14 December 2012
To import a field report from an MaXML file to the Workbench:
- From the Workbench window, click the File:ImportIcon.png button.
- The Import Options window displays (Import Options).
Import Options window
- Select the Import MaXML (Standard Field Reports) option.
- Click the OK button.
- The Field Report Import Options window displays.
- Click the Browse button.
- The Open window displays.
- From the Open window:
- Navigate to the directory where the file that you would like to import is located.
- Select the file name.
- Click the Open button.
- In the Field Report Import window, the number of field reports and the number of objects associated with the reports are displayed in the XML Summary section of the window. The contents of the file are displayed in the Raw XML View section(Field Report Import window).
- Click the Import button.
- The Field Report Import Options window displays (Field Report Import Options).
- In the Field Report Import Options window, select one of the options listed in Table 52.
- If you do not want to import the field reports, click the Cancel button.
Field Report Import window
Field Report Import Options window
| Table 52. Description of Import Options | |
| If you choose to… | The field reports... |
| Approve all field reports | With no import errors and complete reconciliation are imported and marked as Approved. With import errors and/or incomplete reconciliation are imported, marked as Needs Approval, and added to the Workbench. |
| Use approval data in the Field Reports | That have been previously approved and unapproved are imported and marked as Approved. That have not been approved are imported, marked as Needs Approval, and are added to the Workbench. |
| Import only | Are imported, marked as Needs Approval, and added to the Workbench. |
- Click the OK button.
- The Information window displays a message stating that the field report import is complete.
- Click the Close button.
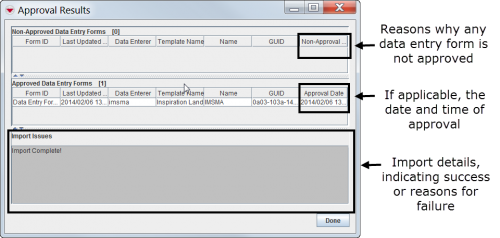
- If you chose the Approve all field reports option or the Use approval data in the Field Reports option, the Approval Results window displays (Approval Results).
Approval Results Window
Field reports that were approved appear in the Approved Field Reports section of the Approval Results window. The Approval Date column lists the date and time the reports were approved.
Reports that were not approved appear in the Non-Approved Field Reports section. The Non-Approval column lists the reasons they were not approved. Possible reasons include Reconciliation Incomplete, Import Error, and Unknown Error.
- Click the Done button.
- If a field report was not approved, open the Workbench window and double-click the row associated with the unapproved field report.
- The Field Report Editor window displays.
- Resolve the error on the Reconciliation tab if applicable. See the Field reports – Reconciling Items section for additional information.
- Resolve the error on the Import Issues tab if applicable. When complete, check the All Import Issues have been resolved checkbox.
- Click the Approve button.
- The Information window displays confirming the field report was approved.
- If you chose the Import Only option, the Field Report Import Results window displays (Field Report Import Results).
Figure 184. Field Report Import Results Window
The Imported Items section of the window lists the items that were imported. Any errors that occurred during the import are noted in the Error Log section of the window. You can save the error log to a file by clicking the Save Log button. You can also view import errors on the Import Issues tab of the Field Report Editor window.
- Click the Done button.
- The imported field reports will be listed in the Workbench. You will need to reconcile the item records in the field reports.

