Difference between revisions of "Add Custom Defined Fields"
From IMSMA Wiki
(Version 6.0) |
(Version 6.0) |
||
| Line 23: | Line 23: | ||
{| class="wikitable" | {| class="wikitable" | ||
| − | ! colspan="2" | | + | ! colspan="2" | Data Types for Custom Defined Fields |
|- | |- | ||
! Data Type | ! Data Type | ||
Revision as of 16:05, 27 February 2014
| |
Custom defined fields must have a unique combination of item, label, and data type. |
To add a custom defined field:
- From the Customisation menu, select Data Inventory Manager.
- The Data Inventory Manager window displays.
- From the left pane of the Data Inventory Manager window, select the item under the data category to which you would like to add a CDF.
- From the right pane of the Data Inventory Manager window, click the
 button.
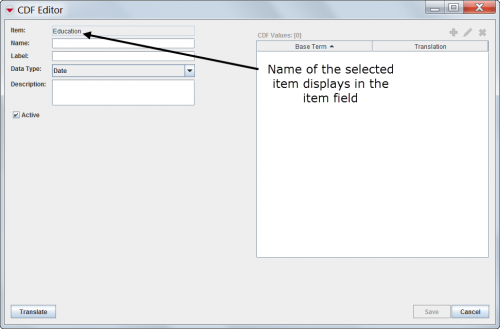
 - The CDF Editor window displays.
CDF Editor Window
- Enter a name in the Name field. The name should be no longer than 60 characters and should not contain periods (.), underscores (_), or capital letters. In addition it cannot start with a digit.
- Enter a label in the Label field. The label is the default custom defined field’s name that the user will see in the Data Entry Form Manager window.
- Select the data type for the custom defined field from the Data Type list.
| Data Types for Custom Defined Fields | |
|---|---|
| Data Type | Description and Comments |
| Text Field | ≤250 characters |
| Date | Month, day, year |
| Number | ≤15 decimal points |
| Organisation | Allows the user to select organisational data |
| Place | Allows the user to select place data |
| Country Structure | Allows the user to select country structure level data |
| Multiple Select | Allows the user to select zero or more values provided in the CDF Values field |
| Single Select | Allows the user to select one value from provided values in the CDF Values field |
- Enter a description for the custom defined field in the Description field.
- If the CDF is active, check the Active checkbox.
- If you selected the Multiple Select or Single Select option, click the
 button.
 - The Add window displays.
- Enter the value for the list in the Value field.
| |
When entering values for lists, be sure to:
|
- Do one of the following:
- If you would like to save the value and enter additional values, click the Save button.
- If you have completed entering the values for the list, click the Done button.
- If you selected the Single Select option, chose an option from the Selection Display field to display the CDF as either a list of radio buttons or as a combo box.
| |
You can also translate the label and, if applicable, list option values by clicking the Translate button at this time. See Translate Custom Defined Field Labels for more information. |
- Do one of the following:
- To save the custom defined field and close the CDF Editor window, click the Save button.
- If the custom defined field information is successfully saved, the CDF Editor window closes and the custom defined field is listed in the Data Inventory Manager window. After the custom defined field is added, it becomes available from the folder of the data category in which it was created in the Data Entry Form Manager.
| |
If you would like to add the custom defined field to existing data entry form templates, you will need to update and republish the data entry form template. |
- To discard the custom defined field and close the CDF Editor window, click the Cancel button.
| ||||||||||||||||
