Difference between revisions of "Export Data Entry Form from Workbench"
From IMSMA Wiki
| (13 intermediate revisions by 3 users not shown) | |||
| Line 1: | Line 1: | ||
| − | Exporting a Data Entry Form from the Workbench allows you to export | + | Exporting a Data Entry Form from the Workbench allows you to export '''non-approved''' Data Entry Forms to a xml file.<ol> |
| − | + | <li>Select one or more Data Entry Forms and click the [[Image:FieldReportExportIcon.png]] button. | |
| − | < | + | [[Image:WB Export xml.png|600px|center]] |
| − | <li> | + | <div align="center"> '' Workbench window''</div></li> |
| − | + | <li>The Export Options window displays.</li> | |
| − | <li> | + | <li>If appropiate, change number of records per file.</li> |
| − | <li>Click | + | <li>If you do not want to include the attachments, check ''Exclude Data Entry Form Attachments data on maXML export''.</li> |
| − | + | <li>Click '''OK'''. | |
| − | < | + | [[Image:ExportOptionsWindow.png|600px|center]] |
| − | <li>Specify the directory to which you would like to export the file | + | <div align="center"> '' Export Options window''</div></li> |
| − | + | <li>Specify the directory to which you would like to export the file and the name of the file.</li> | |
| − | <li>Click the ''' | + | <li>Click the '''Save''' button.</li> |
| − | + | <li>The Export finished window displays.</li> | |
| − | + | <li>Click the '''OK''' button. | |
| − | + | [[Image:Xml Export confirm.png|500px|center]] | |
| − | <li>Click the ''' | + | <div align="center"> '' Export confirmation window''</div></li></ol> |
| − | : | ||
| − | < | ||
| − | |||
| − | </ol> | ||
| − | {{NavBox HowTo | + | {{note| In the [[Search for Exporting Data Entry Form]] you may use more criteria to select which Data Entry Forms you would like to export than in the Workbench.}} |
| + | |||
| + | {{NavBox HowTo Reconcile and Approve}} | ||
| + | |||
| + | [[Category:NAA]] | ||
Latest revision as of 08:08, 18 March 2019
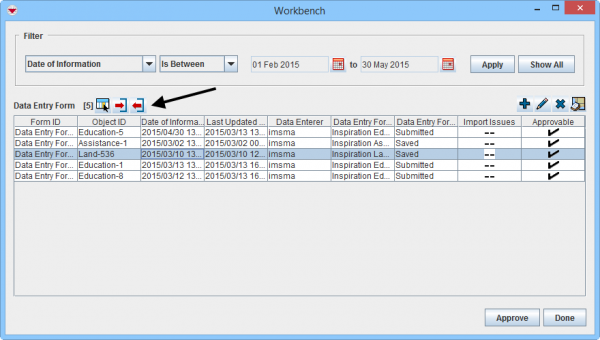
Exporting a Data Entry Form from the Workbench allows you to export non-approved Data Entry Forms to a xml file.- Select one or more Data Entry Forms and click the
 button.
Workbench window
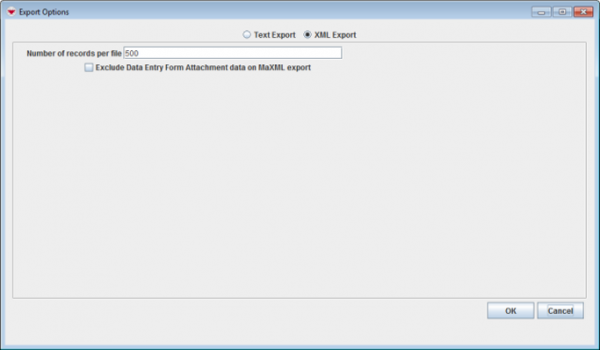
 - The Export Options window displays.
- If appropiate, change number of records per file.
- If you do not want to include the attachments, check Exclude Data Entry Form Attachments data on maXML export.
- Click OK.
Export Options window
- Specify the directory to which you would like to export the file and the name of the file.
- Click the Save button.
- The Export finished window displays.
- Click the OK button.
Export confirmation window
| |
In the Search for Exporting Data Entry Form you may use more criteria to select which Data Entry Forms you would like to export than in the Workbench. |
| |||||||||||||||||||||


