Difference between revisions of "Complete and Manage Data Entry Forms"
From IMSMA Wiki
(Version 6.0) |
|||
| (9 intermediate revisions by 3 users not shown) | |||
| Line 22: | Line 22: | ||
Examples include: | Examples include: | ||
<ol> | <ol> | ||
| − | <li> Click [[Image: | + | <li> Click [[Image:CSA.png|25px]] to select a Country Structure node. </li> |
| − | :The selected | + | :The selected Country Structure name displays on the Data Entry Form |
| − | <li> Click [[Image:Select and Organisation.png|25px | + | <li> Click [[Image:Select and Organisation.png|25px]] to select an organisation. </li> |
:The selected organisation displays on the Data Entry Form. | :The selected organisation displays on the Data Entry Form. | ||
<li> Click [[Image:Select_a_Place.png|25px|]] to select a place. </li> | <li> Click [[Image:Select_a_Place.png|25px|]] to select a place. </li> | ||
| − | <li> Click [[Image: | + | <li> Click [[Image:FieldTemplateIcon.png|25px|]] to select an ordnance. </li> |
:The selected ordnances display on the Data Entry Form. | :The selected ordnances display on the Data Entry Form. | ||
<ol type="a"> | <ol type="a"> | ||
| Line 39: | Line 39: | ||
<ol> | <ol> | ||
| − | <li>Click [[Image: | + | <li>Click [[Image:FieldTemplateIcon.png|25px|]] above the Points table to open the Point dialog box.</li> |
[[Image:Points_Table.png|500px|]] | [[Image:Points_Table.png|500px|]] | ||
<li>Enter a unique numeric point number in the '''Point No''' field.</li> | <li>Enter a unique numeric point number in the '''Point No''' field.</li> | ||
<li>Enter a unique alphanumeric local identifier in the '''Point ID''' field.</li> | <li>Enter a unique alphanumeric local identifier in the '''Point ID''' field.</li> | ||
| − | <li>Enter coordinates according | + | <li>Enter coordinates according in the chosen coordinate system and format.</li> |
<li>Click '''OK'''.</li> | <li>Click '''OK'''.</li> | ||
:The point displays in the Points table. | :The point displays in the Points table. | ||
| − | [[Image:Point_Dialog_Box.png| | + | [[Image:Point_Dialog_Box.png|340px|''Point Dialog Box'']] |
| − | <div align=" | + | <div align="left"> |
''Point Dialog Box'' | ''Point Dialog Box'' | ||
</div> | </div> | ||
| Line 54: | Line 54: | ||
===Entering a Relative Geospatial Point===__NOEDITSECTION__ | ===Entering a Relative Geospatial Point===__NOEDITSECTION__ | ||
<ol> | <ol> | ||
| − | <li>Click [[Image: | + | <li>Click [[Image:FieldTemplateIcon.png|25px|]] above the Points table to open the Point dialog box.</li> |
<li>Enter a unique numeric point number in the '''Point No''' field.</li> | <li>Enter a unique numeric point number in the '''Point No''' field.</li> | ||
<li>Enter a unique alphanumeric local identifier in the '''Point ID''' field.</li> | <li>Enter a unique alphanumeric local identifier in the '''Point ID''' field.</li> | ||
| Line 67: | Line 67: | ||
<ol> | <ol> | ||
| − | <li>Click [[Image: | + | <li>Click [[Image:FieldTemplateIcon.png|25px|]] above the Polygons table to open the Polygon/Polyline Editor dialog box.</li> |
| + | [[Image:Polygon_Table.png|500px|]] | ||
<li>Enter a unique alphanumeric local identifier in the '''Polygon/Polyline Shape ID''' field.</li> | <li>Enter a unique alphanumeric local identifier in the '''Polygon/Polyline Shape ID''' field.</li> | ||
<li>Select either the '''Polygon or Polyline''' option.</li> | <li>Select either the '''Polygon or Polyline''' option.</li> | ||
| Line 76: | Line 77: | ||
<ol start="4"> | <ol start="4"> | ||
<li>Select an option from the '''Polygon Property''' list if required. </li> | <li>Select an option from the '''Polygon Property''' list if required. </li> | ||
| − | <li>Click [[Image: | + | <li>Click [[Image:FieldTemplateIcon.png|25px|]] above the Polygon and Polyline Points table. </li> |
<li>Enter polygon/polyline points into the Point dialog box the same way as when adding an absolute geospatial point or a relative point.</li> | <li>Enter polygon/polyline points into the Point dialog box the same way as when adding an absolute geospatial point or a relative point.</li> | ||
</ol> | </ol> | ||
| Line 85: | Line 86: | ||
<li> Click '''OK''' in the Point dialog box. </li> | <li> Click '''OK''' in the Point dialog box. </li> | ||
:The point displays in the Polygon and Polyline Points table. | :The point displays in the Polygon and Polyline Points table. | ||
| + | [[Image:Polygon_Dialog_Box.png|440px|''Point Dialog Box'']] | ||
| + | <div align="left"> | ||
| + | ''Point Dialog Box'' | ||
| + | </div> | ||
<li> When each of the points has been added, click '''OK''' in the Polygon/Polyline Editor dialog box. </li> | <li> When each of the points has been added, click '''OK''' in the Polygon/Polyline Editor dialog box. </li> | ||
:The points display in the Polygons table. | :The points display in the Polygons table. | ||
| Line 92: | Line 97: | ||
<ol> | <ol> | ||
<li>Click '''Attach file''' at the bottom of the Data Entry Form Editor.</li> | <li>Click '''Attach file''' at the bottom of the Data Entry Form Editor.</li> | ||
| − | <li>Click '''Browse''' in the Attach file dialog box.</li> | + | [[Image:Attach_file.png|500px|]] |
| + | <li>Click '''Browse''' or '''Choose File''', depending on which browser you are using, in the Attach file dialog box.</li> | ||
<li>Choose a file, and then click '''Open'''.</li> | <li>Choose a file, and then click '''Open'''.</li> | ||
<li>Click '''Attach''' in the Attach file dialog box.</li> | <li>Click '''Attach''' in the Attach file dialog box.</li> | ||
:The file name of the attached file displays at the bottom of the Data Entry Form Editor. | :The file name of the attached file displays at the bottom of the Data Entry Form Editor. | ||
| + | [[Image:Attach_file_dialog_box.png]] | ||
| + | <div align="left"> | ||
| + | ''Attach File Dialog Box'' | ||
| + | </div> | ||
</ol> | </ol> | ||
| Line 101: | Line 111: | ||
<ol> | <ol> | ||
<li>Click '''Save As'''.</li> | <li>Click '''Save As'''.</li> | ||
| + | [[Image:Save_data_entry_form.png|500px|]] | ||
<li>Enter a unique file name in the '''Data Entry Form File Name''' field.</li> | <li>Enter a unique file name in the '''Data Entry Form File Name''' field.</li> | ||
<li>Click '''Save'''.</li> | <li>Click '''Save'''.</li> | ||
| Line 111: | Line 122: | ||
<li>Click '''Export'''.</li> | <li>Click '''Export'''.</li> | ||
:The Data Entry Forms no longer display on the Data Entry Forms tab. | :The Data Entry Forms no longer display on the Data Entry Forms tab. | ||
| + | [[Image:Data_Entry_Forms_tab.png|500px|]] | ||
</ol> | </ol> | ||
| Line 117: | Line 129: | ||
==Importing a Data Entry Form==__NOEDITSECTION__ | ==Importing a Data Entry Form==__NOEDITSECTION__ | ||
| − | {{note| You can also copy and paste a set of Data Entry Forms from | + | {{note| You can also copy and paste a set of Data Entry Forms templates (ffml files) from {{IMSMANG}} into the ''C:\IMSMARE\webapp\templates'' directory.}} |
<ol> | <ol> | ||
| Line 129: | Line 141: | ||
==Editing a Data Entry Form==__NOEDITSECTION__ | ==Editing a Data Entry Form==__NOEDITSECTION__ | ||
| − | {{warning| Ensure that the template used to complete the Data Entry Form is stored in the c:\IMSMARE\webapp\templates folder.}} | + | {{warning| Ensure that the template used to complete the Data Entry Form is stored in the ''c:\IMSMARE\webapp\templates'' folder.}} |
*Click the Data Entry Form on the Data Entry Forms tab. | *Click the Data Entry Form on the Data Entry Forms tab. | ||
| Line 136: | Line 148: | ||
<ol> | <ol> | ||
<li>Edit the values in numeric and alphanumeric fields.</li> | <li>Edit the values in numeric and alphanumeric fields.</li> | ||
| − | <li>Click [[File:FieldViewIcon.png|25px]] to edit auxiliary data, or click [[Image: | + | <li>Click [[File:FieldViewIcon.png|25px]] to edit auxiliary data, or click [[Image:EcksButton.png|25px|]] to delete auxiliary data.</li> |
</ol> | </ol> | ||
| Line 143: | Line 155: | ||
===Deleting an Attachment from a Data Entry Form===__NOEDITSECTION__ | ===Deleting an Attachment from a Data Entry Form===__NOEDITSECTION__ | ||
*Click '''X''' next to an attachment at the bottom of the Data Entry Form Editor. | *Click '''X''' next to an attachment at the bottom of the Data Entry Form Editor. | ||
| − | The attached file is removed and no longer displays | + | The attached file is removed and no longer displays. |
| + | |||
| + | [[Image:Remove_attachment.png|500px|]] | ||
===Saving Changes to a Data Entry Form===__NOEDITSECTION__ | ===Saving Changes to a Data Entry Form===__NOEDITSECTION__ | ||
| Line 151: | Line 165: | ||
:*Enter a unique file name in the '''Data Entry Form File Name''' field, and then click '''Save'''. | :*Enter a unique file name in the '''Data Entry Form File Name''' field, and then click '''Save'''. | ||
::The new Data Entry Form displays on the Data Entry Forms tab. | ::The new Data Entry Form displays on the Data Entry Forms tab. | ||
| + | [[Image:Save_data_entry_form2.png|500px|]] | ||
==Deleting a Data Entry Form==__NOEDITSECTION__ | ==Deleting a Data Entry Form==__NOEDITSECTION__ | ||
| − | {{warning| Ensure that the template used to complete the Data Entry Form is stored in the c:\IMSMARE\webapp\templates folder.}} | + | {{warning| Ensure that the template used to complete the Data Entry Form is stored in the ''c:\IMSMARE\webapp\templates'' folder.}} |
<ol> | <ol> | ||
| Line 165: | Line 180: | ||
{{NavBox IMSMA Remote Entry}} | {{NavBox IMSMA Remote Entry}} | ||
| − | [[Category: | + | [[Category:NAA]] |
Latest revision as of 15:24, 26 May 2017
Completing a Data Entry Form
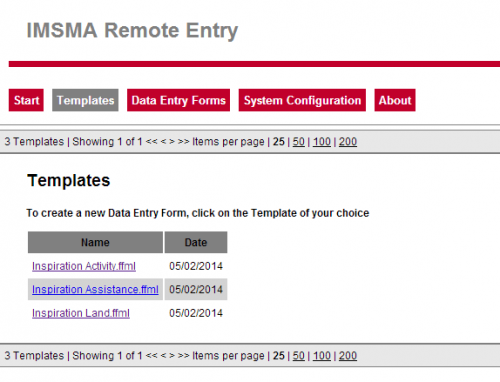
- Click a Data Entry Form template on the Templates tab.
Entering Data
- Enter alphanumeric values in the text fields.
- Enter numeric values in numeric fields.
| |
Use decimal (not comma) separators when entering data into number fields. |
Entering Auxiliary Data
Examples include:
- Click
 to select a Country Structure node.
 - The selected Country Structure name displays on the Data Entry Form
- Click
 to select an organisation.
 - The selected organisation displays on the Data Entry Form.
- Click
 to select a place.
 - Click
 to select an ordnance.
 - The selected ordnances display on the Data Entry Form.
- Enter a number in the Quantity column.
- Enter data in the other columns as necessary.
Entering Geospatial Data
| |
Enter only coordinates for absolute points. |
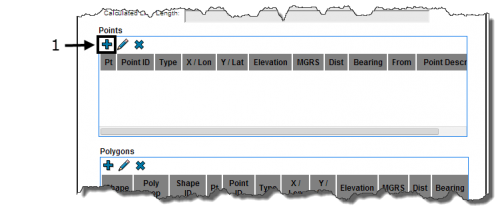
- Click
 above the Points table to open the Point dialog box.
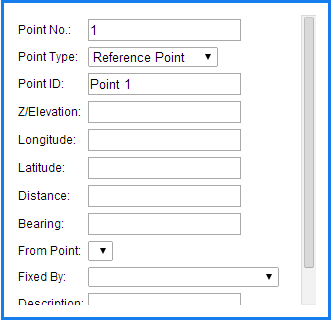
 - Enter a unique numeric point number in the Point No field.
- Enter a unique alphanumeric local identifier in the Point ID field.
- Enter coordinates according in the chosen coordinate system and format.
- Click OK.
- The point displays in the Points table.
Point Dialog Box
Entering a Relative Geospatial Point
- Click
 above the Points table to open the Point dialog box.
 - Enter a unique numeric point number in the Point No field.
- Enter a unique alphanumeric local identifier in the Point ID field.
- Enter the distance from another point in the Distance field.
- Enter the bearing in degrees (0 to 360) from another point in the Bearing field.
- Select the Point ID of a referenced point from the From Point list.
- Click OK.
- The entered point displays in the Points table.
Adding a Polygon or Polyline
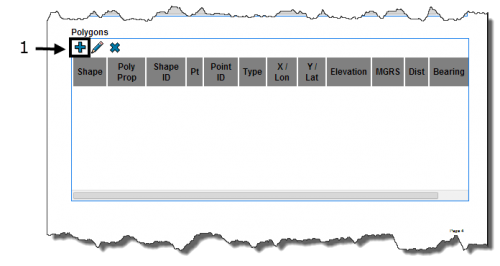
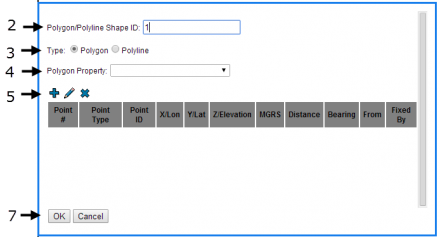
- Click
 above the Polygons table to open the Polygon/Polyline Editor dialog box.
 - Enter a unique alphanumeric local identifier in the Polygon/Polyline Shape ID field.
- Select either the Polygon or Polyline option.
| |
Selecting the wrong option (such as selecting Polygon and drawing a polyline) can cause mapping errors when a Data Entry Form is imported into IMSMANG. |
- Select an option from the Polygon Property list if required.
- Click
 above the Polygon and Polyline Points table.
 - Enter polygon/polyline points into the Point dialog box the same way as when adding an absolute geospatial point or a relative point.
| |
You can use an existing point from either the Points or Polygons table to create a relative polygon/polyline point. |
- Click OK in the Point dialog box.
- The point displays in the Polygon and Polyline Points table.
- When each of the points has been added, click OK in the Polygon/Polyline Editor dialog box.
- The points display in the Polygons table.
Point Dialog Box
Adding Attachments to a Data Entry Form
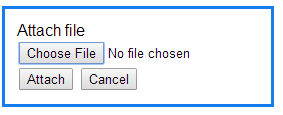
- Click Attach file at the bottom of the Data Entry Form Editor.
- Click Browse or Choose File, depending on which browser you are using, in the Attach file dialog box.
- Choose a file, and then click Open.
- Click Attach in the Attach file dialog box.
- The file name of the attached file displays at the bottom of the Data Entry Form Editor.
Attach File Dialog Box
Saving a Data Entry Form
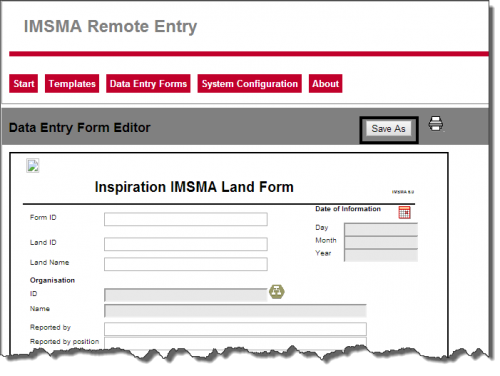
- Click Save As.
- Enter a unique file name in the Data Entry Form File Name field.
- Click Save.
- The Data Entry Form displays by file name and save date on the Data Entry Forms tab.
Exporting a Data Entry Form
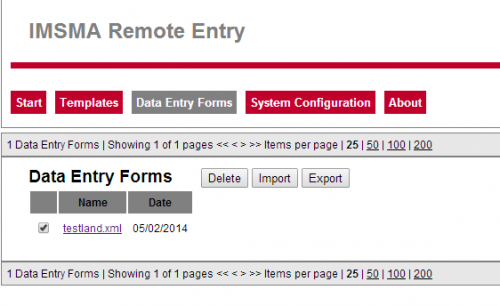
- Select the check box next to each Data Entry Form to export from the Data Entry Forms tab.
- Click Export.
- The Data Entry Forms no longer display on the Data Entry Forms tab.
| |
Locate the .zip file of exported Data Entry Forms in your export directory. This file will be emailed to your program’s headquarters, unzipped, and imported into IMSMANG. |
Importing a Data Entry Form
| |
You can also copy and paste a set of Data Entry Forms templates (ffml files) from IMSMANG into the C:\IMSMARE\webapp\templates directory. |
- Click Import on the Data Entry Forms tab.
- Click Browse to locate the Data Entry Form.
- Select the Data Entry Form, and then click Open.
- Click Import.
- The imported Data Entry Form displays on the Data Entry Forms tab by file name and import date.
| |
These instructions are for Internet Explorer Version 9 browser. Google Chrome browser users will see a Choose Files button instead of a Browse button. |
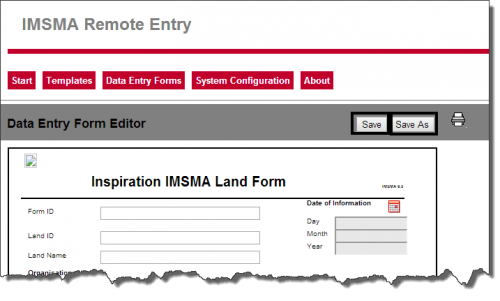
Editing a Data Entry Form
| |
Ensure that the template used to complete the Data Entry Form is stored in the c:\IMSMARE\webapp\templates folder. |
- Click the Data Entry Form on the Data Entry Forms tab.
Editing Data
- Edit the values in numeric and alphanumeric fields.
- Click
 to edit auxiliary data, or click
  to delete auxiliary data.
| |
Deleting a geospatial point that is referenced by another point will cause an error when viewing the Data Entry Form in IMSMANG. |
Deleting an Attachment from a Data Entry Form
- Click X next to an attachment at the bottom of the Data Entry Form Editor.
The attached file is removed and no longer displays.
Saving Changes to a Data Entry Form
- To overwrite the existing Data Entry Form, click Save.
- The updated Data Entry Form displays on the Data Entry Forms tab.
- To save a new Data Entry Form, click Save As.
- Enter a unique file name in the Data Entry Form File Name field, and then click Save.
- The new Data Entry Form displays on the Data Entry Forms tab.
Deleting a Data Entry Form
| |
Ensure that the template used to complete the Data Entry Form is stored in the c:\IMSMARE\webapp\templates folder. |
- Select the check box next to each Data Entry Form to delete from the Data Entry Forms tab.
- Click Delete.
- When prompted to confirm, click Delete.
- The selected Data Entry Forms are deleted from the home directory and no longer display on the Data Entry Forms tab.
