Difference between revisions of "Reconcile as New"
From IMSMA Wiki
| (17 intermediate revisions by 2 users not shown) | |||
| Line 1: | Line 1: | ||
| − | + | {{Note | This page '''ONLY''' applies when the Data Entry Form has been created via the ''Data Entry'' menu or the ''Add Data Entry Forms'' button in the Main Navigation toolbar.}} | |
| − | {{ | + | |
| − | + | {{Note | To do Data Entry and/or Submit/Approve Data Entry Forms, your {{IMSMANG}} user account must belong to a User Role that has permissions to do so. There are several different permissions e.g. ''Data Entry Form'' and ''Link''. Contact your {{IMSMANG}} Administrator if you have questions on permissions. }} | |
| − | + | ||
| − | | | + | <ol><li>From the Reconciliation tab of the Data Entry Form Editor window, select the row associated with the item you would like to assign to a Location. |
| − | }} | + | [[Image:Recon tab.png|600px|center]] |
| − | <ol> | + | <div align="center"> |
| − | <li>From the Reconciliation tab of the Data Entry Form Editor window, select the row associated with the item | + | '' Reconciliation Tab'' |
| + | </div></li> | ||
<li>Click the [[Image:ReconItemRecIcon.png]].</li> | <li>Click the [[Image:ReconItemRecIcon.png]].</li> | ||
| − | <li>When the Data Entry Form Reconciliation window displays, select the Reconcile as New option. Click the '''OK''' button.</li> | + | <li>When the Data Entry Form Reconciliation window displays, select the Reconcile as New option. Click the '''OK''' button. |
| − | + | [[Image:Recon options.png|500px|center]] | |
| − | <li>Filter the item list to display the desired location. Click the row for the location that you would like to assign to the item | + | <div align="center"> |
| + | '' Reconciliation Options'' | ||
| + | </div></li> | ||
| + | <li>The ''Pick Location'' window displays. | ||
| + | [[Image:fig55.png|center|500px|''Pick Location Window'']] | ||
| + | <div align="center"> | ||
| + | ''Pick Location Window'' | ||
| + | </div></li> | ||
| + | <li>Filter the item list to display the desired location. Click '''[[Filter Lists | here]]''' for help on how to filter lists. <li>Select the row for the location that you would like to assign to the item to.</li> | ||
<li>Click the '''Assign''' button.</li> | <li>Click the '''Assign''' button.</li> | ||
| − | + | <li>The location name displays in the Data Entry Form Editor window under Action/Object under the Reconciliation tab. | |
| − | < | + | [[Image:Recon tab Assigned Location.png|600px|center]] |
| − | + | <div align="center"> | |
| − | <li> | + | '' Reconciliation Tab'' |
| − | </ol> | + | </div></li> |
| + | <li>If appropriate, '''[[Link to Existing Item | Link]]''' to other items.</li> | ||
| + | <li>Verify that the Date of Information is correct. It should reflect the '''age''' of the information (not the date of data entry).</li> | ||
| + | <li>Save, Submit or Approve the Data Entry Form.</li></ol> | ||
| + | |||
| + | {{note| When reconciling an Education item, a new item will always be created. An Education item cannot be combined with existing Education items.}} | ||
| − | + | For more information on how to do data entry, see [[Use the Data Entry Form Editor Window]]. | |
{{NavBox HowTo Reconcile and Approve}} | {{NavBox HowTo Reconcile and Approve}} | ||
| − | [[Category: | + | [[Category:NAA]] |
Latest revision as of 10:30, 18 March 2019
| |
This page ONLY applies when the Data Entry Form has been created via the Data Entry menu or the Add Data Entry Forms button in the Main Navigation toolbar. |
| |
To do Data Entry and/or Submit/Approve Data Entry Forms, your IMSMANG user account must belong to a User Role that has permissions to do so. There are several different permissions e.g. Data Entry Form and Link. Contact your IMSMANG Administrator if you have questions on permissions. |
- From the Reconciliation tab of the Data Entry Form Editor window, select the row associated with the item you would like to assign to a Location.

Reconciliation Tab
- Click the
 .
. - When the Data Entry Form Reconciliation window displays, select the Reconcile as New option. Click the OK button.
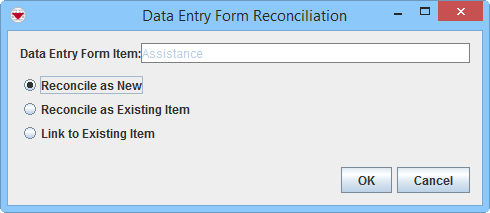
Reconciliation Options
- The Pick Location window displays.
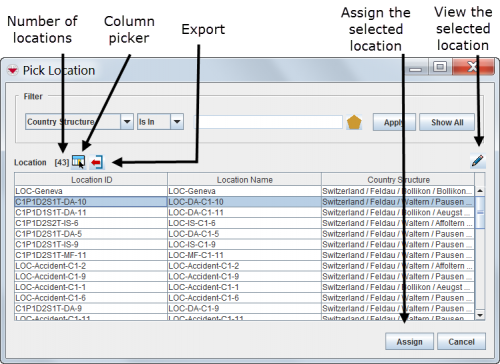
Pick Location Window
- Filter the item list to display the desired location. Click here for help on how to filter lists.
- Select the row for the location that you would like to assign to the item to.
- Click the Assign button.
- The location name displays in the Data Entry Form Editor window under Action/Object under the Reconciliation tab.

Reconciliation Tab
- If appropriate, Link to other items.
- Verify that the Date of Information is correct. It should reflect the age of the information (not the date of data entry).
- Save, Submit or Approve the Data Entry Form.


| |
When reconciling an Education item, a new item will always be created. An Education item cannot be combined with existing Education items. |
For more information on how to do data entry, see Use the Data Entry Form Editor Window.
| |||||||||||||||||||||