Difference between revisions of "Modify an iReport Template"
(→Adding a Parameter to an iReport Template) |
|||
| (42 intermediate revisions by 5 users not shown) | |||
| Line 1: | Line 1: | ||
| − | |||
{{TOC right}} | {{TOC right}} | ||
| − | {{ | + | {{Warning | Do not edit / overwrite the iReports templates that are included in the installation package. Use the '''''Save as''''' function and give the iReport template a '''new''' name.}} |
| − | | | ||
| − | |||
| − | |||
| − | |||
| − | |||
| − | |||
| − | |||
| − | |||
| − | |||
| − | == | + | ==Overview==__NOEDITSECTION__ |
| − | + | Once an iReport template has been created, there are many options for modifying the report template including adding new fields, creating variables, filtering the query results and many other options. This section covers the main customisations performed on iReport templates for use in {{IMSMANG}}. | |
| − | |||
| − | ====Option 1==== | + | ==Fields, Variables, and Parameters==__NOEDITSECTION__ |
| − | Using the Report Query dialogue, you can select the option to Get Fields from Datasource Provider, which will automatically add all fields from the selected datasource to the report template. You can then | + | ===Adding a Field to an iReport Template===__NOEDITSECTION__ |
| − | # Choose the Report Query button | + | <p>If you need to include a field that was not selected while using the Report Wizard, there are several options for including additional fields. |
| − | #:<div align="center">[[Image:IReport_ReportQueryButton.png|center| | + | |
| + | ====Option 1: Get fields from Datasource====__NOEDITSECTION__ | ||
| + | Using the Report Query dialogue, you can select the option to Get Fields from Datasource Provider, which will automatically add all fields from the selected datasource to the report template. You can then delete any unwanted fields from the report. {{Note| Make sure that the datasource selected in iReports corresponds to the data source for the report.}} To add fields from the Report Query dialogue: | ||
| + | # Choose the Report Query button. | ||
| + | #:<div align="center">[[Image:IReport_ReportQueryButton.png|center|500px|''Report Query Button'']]''iReport Report Query Button''</div> | ||
# From the Report Query Window, choose the '''Datasource Provider''' tab. | # From the Report Query Window, choose the '''Datasource Provider''' tab. | ||
#:[[Image:IReport_ReportQuery.png|center|400px|''Report Query Window'']] | #:[[Image:IReport_ReportQuery.png|center|400px|''Report Query Window'']] | ||
| Line 25: | Line 18: | ||
# Select the '''Get Fields From Datasource''' button. | # Select the '''Get Fields From Datasource''' button. | ||
#:[[Image:IReport ReportQuery Datasource1.png|center|500px|''Datasource Fields'']]<div align="center">''Datasource Fields''</div> | #:[[Image:IReport ReportQuery Datasource1.png|center|500px|''Datasource Fields'']]<div align="center">''Datasource Fields''</div> | ||
| − | # All fields will now be displayed. | + | # All fields will now be displayed. |
# Choose '''Ok''' to save the fields and return to the iReport Designer. | # Choose '''Ok''' to save the fields and return to the iReport Designer. | ||
| − | ====Option 2==== | + | ====Option 2: Copy and Paste====__NOEDITSECTION__ |
Alternatively, you can create a new report template using the Wizard and add the desired fields to the new report. Fields can then be copied and pasted from the new report to the original report. | Alternatively, you can create a new report template using the Wizard and add the desired fields to the new report. Fields can then be copied and pasted from the new report to the original report. | ||
| − | # Create a new report using the [[Create a Basic | + | # Create a new report using the [[Create a Basic iReport Template|iReport Wizard]] and the same data source |
# Select the desired fields and finish the report | # Select the desired fields and finish the report | ||
# Using the Report Inspector, navigate to the desired fields | # Using the Report Inspector, navigate to the desired fields | ||
| − | # Right click on the field and select copy | + | # Right click on the field and select copy |
#:[[Image:IReport Field Copy.png|center|250px|''Field Copy'']]<div align="center">''Field Copy''</div> | #:[[Image:IReport Field Copy.png|center|250px|''Field Copy'']]<div align="center">''Field Copy''</div> | ||
# Navigate to the original report with the missing fields | # Navigate to the original report with the missing fields | ||
| − | # Right-click on the fields tree in Report Inspector and choose '''paste''' | + | # Right-click on the fields tree in Report Inspector and choose '''paste''' |
| − | {{note | It is not recommended to | + | {{note | It is not recommended to use the "Add Field" option from the Report Inspector due to the complexity of adding the correct field attributes and properties.}} |
| − | ===Adding a Parameter to an iReport Template=== | + | ===Adding a Parameter to an iReport Template===__NOEDITSECTION__ |
| − | It is sometimes necessary to add a parameter to an iReport template. Usually parameters are used for transferring data from a main report to a subreport. Below are the steps to add a parameter to | + | It is sometimes necessary to add a parameter to an iReport template. Usually parameters are used for transferring data from a main report to a subreport. Below are the steps to add a parameter to an iReport Template. |
# From the Report Inspector, '''right click''' on the '''Parameter''' tree and choose '''Add Parameter'''. | # From the Report Inspector, '''right click''' on the '''Parameter''' tree and choose '''Add Parameter'''. | ||
#: [[Image:IReport AddParameter1.png|center|250px|''Add Parameter'']] | #: [[Image:IReport AddParameter1.png|center|250px|''Add Parameter'']] | ||
| − | # In the '''Properties''' pane, enter a parameter name (e.g. ItemGUID} and edit any other properties. | + | # In the '''Properties''' pane, enter a parameter name (e.g. ItemGUID} and edit any other properties. For example, if you do not want to use the parameter as a prompt, then deselect the '''Use as a prompt''' option. |
#: [[Image:IReport AddParameter2.png|center|250px|''Add Parameter'']] | #: [[Image:IReport AddParameter2.png|center|250px|''Add Parameter'']] | ||
| − | ===Adding a Variable to an iReport Template=== | + | ===Adding a Variable to an iReport Template===__NOEDITSECTION__ |
| − | + | Often it is necessary to add a variable to an iReport template. Variables are used to store calculations and totals in an iReport template. They are often used in the Summary Band portion of a report to store sums of numeric fields (e.g. areaSize) or record counts. There are two main ways to add variables to an iReport template. | |
| − | # Add a variable | + | |
| − | # Drag to | + | ====For numeric variables====__NOEDITSECTION__ |
| + | For variables that are numeric (area sizes, number of devices, etc): | ||
| + | # From the '''Report Inspector''', select the field that you wish to sum or count. | ||
| + | # Drag the field to the Summary Band of the iReport Template canvas. | ||
| + | # A dialogue will pop up, select '''The result of an aggregation function''' and choose the calculation type you want to perform. | ||
| + | #: [[Image:IReport VariableAdd1.png|center|300px|''Select aggregation function'']]<div align="center">''Choose the type of calculation''</div> | ||
| + | # Choose '''OK'''. | ||
| + | # The variable will now appear in the '''Report Inspector''' and can be used in the iReport. | ||
| + | #: [[Image:IReport VariableAdd2.png|center|300px|''Select aggregation function'']]<div align="center">''Choose the type of calculation''</div> | ||
| + | |||
| + | ====To add a variable manually====__NOEDITSECTION__ | ||
| + | This may be required when adding more complicated variables such as variables designed to perform calculations on one or more fields or when using fields that are not numeric. | ||
| + | # From the '''Report Inspector''' '''right click''' on the '''Variable''' tree and choose '''Add Variable'''. | ||
| + | #: [[Image:IReport VariableAdd3.png|center|300px|''Add Variable'']]<div align="center">''Add Variable''</div> | ||
| + | # In the '''Properties''' pane, | ||
| + | #: [[Image:IReport VariableAdd4.png|center|300px|''Variable Properties Pane'']]<div align="center">''Variable Properties Pane''</div> | ||
| + | ## Enter a Variable name (e.g. SumAreaSize}. | ||
| + | ## Select the variable class (i.e. the type of variable to be created. Normally this is the same as the type of the field to be used). | ||
| + | ## Choose the '''Calculation''' type, normally '''Sum''' or '''Count'''. | ||
| + | ## Enter a '''Variable Expression'''. Normally this is simply selecting the field to be summed or counted (e.g. '''$F{areaSize}'''). Click the [[Image:Editor Button.png]] on the Variable Expression line to open the Variable Expression editor. | ||
| + | #: [[Image:IReport VariableAdd5.png|center|300px|''Edit Variable Expression'']]<div align="center">''Edit Variable Expression''</div> | ||
| + | # Choose OK. | ||
| + | # Drag the variable to the iReport template as desired. | ||
| + | |||
| + | ==Report Query Filtering==__NOEDITSECTION__ | ||
| + | iReport Designer provides an option for limiting or filtering the results of the query that returns data to the report. While in most cases this Report Query filter is ignored by {{IMSMANG}} once the report has been imported in favor of the search criteria, there are some cases where it is important to edit the Report Query filters in iReport. The two main reasons are: | ||
| + | * '''temporarily''': to limit the results returned when previewing the report during the design phase in iReport | ||
| + | * '''permanently''': for use in [[Create iReport Templates with Subreports|Subreports]] to restrict the data returned to those that have a relationship with the main report. For example to only return Activities that are associated with the Land in the main report. | ||
| + | |||
| + | Both approaches use the same steps. | ||
| + | |||
| + | ===Using Report Query filters===__NOEDITSECTION__ | ||
| + | To use Report Query filters, | ||
| + | |||
| + | #Open the Report Query window from iReport Designer. | ||
| + | #:[[Image:IReport ReportQueryButton.png|center|500px|''iReport Report Query Button'']]<div align="center">''Open Report Query''</div> | ||
| + | # Choose '''ImsmaQuery''' from the '''Query language''' drop down. | ||
| + | #:[[Image:IReport ReportQuery.png |center|400px|''iReport Report Query Window'']]<div align="center">''Report Query Window''</div> | ||
| + | # Enter a valid [[#ImsmaQuery Language Syntax|ImsmaQuery Language]] filter in the textbox (e.g. localId="MF-HQ-1"). | ||
| + | # Choose the '''Preview Data''' button to verify that the query is limited as desired. | ||
| + | # Choose '''OK''' to save the Report Query settings and return to the report. | ||
| + | |||
| + | ===ImsmaQuery Language Syntax===__NOEDITSECTION__ | ||
| + | The ImsmaQuery Language syntax is a language designed to limit or filter datasets in iReports interacting with {{IMSMANG}}. It is similar to the WHERE clause syntax in SQL though not identical. ImsmaQuery language generally uses the following format: | ||
| + | ''field'' OPERATOR "''value''" | ||
| + | as in | ||
| + | localId = "MF-HQ-1" | ||
| + | |||
| + | #To start using ImsmaQuery Language, first decide which field you want to include in your filter. You may choose any field that is available on the data source to begin your filtering. As in most places in iReport fields are case sensitive. Therefore '''''localId''''' will work but '''''LocalId''''', '''''LocalID''''' and '''''localid''''' will all fail to filter the data. | ||
| + | #Next choose your operator. Valid operators include "=", "<", ">", "<>", and "LIKE" among others. | ||
| + | #Finally, select the value you want to use. Values in ImsmaQuery are always double quoted (e.g. "MF-HQ-1" or "MF-HQ-%"). In addition to constants in the value section, the LIKE operator can take % characters to represent wild cards. For example: | ||
| + | localId LIKE "MF-HQ-1%" | ||
| + | |||
| + | Further, parameters can be used in the ImsmaQuery to represent variables. These take the form: | ||
| + | localId = "''$P{parametername}''" | ||
| + | |||
| + | Finally, ImsmaQuery language can support the "IN" operator. The IN operation takes a comma separated, double quoted list, bounded by parentheses as it's value. As in: | ||
| + | localId IN ("value1", "value2", "value3") | ||
| + | |||
| + | ====ImsmaQuery Examples====__NOEDITSECTION__ | ||
| + | localId LIKE "MF-HQ-%" | ||
| + | endDate > 2010-09-01 AND endDate <2010-09-30 | ||
| + | links.toGuid = "$P{ItemGUID}" and type = "ProgressReport" | ||
| + | areaSize < 1000.0 | ||
| + | status = "Active" OR status = "Transitional" | ||
| + | |||
| + | {{note | Numeric fields should always have the ''value'' portion of the filter set to a decimal. | ||
| + | Dates should use the format yyyy-MM-dd. | ||
| + | |||
| + | Strings from lookup tables (i.e. ImsmaEnum) should always refer to the key value rather than the translated value. In one of the above examples, the query filters the status on "Active". However, the status value for the returned rows will be the translated value "Open" instead of "Active".}} | ||
| + | |||
| + | ==Special Fields ==__NOEDITSECTION__ | ||
| + | In addition to providing access to all of the data fields on a particular object, the iReport data sources provide access to several special fields to access hard to reach data from the IMSMA database. | ||
| + | |||
| + | ===The SQL Field===__NOEDITSECTION__ | ||
| + | All iReport data sources have access to a special field called the SQL field to access hard to reach data. This field allows report designers to insert and execute a SQL query to access data from within an iReport template. It's usage requires a knowledge of SQL and the IMSMA database structure and is only recommended for IMSMA administrators with a strong information management background. In all data sources, this special field is called '''SQLField'''. | ||
| − | + | These fields can be added during the [[Create a Basic iReport Template|iReport Wizard]] process or manually added later. | |
| − | |||
| − | + | To use the SQL field to select data from the IMSMA database: | |
| − | = | + | # In the '''Report Inspector''', click on the SQLField to view its properties in the '''Properties''' pane. |
| + | # Edit the name of the SQL field by adding a unique value to the end of the SQL field in parentheses. For example, ''SQLField(testSQL)'' or ''SQLField(VictimCount)''. | ||
| + | # Choose the '''Properties''' setter to open the '''Properties List'''. | ||
| + | #: [[Image:IReport SQLField1.png|center|300px|''SQL Field Properties'']]<div align="center">''SQL Field Properties''</div> | ||
| + | # Choose '''Add''' to create a new property. | ||
| + | #: [[Image:IReport SQLField2.png|center|300px|''Create the SQL Property'']]<div align="center">''Create the SQL Property''</div> | ||
| + | # Set the '''Property Name''' to '''''SQL''''' | ||
| + | # Set the '''Property Value''' to the desired SQL statement. | ||
| + | #: [[Image:IReport SQLField3.png|center|300px|''Set the SQL Values'']]<div align="center">''Set the SQL Values''</div> | ||
| + | # Return to the report and use the new SQL Field just like any other '''string''' field. {{note|Even if the query returns a numeric value, it is converted into a string; the result of the SQLField is always a string. Therefore, if the return values have to be used as input to some calculation, they need to be explicitly cast to numeric values.}} | ||
| − | == | + | ====SQL Field Examples====__NOEDITSECTION__ |
| − | == | + | The SQL statement can be any valid PostgreSQL statement that '''returns a result'''. Especially when working with charts, null values will lead to errors. Therefore, it is a good practice to use a function like COALESCE() in order to ensure that null values are replaced by a custom value. You can use any valid PostgreSQL statement in the SQL field including |
| + | * VIEWS, JOINS, HAVING, sub-selects, and sub-queries | ||
| + | * PostrgreSQL functions such as COALESCE() | ||
| + | * a special parameter called {guid} that passes the value of the {guid} from the report to the SQL statement. This can be used like a regular string to limit the SQL statement according to the object in the report. | ||
| − | = | + | Examples of SQLField statements include: |
| + | SELECT hazard_localid FROM hazard WHERE hazard_guid = '{guid}' | ||
| − | = | + | SELECT COALESCE(sum(qty),0) as QTY |
| − | + | FROM hazreducdeviceinfo | |
| − | + | WHERE hazreduc_guid = '{guid}' AND | |
| + | ordnance_guid IN (SELECT ordnance_guid FROM ordnance WHERE model LIKE '%AP%') | ||
| − | [[Image:iRep07.png|center|500px|'' | + | ===links.toGuid===__NOEDITSECTION__ |
| + | Another example of a special field available in iReport templates is the '''links.toGuid''' value. links.toGuid is available on any of the major objects in {{IMSMANG}} including Land, Activity, Education, Accident, Victim, Assistance, Location, and Quality Management. This field can be used in the Report Query portion of a report to filter the results based on linkages to other objects. For example, on a Land report with an Activity subreport, the subreport could contain the following Report Query filter to return only Activities with linkages to the Land on the main report: | ||
| + | links.toGuid = "$P{HazardGUID}" | ||
| + | |||
| + | As with other areas in iReport, the ''links.toGuid'' field is case sensitive and must be referenced exactly. | ||
| + | |||
| + | Further information about this can be found on the [[Create iReport Templates with Subreports|Subreport instruction pages]]. | ||
| + | |||
| + | ==Sorting and Grouping==__NOEDITSECTION__ | ||
| + | |||
| + | ===Grouping===__NOEDITSECTION__ | ||
| + | Grouping allows you to organise the report results using the values of a particular field. Grouping results makes it easier to identify the records which share a common value. Rather than having to visually scan the report results to determine which records have a common value, grouping automatically organises the results for you. | ||
| + | |||
| + | To illustrate, suppose you wanted to create a report to list all land within each location ID. An ungrouped report would simply list all land along with their location ID. Although the location ID is included in the report, it would be difficult, tedious, and time-consuming to scan the entire report to identify those land that have a common location ID. | ||
| + | |||
| + | [[Image:iRep07.png|center|500px|''Land report with no grouping'']] | ||
<div align="center"> | <div align="center"> | ||
| − | '' | + | ''Land report with no grouping'' |
</div> | </div> | ||
| − | + | Grouping report results automatically organises the records using the values on the specified field. Using the example above, the land in the report shown in the figure below are organised within the location to which they are associated. Records that do not contain a value for the selected grouping are put into their own group. | |
[[Image:iRep08.png|center|500px|'' Land grouped by location'']] | [[Image:iRep08.png|center|500px|'' Land grouped by location'']] | ||
| Line 79: | Line 175: | ||
</div> | </div> | ||
| − | ===Adding a Group to an iReport Template=== | + | ===Adding a Group to an iReport Template===__NOEDITSECTION__ |
{{note|The field on which you would like to group your report results must be included in the report.}} | {{note|The field on which you would like to group your report results must be included in the report.}} | ||
To add a group to an existing report: | To add a group to an existing report: | ||
| − | |||
| − | |||
| − | |||
| − | |||
| − | |||
| − | |||
| − | |||
| − | |||
| − | |||
| − | |||
| − | |||
| − | |||
| − | |||
| − | |||
| − | |||
| − | |||
| − | |||
| − | + | #From the '''Report Inspector''', right-click on the top node of the Report. | |
| + | #Select '''Add Report Group''' from the menu | ||
| + | #: [[Image:IReport Group1.png|center|200px|''Add a Report Group'']]<div align="center">''Add a Report Group''</div> | ||
| + | #Select a name for your Report Group and choose a field to group by (e.g. maAreaType to group by land classification). The name should be a meaningful name that allows you to easily identify the contents of the group such as the field on which the results are grouped | ||
| + | #: [[Image:IReport Group2.png|center|500px|''Create a Report Group'']]<div align="center">''Create a Report Group''</div> | ||
| + | # Choose '''Next''' and '''Finish'''. | ||
| + | |||
| + | This will create a new group in the iReport template as well as two additional bands (a header and a footer for the group). | ||
| − | ===Sorting Report Results=== | + | ===Sorting Report Results===__NOEDITSECTION__ |
| − | It may be helpful to sort the report results using | + | It may be helpful to sort the report results using values in one or more of the fields. Sorting the results makes it easier to review them and locate any records that you may be searching for. |
To sort report results: | To sort report results: | ||
| − | <ol start=" | + | <ol start="1"> |
<li>Create the report.</li> | <li>Create the report.</li> | ||
| − | <li> | + | <li>Select the '''Report Query''' button.</li> |
:The Report query window displays. | :The Report query window displays. | ||
<li>Click the '''Sort options''' button that is located at the bottom of the Report query window.</li> | <li>Click the '''Sort options''' button that is located at the bottom of the Report query window.</li> | ||
| − | :The Sorting | + | :The Sorting window displays. |
<li>Click the '''Add Field''' button.</li> | <li>Click the '''Add Field''' button.</li> | ||
| − | |||
<li>From the '''Sort by''' list, select the field by which you would like to sort the report results.</li> | <li>From the '''Sort by''' list, select the field by which you would like to sort the report results.</li> | ||
</ol> | </ol> | ||
| Line 120: | Line 205: | ||
{{note|When sorting data in reports that contain groups, ensure the “Group by” fields appear first in the sort order.}} | {{note|When sorting data in reports that contain groups, ensure the “Group by” fields appear first in the sort order.}} | ||
| − | <ol start=" | + | <ol start="6"> |
| − | <li>From the '''Sort | + | <li>From the '''Sort type''' list, select either the ''Ascending'' or ''Descending'' sort order.</li> |
<li>Click the '''OK''' button.</li> | <li>Click the '''OK''' button.</li> | ||
| − | :The selected | + | ::The Sorting window displays. The Sort by list displays all the fields that you have selected for the report. |
<li>Repeat steps 4-7 for each field on which you would like to sort the results.</li> | <li>Repeat steps 4-7 for each field on which you would like to sort the results.</li> | ||
| − | <li>After you have | + | <li>After you have added all the fields on which you would like to sort the results, click the '''Close''' button.</li> |
| − | :The Sorting | + | :The Sorting window closes. |
<li>From the Report query window, click the '''OK''' button.</li> | <li>From the Report query window, click the '''OK''' button.</li> | ||
:The Report query window closes. | :The Report query window closes. | ||
</ol> | </ol> | ||
| − | + | {{NavBox HowTo Standardizing Data Analysis and Information Reporting}} | |
| − | + | [[Category:NAA]] | |
| − | |||
| − | |||
| − | |||
Latest revision as of 20:30, 20 February 2020
| |
Do not edit / overwrite the iReports templates that are included in the installation package. Use the Save as function and give the iReport template a new name. |
Overview
Once an iReport template has been created, there are many options for modifying the report template including adding new fields, creating variables, filtering the query results and many other options. This section covers the main customisations performed on iReport templates for use in IMSMANG.
Fields, Variables, and Parameters
Adding a Field to an iReport Template
If you need to include a field that was not selected while using the Report Wizard, there are several options for including additional fields.
Option 1: Get fields from Datasource
Using the Report Query dialogue, you can select the option to Get Fields from Datasource Provider, which will automatically add all fields from the selected datasource to the report template. You can then delete any unwanted fields from the report.
| |
Make sure that the datasource selected in iReports corresponds to the data source for the report. |
- Choose the Report Query button.
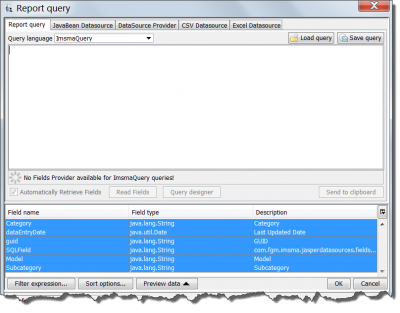
- From the Report Query Window, choose the Datasource Provider tab.
- Report Query Window
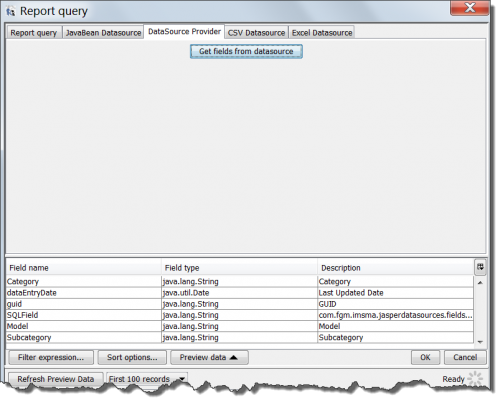
- Select the Get Fields From Datasource button.
- Datasource Fields
- All fields will now be displayed.
- Choose Ok to save the fields and return to the iReport Designer.
Option 2: Copy and Paste
Alternatively, you can create a new report template using the Wizard and add the desired fields to the new report. Fields can then be copied and pasted from the new report to the original report.
- Create a new report using the iReport Wizard and the same data source
- Select the desired fields and finish the report
- Using the Report Inspector, navigate to the desired fields
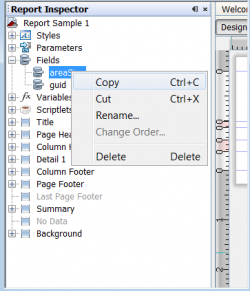
- Right click on the field and select copy
- Field Copy
- Navigate to the original report with the missing fields
- Right-click on the fields tree in Report Inspector and choose paste
| |
It is not recommended to use the "Add Field" option from the Report Inspector due to the complexity of adding the correct field attributes and properties. |
Adding a Parameter to an iReport Template
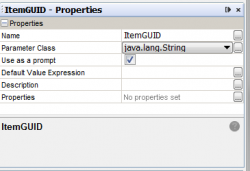
It is sometimes necessary to add a parameter to an iReport template. Usually parameters are used for transferring data from a main report to a subreport. Below are the steps to add a parameter to an iReport Template.
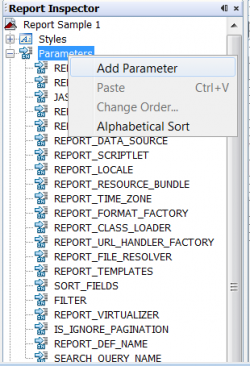
- From the Report Inspector, right click on the Parameter tree and choose Add Parameter.
- In the Properties pane, enter a parameter name (e.g. ItemGUID} and edit any other properties. For example, if you do not want to use the parameter as a prompt, then deselect the Use as a prompt option.
Adding a Variable to an iReport Template
Often it is necessary to add a variable to an iReport template. Variables are used to store calculations and totals in an iReport template. They are often used in the Summary Band portion of a report to store sums of numeric fields (e.g. areaSize) or record counts. There are two main ways to add variables to an iReport template.
For numeric variables
For variables that are numeric (area sizes, number of devices, etc):
- From the Report Inspector, select the field that you wish to sum or count.
- Drag the field to the Summary Band of the iReport Template canvas.
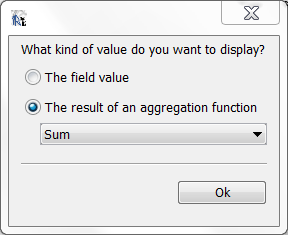
- A dialogue will pop up, select The result of an aggregation function and choose the calculation type you want to perform.
- Choose the type of calculation
-
- Choose OK.
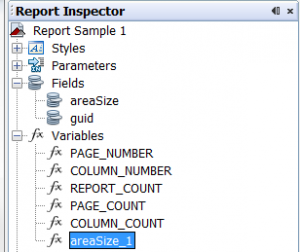
- The variable will now appear in the Report Inspector and can be used in the iReport.
- Choose the type of calculation
-
To add a variable manually
This may be required when adding more complicated variables such as variables designed to perform calculations on one or more fields or when using fields that are not numeric.
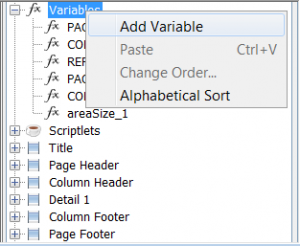
- From the Report Inspector right click on the Variable tree and choose Add Variable.
- Add Variable
-
- In the Properties pane,
- Variable Properties Pane
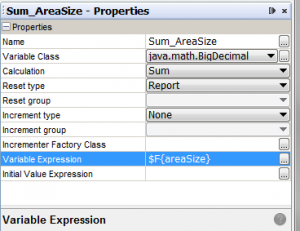
- Enter a Variable name (e.g. SumAreaSize}.
- Select the variable class (i.e. the type of variable to be created. Normally this is the same as the type of the field to be used).
- Choose the Calculation type, normally Sum or Count.
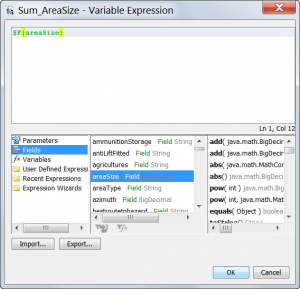
- Enter a Variable Expression. Normally this is simply selecting the field to be summed or counted (e.g. $F{areaSize}). Click the
 on the Variable Expression line to open the Variable Expression editor.
- Edit Variable Expression
-
- Choose OK.
- Drag the variable to the iReport template as desired.
Report Query Filtering
iReport Designer provides an option for limiting or filtering the results of the query that returns data to the report. While in most cases this Report Query filter is ignored by IMSMANG once the report has been imported in favor of the search criteria, there are some cases where it is important to edit the Report Query filters in iReport. The two main reasons are:
- temporarily: to limit the results returned when previewing the report during the design phase in iReport
- permanently: for use in Subreports to restrict the data returned to those that have a relationship with the main report. For example to only return Activities that are associated with the Land in the main report.
Both approaches use the same steps.
Using Report Query filters
To use Report Query filters,
- Open the Report Query window from iReport Designer.
- Open Report Query
- Choose ImsmaQuery from the Query language drop down.
- Report Query Window
- Enter a valid ImsmaQuery Language filter in the textbox (e.g. localId="MF-HQ-1").
- Choose the Preview Data button to verify that the query is limited as desired.
- Choose OK to save the Report Query settings and return to the report.
ImsmaQuery Language Syntax
The ImsmaQuery Language syntax is a language designed to limit or filter datasets in iReports interacting with IMSMANG. It is similar to the WHERE clause syntax in SQL though not identical. ImsmaQuery language generally uses the following format:
field OPERATOR "value"
as in
localId = "MF-HQ-1"
- To start using ImsmaQuery Language, first decide which field you want to include in your filter. You may choose any field that is available on the data source to begin your filtering. As in most places in iReport fields are case sensitive. Therefore localId will work but LocalId, LocalID and localid will all fail to filter the data.
- Next choose your operator. Valid operators include "=", "<", ">", "<>", and "LIKE" among others.
- Finally, select the value you want to use. Values in ImsmaQuery are always double quoted (e.g. "MF-HQ-1" or "MF-HQ-%"). In addition to constants in the value section, the LIKE operator can take % characters to represent wild cards. For example:
localId LIKE "MF-HQ-1%"
Further, parameters can be used in the ImsmaQuery to represent variables. These take the form:
localId = "$P{parametername}"
Finally, ImsmaQuery language can support the "IN" operator. The IN operation takes a comma separated, double quoted list, bounded by parentheses as it's value. As in:
localId IN ("value1", "value2", "value3")
ImsmaQuery Examples
localId LIKE "MF-HQ-%"
endDate > 2010-09-01 AND endDate <2010-09-30
links.toGuid = "$P{ItemGUID}" and type = "ProgressReport"
areaSize < 1000.0
status = "Active" OR status = "Transitional"
Special Fields
In addition to providing access to all of the data fields on a particular object, the iReport data sources provide access to several special fields to access hard to reach data from the IMSMA database.
The SQL Field
All iReport data sources have access to a special field called the SQL field to access hard to reach data. This field allows report designers to insert and execute a SQL query to access data from within an iReport template. It's usage requires a knowledge of SQL and the IMSMA database structure and is only recommended for IMSMA administrators with a strong information management background. In all data sources, this special field is called SQLField.
These fields can be added during the iReport Wizard process or manually added later.
To use the SQL field to select data from the IMSMA database:
- In the Report Inspector, click on the SQLField to view its properties in the Properties pane.
- Edit the name of the SQL field by adding a unique value to the end of the SQL field in parentheses. For example, SQLField(testSQL) or SQLField(VictimCount).
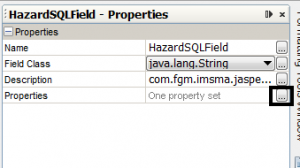
- Choose the Properties setter to open the Properties List.
- SQL Field Properties
-
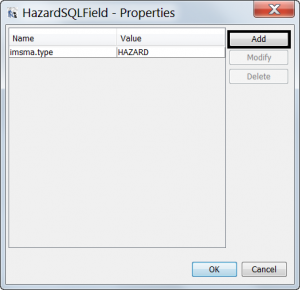
- Choose Add to create a new property.
- Create the SQL Property
-
- Set the Property Name to SQL
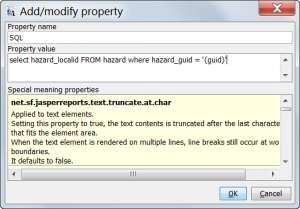
- Set the Property Value to the desired SQL statement.
- Set the SQL Values
-
- Return to the report and use the new SQL Field just like any other string field.
SQL Field Examples
The SQL statement can be any valid PostgreSQL statement that returns a result. Especially when working with charts, null values will lead to errors. Therefore, it is a good practice to use a function like COALESCE() in order to ensure that null values are replaced by a custom value. You can use any valid PostgreSQL statement in the SQL field including
- VIEWS, JOINS, HAVING, sub-selects, and sub-queries
- PostrgreSQL functions such as COALESCE()
- a special parameter called {guid} that passes the value of the {guid} from the report to the SQL statement. This can be used like a regular string to limit the SQL statement according to the object in the report.
Examples of SQLField statements include:
SELECT hazard_localid FROM hazard WHERE hazard_guid = '{guid}'
SELECT COALESCE(sum(qty),0) as QTY
FROM hazreducdeviceinfo
WHERE hazreduc_guid = '{guid}' AND
ordnance_guid IN (SELECT ordnance_guid FROM ordnance WHERE model LIKE '%AP%')
links.toGuid
Another example of a special field available in iReport templates is the links.toGuid value. links.toGuid is available on any of the major objects in IMSMANG including Land, Activity, Education, Accident, Victim, Assistance, Location, and Quality Management. This field can be used in the Report Query portion of a report to filter the results based on linkages to other objects. For example, on a Land report with an Activity subreport, the subreport could contain the following Report Query filter to return only Activities with linkages to the Land on the main report:
links.toGuid = "$P{HazardGUID}"
As with other areas in iReport, the links.toGuid field is case sensitive and must be referenced exactly.
Further information about this can be found on the Subreport instruction pages.
Sorting and Grouping
Grouping
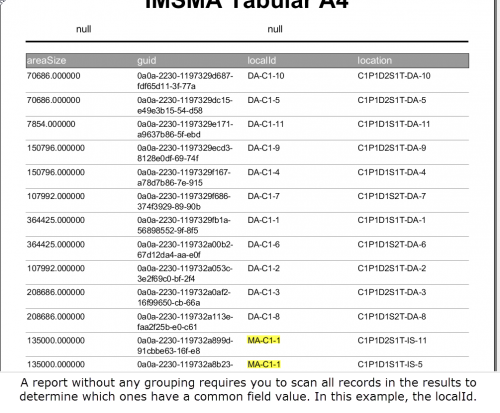
Grouping allows you to organise the report results using the values of a particular field. Grouping results makes it easier to identify the records which share a common value. Rather than having to visually scan the report results to determine which records have a common value, grouping automatically organises the results for you.
To illustrate, suppose you wanted to create a report to list all land within each location ID. An ungrouped report would simply list all land along with their location ID. Although the location ID is included in the report, it would be difficult, tedious, and time-consuming to scan the entire report to identify those land that have a common location ID.
Land report with no grouping
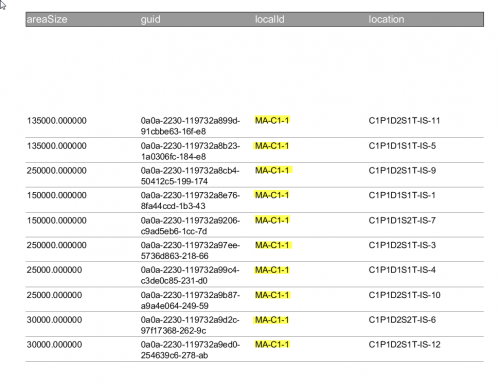
Grouping report results automatically organises the records using the values on the specified field. Using the example above, the land in the report shown in the figure below are organised within the location to which they are associated. Records that do not contain a value for the selected grouping are put into their own group.
Land grouped by location
Adding a Group to an iReport Template
| |
The field on which you would like to group your report results must be included in the report. |
To add a group to an existing report:
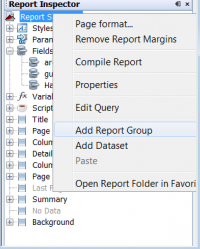
- From the Report Inspector, right-click on the top node of the Report.
- Select Add Report Group from the menu
- Add a Report Group
-
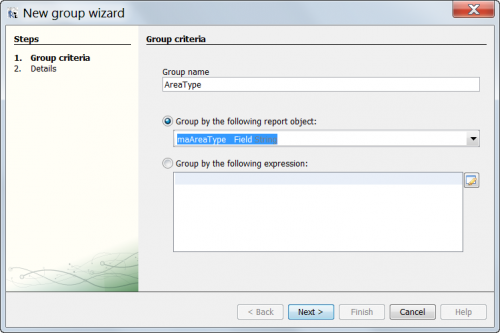
- Select a name for your Report Group and choose a field to group by (e.g. maAreaType to group by land classification). The name should be a meaningful name that allows you to easily identify the contents of the group such as the field on which the results are grouped
- Create a Report Group
-
- Choose Next and Finish.
This will create a new group in the iReport template as well as two additional bands (a header and a footer for the group).
Sorting Report Results
It may be helpful to sort the report results using values in one or more of the fields. Sorting the results makes it easier to review them and locate any records that you may be searching for. To sort report results:
- Create the report.
- Select the Report Query button.
- The Report query window displays.
- Click the Sort options button that is located at the bottom of the Report query window.
- The Sorting window displays.
- Click the Add Field button.
- From the Sort by list, select the field by which you would like to sort the report results.
| |
When sorting data in reports that contain groups, ensure the “Group by” fields appear first in the sort order. |
- From the Sort type list, select either the Ascending or Descending sort order.
- Click the OK button.
- The Sorting window displays. The Sort by list displays all the fields that you have selected for the report.
- Repeat steps 4-7 for each field on which you would like to sort the results.
- After you have added all the fields on which you would like to sort the results, click the Close button.
- The Sorting window closes.
- From the Report query window, click the OK button.
- The Report query window closes.
| ||||||||||

