Difference between revisions of "Search for Exporting Data Entry Form"
From IMSMA Wiki
| (2 intermediate revisions by the same user not shown) | |||
| Line 1: | Line 1: | ||
| − | + | {{Note| The order in the drop-down list for Data Entry Form is strictly alphabetic.}} | |
This example shows how to export Approved Progress reports. | This example shows how to export Approved Progress reports. | ||
| Line 7: | Line 7: | ||
<li>Next action is to add the first criterion row by clicking on the [[Image:FieldTemplateIcon.png]] button.</li> | <li>Next action is to add the first criterion row by clicking on the [[Image:FieldTemplateIcon.png]] button.</li> | ||
[[Image:Adv search DEF.png|600px|center]] | [[Image:Adv search DEF.png|600px|center]] | ||
| − | <li>Select ''Data Entry Form Status'' in the drop-down list. | + | <li>Select ''Data Entry Form Status'' in the drop-down list.</li> |
<li>Specify the status to ''Approved''. It is recommended to always specify status even if ''Approved date'' is used.</li> | <li>Specify the status to ''Approved''. It is recommended to always specify status even if ''Approved date'' is used.</li> | ||
<li>Next action is to add the second criterion row by clicking on the [[Image:FieldTemplateIcon.png]] button.</li> | <li>Next action is to add the second criterion row by clicking on the [[Image:FieldTemplateIcon.png]] button.</li> | ||
| Line 15: | Line 15: | ||
<li>This criterion is a ''Subobject'' so next action is to click on the [[Image:SubobjectSearchIcon.png | SubObject Search]] button.</li> | <li>This criterion is a ''Subobject'' so next action is to click on the [[Image:SubobjectSearchIcon.png | SubObject Search]] button.</li> | ||
[[Image:Adv search DEF4.png|600px|center]] | [[Image:Adv search DEF4.png|600px|center]] | ||
| − | <li>In the next window select ''Type of Activity'' and specify ''Progress report''. | + | <li>In the next window select ''Type of Activity'' and specify ''Progress report''.</li> |
| − | <li>Click on OK when you are done.<li> | + | <li>Click on OK when you are done.</li> |
[[Image:Adv search DEF3.png|600px|center]] | [[Image:Adv search DEF3.png|600px|center]] | ||
| − | <li>Back in the main search window, click on '''Run''' to start the search.</li></ol> | + | <li>Back in the main search window, click on '''Run''' to start the search.</li> |
| − | + | </ol> | |
| − | |||
| − | |||
| − | |||
| − | |||
| − | |||
| − | |||
| − | |||
| + | When you have filtered the Data Entry Forms you would like to export, click on the [[Image:FieldReportExportIcon.png]] button and follow the instructions for xml-export on page [[Export Search Result]].<br/> | ||
| + | It is also possible to [[Export Data Entry Form from Workbench| export non-approved Data Entry Forms from the Workbench]]. | ||
{{NavBox HowTo Search}} | {{NavBox HowTo Search}} | ||
| − | [[Category: | + | [[Category:NAA]] |
Latest revision as of 11:42, 18 March 2019
| |
The order in the drop-down list for Data Entry Form is strictly alphabetic. |
This example shows how to export Approved Progress reports.
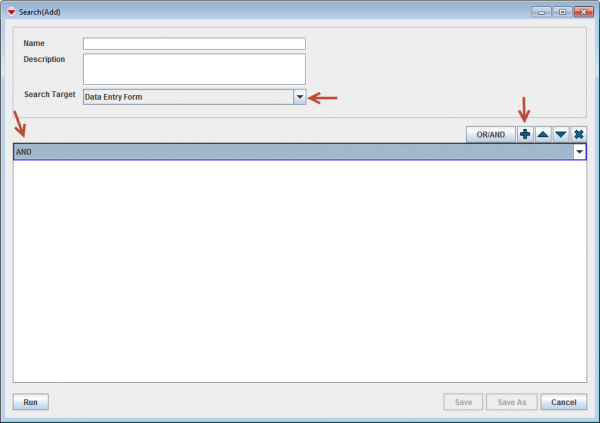
- Selecting Data Entry Form in the Search Target drop-down list.
- Specify that all criteria should be true (AND)(more details can be found here).
- Next action is to add the first criterion row by clicking on the
 button.
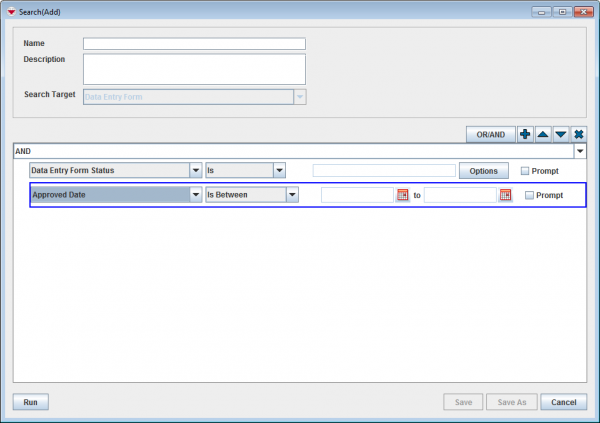
 - Select Data Entry Form Status in the drop-down list.
- Specify the status to Approved. It is recommended to always specify status even if Approved date is used.
- Next action is to add the second criterion row by clicking on the
 button.
 - Select Approved Date and specify the date range.
- Next action is to add the third criterion row by clicking on the
 button.
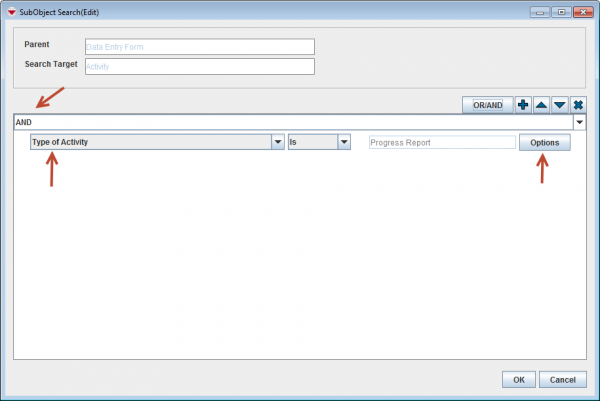
 - This criterion is a Subobject so next action is to click on the
 button.
 - In the next window select Type of Activity and specify Progress report.
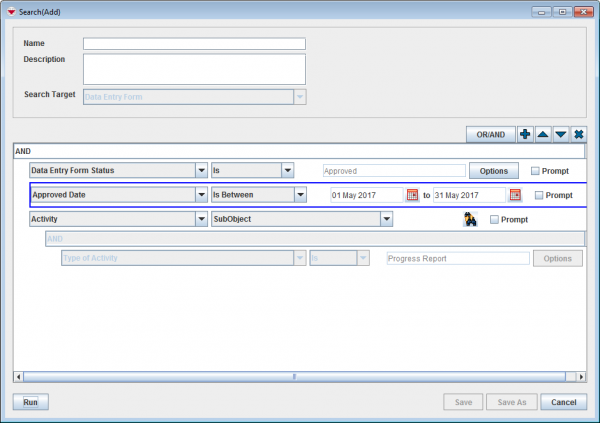
- Click on OK when you are done.
- Back in the main search window, click on Run to start the search.
When you have filtered the Data Entry Forms you would like to export, click on the ![]() button and follow the instructions for xml-export on page Export Search Result.
button and follow the instructions for xml-export on page Export Search Result.
It is also possible to export non-approved Data Entry Forms from the Workbench.
| ||||||||||||||||


