Difference between revisions of "Add Ordnance Classification"
From IMSMA Wiki
| (22 intermediate revisions by 4 users not shown) | |||
| Line 1: | Line 1: | ||
| − | To add | + | {{Note | To add an Ordnance classification, your {{IMSMANG}} user account must belong to a User Role that has permission ''Ordnance classification'' with ''Read and Write'' level. Contact your {{IMSMANG}} Administrator if you have questions on permissions. }} |
| − | |||
| − | |||
| − | |||
| − | |||
| − | + | To add ordnance to {{IMSMANG}}: | |
| + | <ol> | ||
| + | <li>In the '''Data Entry''' menu → '''Ordnance Classification'''.</li> | ||
| − | + | <li>Click the [[File:FieldTemplateIcon.png|20px]] button.</li> | |
| − | |||
| − | |||
| − | |||
| − | |||
| − | |||
| − | |||
| − | |||
| − | |||
| − | |||
| + | [[Image:OrdnanceEditorWindow.png | 500px | center]] | ||
| + | <br> | ||
| + | <li>Select the category from the Category list.</li> | ||
| + | <li>Select the subcategory from the Subcategory list.</li> | ||
| + | {{Note | When you add a new Ordnance classification it is very important that the Category and the Subcategory are set to the correct values so reporting on Category/Subcategory will be correct.}} | ||
| + | {{New_6.0 | | ||
| + | # '''[[IED Classification | IED]]''', Less-lethal weapons, Light weapons, MANPADS, Small Arm Ammunitions and Small Arms are new Categories. | ||
| + | # The new models belonging to the above categories are Inactive. }} | ||
| + | <li>Enter the model name in the Model field.</li> | ||
| + | <li>Enter the source in the Source field.</li> | ||
| + | <li>Enter the Statistic Group value in the Statistic Group field.</li> | ||
| + | {{New_6.0 | The new field ''Statistic Group'' has been added in order to facilitate flexible reporting. }} | ||
| + | <li>If there are any fields in the Custom Defined Fields section, enter data in those fields. </li> | ||
| + | <li>Click the '''Save''' button. | ||
| + | </ol> | ||
{{NavBox HowTo Standardizing Auxiliary Data}} | {{NavBox HowTo Standardizing Auxiliary Data}} | ||
| + | |||
| + | [[Category:NAA]] | ||
Latest revision as of 18:45, 17 June 2017
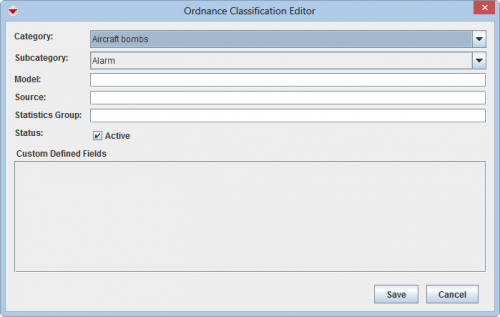
To add ordnance to IMSMANG:
- In the Data Entry menu → Ordnance Classification.
- Click the
 button.
 - Select the category from the Category list.
- Select the subcategory from the Subcategory list.
- IED, Less-lethal weapons, Light weapons, MANPADS, Small Arm Ammunitions and Small Arms are new Categories.
- The new models belonging to the above categories are Inactive.
- Enter the model name in the Model field.
- Enter the source in the Source field.
- Enter the Statistic Group value in the Statistic Group field.
- If there are any fields in the Custom Defined Fields section, enter data in those fields.
- Click the Save button.
| |
When you add a new Ordnance classification it is very important that the Category and the Subcategory are set to the correct values so reporting on Category/Subcategory will be correct. |
| |
|
| |
The new field Statistic Group has been added in order to facilitate flexible reporting. |
| |||||||||||||||||||||||
