Difference between revisions of "Add Custom Defined Fields"
From IMSMA Wiki
| Line 55: | Line 55: | ||
</li> | </li> | ||
<li>Enter a description for the custom defined field in the '''Description''' field.</li> | <li>Enter a description for the custom defined field in the '''Description''' field.</li> | ||
| + | <li>Go through the checklist for implementation of '''[[Custom Defined Fields]]'''.</li> | ||
</ol> | </ol> | ||
=== Display options for single-select and text CDFs===__NOEDITSECTION__ | === Display options for single-select and text CDFs===__NOEDITSECTION__ | ||
| Line 65: | Line 66: | ||
=== Adding values for multi- and single-select CDFs===__NOEDITSECTION__ | === Adding values for multi- and single-select CDFs===__NOEDITSECTION__ | ||
| − | + | If you selected the ''Multiple Select'' or ''Single Select'' option, click the [[Image:FieldTemplateIcon.png]] button. | |
[[Image:CDF value.png|center|300px|''Add multi- and single-select value window'']] | [[Image:CDF value.png|center|300px|''Add multi- and single-select value window'']] | ||
<div align="center"> | <div align="center"> | ||
''Add multi- and single-select value window'' | ''Add multi- and single-select value window'' | ||
</div> | </div> | ||
| − | + | Enter the value for the list in the '''Value''' field. | |
| − | + | When you have completed entering the values for the list, click the '''Done''' button. | |
{{Note|You can also translate the label and, if applicable, list option values by clicking the '''Translate''' button at this time. See [[Translate Custom Defined Field Labels]] for more information. }} | {{Note|You can also translate the label and, if applicable, list option values by clicking the '''Translate''' button at this time. See [[Translate Custom Defined Field Labels]] for more information. }} | ||
Revision as of 21:25, 12 June 2017
| |
Custom defined fields must have a unique combination of item, name and data type. |
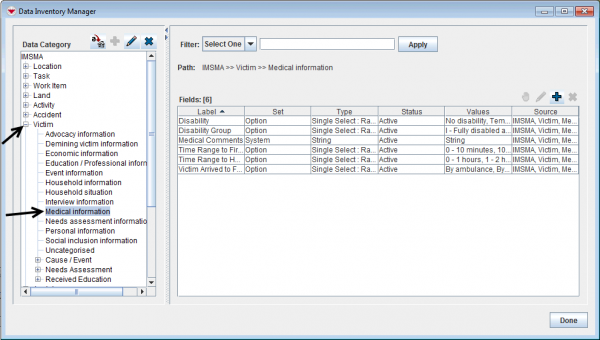
- From the Customisation menu, select Data Inventory Manager.
- In the left pane of the Data Inventory Manager window, select the item and the data category to which you would like to add a CDF.
- In the right pane of the Data Inventory Manager window, click the
 button.
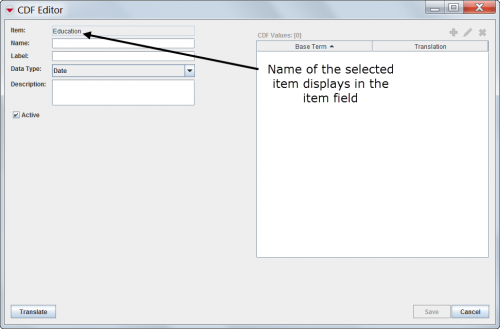
 - Enter a name in the Name field. The name should be
- maximum 60 characters long
- only allowed characters are a - z and 0 - 9 i.e.
- cannot contain . , / \ ( ) ! ? - @
- cannot contain space/blanks
- cannot contain capital/upper case character
- cannot start with a digit.
- Enter a label in the Label field. The label is the default custom defined field’s name that the user will see in the Data Entry Form Manager window.
- Select the data type for the custom defined field from the Data Type list.
Data Types for Custom Defined Fields Data Type Description and Comments Text Field unlimited characters Date Month, day, year Number ≤15 decimal points Organisation Allows the user to select organisational data Place Allows the user to select place data Country Structure Allows the user to select country structure level data Multiple Select Allows the user to select zero or more values provided in the CDF Values field Single Select Allows the user to select one value from provided values in the CDF Values field - Enter a description for the custom defined field in the Description field.
- Go through the checklist for implementation of Custom Defined Fields.
CDF Editor Window
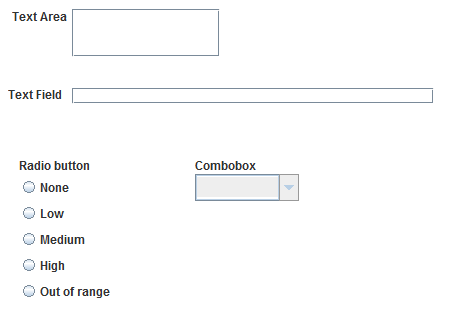
Display options for single-select and text CDFs
Display formats
For Text and Single Select CDFs, there are two different display formats to choose between.
| |
In version 6.0 two different display formats for Text fields has been introduced. |
Adding values for multi- and single-select CDFs
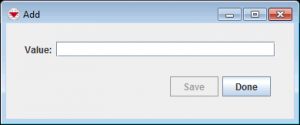
If you selected the Multiple Select or Single Select option, click the ![]() button.
button.
Add multi- and single-select value window
Enter the value for the list in the Value field. When you have completed entering the values for the list, click the Done button.
| |
You can also translate the label and, if applicable, list option values by clicking the Translate button at this time. See Translate Custom Defined Field Labels for more information. |
| ||||||||||||||||


