Difference between revisions of "IMSMA Navigation Window"
From IMSMA Wiki
m |
|||
| (49 intermediate revisions by 8 users not shown) | |||
| Line 1: | Line 1: | ||
| − | + | After you log into {{IMSMANG}}, the IMSMA Navigation window displays. It is a central location from which you can access all of IMSMA's features. The IMSMA Navigation window contains a menu toolbar, a status bar, and three panes: | |
| − | |||
| − | |||
| − | |||
| − | |||
| − | |||
| − | |||
| − | |||
| − | |||
| − | |||
| − | |||
| − | |||
| − | |||
| − | |||
| − | |||
| − | |||
| − | |||
| − | |||
| − | |||
| − | |||
| − | |||
| − | |||
| − | |||
| − | |||
| − | |||
| − | |||
| − | |||
| − | |||
| − | |||
| − | |||
| − | |||
| − | |||
| − | |||
| − | |||
| − | |||
| − | |||
| − | |||
| − | |||
| − | |||
| − | |||
| − | |||
| − | |||
| − | |||
| − | + | <ol><li>The [[Country Structure Pane]] displays a list of the Country Structure in a tree format. After you log in, the Country Structure tree displays the first and second levels of the Country Structure.</li> | |
| − | The | + | <li>The [[Map Pane]] initially displays a map view of |
| + | * the highest level of the Country Structure if the map extent has been set or | ||
| + | * the extent of the background map.</li> | ||
| + | <li>The [[Items Pane]] contains tabs that display data about Locations, Tasks, Land, Activities, Accidents, Victims, Assistance, Education activities, and QMs. Data will not display in the items pane until you select a Country Structure node in the Country Structure tree.</li></ol> | ||
| − | [[Image: | + | In addition to the menu and three panes, the IMSMA Navigation window has a status bar which is located at the bottom of the IMSMA Navigation window below the items pane. If there is no status, the status bar is black. |
| + | |||
| + | [[Image:NavWindow.png|center|500px|''IMSMA Navigation Window Panes'']] | ||
<div align="center"> | <div align="center"> | ||
| − | '' | + | ''IMSMA Navigation Window Panes'' |
</div> | </div> | ||
| − | The | + | The three panes interacts with each other in different ways. For example when you select a node in the Country structure pane |
| − | + | * the contents of the Item pane is refreshed and shows the only the items belonging the that Country Structure node and any lower levels | |
| + | * if the extent of the Country Structure is set, the Map pane is centered on the selected Country Structure area | ||
| + | |||
| + | {{Note | You can change the default size of any pane by dragging its edges in and out. The Items pane cannot be resized to below a height of six rows.}} | ||
| + | |||
| + | {{NavBox HowTo Viewing and Browsing}} | ||
| + | [[Category:NAA]] | ||
Latest revision as of 00:06, 27 May 2017
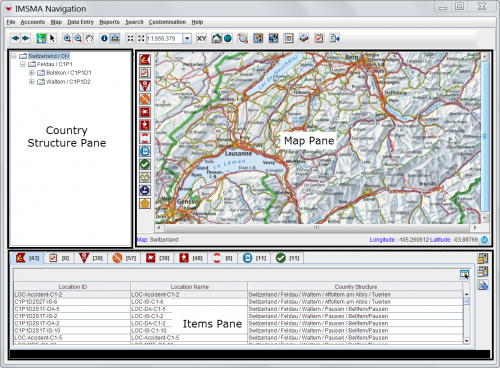
After you log into IMSMANG, the IMSMA Navigation window displays. It is a central location from which you can access all of IMSMA's features. The IMSMA Navigation window contains a menu toolbar, a status bar, and three panes:
- The Country Structure Pane displays a list of the Country Structure in a tree format. After you log in, the Country Structure tree displays the first and second levels of the Country Structure.
- The Map Pane initially displays a map view of
- the highest level of the Country Structure if the map extent has been set or
- the extent of the background map.
- The Items Pane contains tabs that display data about Locations, Tasks, Land, Activities, Accidents, Victims, Assistance, Education activities, and QMs. Data will not display in the items pane until you select a Country Structure node in the Country Structure tree.
In addition to the menu and three panes, the IMSMA Navigation window has a status bar which is located at the bottom of the IMSMA Navigation window below the items pane. If there is no status, the status bar is black.
IMSMA Navigation Window Panes
The three panes interacts with each other in different ways. For example when you select a node in the Country structure pane
- the contents of the Item pane is refreshed and shows the only the items belonging the that Country Structure node and any lower levels
- if the extent of the Country Structure is set, the Map pane is centered on the selected Country Structure area
| |
You can change the default size of any pane by dragging its edges in and out. The Items pane cannot be resized to below a height of six rows. |
