Difference between revisions of "Add Custom Defined Fields"
From IMSMA Wiki
| Line 1: | Line 1: | ||
| − | {{ | + | {{New_6.0|Custom defined fields must have a unique combination of item, '''name''', and data type. |
}} | }} | ||
| Line 29: | Line 29: | ||
|- | |- | ||
| Text Field | | Text Field | ||
| − | | | + | | unlimited characters |
|- | |- | ||
| Date | | Date | ||
| Line 54: | Line 54: | ||
|} | |} | ||
| − | <ol start=" | + | <ol start="7"> |
| − | <li>Enter a description for the custom defined field in the '''Description''' field.</li> | + | <li>Enter a description for the custom defined field in the '''Description''' field.</li><br/> |
| − | < | + | [[Image:CDF display format.png|center|500px|''Disply formats'']] |
| + | <div align="center"> | ||
| + | ''Display formats'' | ||
| + | </div> | ||
| + | |||
| + | <li>For Text and Single Select CDFs, there are two different display formats to choose between.</li> | ||
| + | {{New_6.0 | In version 6.0 two different display formats for Text fields has been introduced.}} | ||
<li>If you selected the ''Multiple Select'' or ''Single Select'' option, click the [[Image:FieldTemplateIcon.png]] button.</li> | <li>If you selected the ''Multiple Select'' or ''Single Select'' option, click the [[Image:FieldTemplateIcon.png]] button.</li> | ||
:The Add window displays. | :The Add window displays. | ||
| Line 67: | Line 73: | ||
}} | }} | ||
| − | <ol start=" | + | <ol start="11"> |
<li>Do one of the following:</li> | <li>Do one of the following:</li> | ||
*If you would like to save the value and enter additional values, click the '''Save''' button. | *If you would like to save the value and enter additional values, click the '''Save''' button. | ||
| Line 77: | Line 83: | ||
}} | }} | ||
| − | <ol start=" | + | <ol start="13"> |
<li>Do one of the following:</li> | <li>Do one of the following:</li> | ||
*To save the custom defined field and close the CDF Editor window, click the '''Save''' button. | *To save the custom defined field and close the CDF Editor window, click the '''Save''' button. | ||
| − | :If the custom defined field information is successfully saved, the CDF Editor window closes and the custom defined field is listed in the Data Inventory Manager window | + | :If the custom defined field information is successfully saved, the CDF Editor window closes and the custom defined field is listed in the Data Inventory Manager window. |
</ol> | </ol> | ||
Revision as of 22:17, 4 November 2014
| |
Custom defined fields must have a unique combination of item, name, and data type. |
To add a custom defined field:
- From the Customisation menu, select Data Inventory Manager.
- The Data Inventory Manager window displays.
- From the left pane of the Data Inventory Manager window, select the item and the data category to which you would like to add a CDF.
- From the right pane of the Data Inventory Manager window, click the
 button.
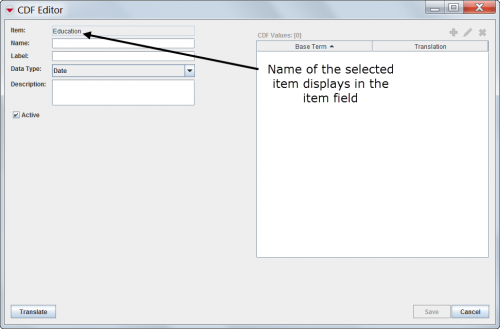
 - The CDF Editor window displays.
CDF Editor Window
- Enter a name in the Name field. The name should be no longer than 60 characters and should not contain periods (.), underscores (_), or capital letters. In addition it cannot start with a digit.
- Enter a label in the Label field. The label is the default custom defined field’s name that the user will see in the Data Entry Form Manager window.
- Select the data type for the custom defined field from the Data Type list.
| Data Types for Custom Defined Fields | |
|---|---|
| Data Type | Description and Comments |
| Text Field | unlimited characters |
| Date | Month, day, year |
| Number | ≤15 decimal points |
| Organisation | Allows the user to select organisational data |
| Place | Allows the user to select place data |
| Country Structure | Allows the user to select country structure level data |
| Multiple Select | Allows the user to select zero or more values provided in the CDF Values field |
| Single Select | Allows the user to select one value from provided values in the CDF Values field |
- Enter a description for the custom defined field in the Description field.
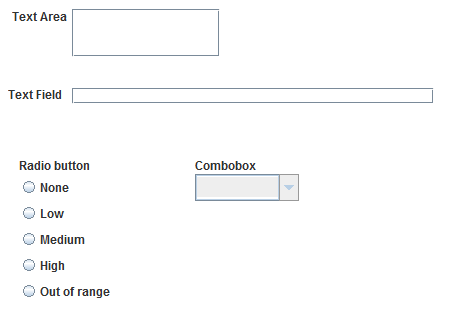
- For Text and Single Select CDFs, there are two different display formats to choose between.
- If you selected the Multiple Select or Single Select option, click the
 button.
 - The Add window displays.
- Enter the value for the list in the Value field.
Display formats
| |
In version 6.0 two different display formats for Text fields has been introduced. |
| |
When entering values for lists, be sure to:
|
- Do one of the following:
- If you would like to save the value and enter additional values, click the Save button.
- If you have completed entering the values for the list, click the Done button.
- If you selected the Single Select option, chose an option from the Selection Display field to display the CDF as either a list of radio buttons or as a combo box.
| |
You can also translate the label and, if applicable, list option values by clicking the Translate button at this time. See Translate Custom Defined Field Labels for more information. |
- Do one of the following:
- To save the custom defined field and close the CDF Editor window, click the Save button.
- If the custom defined field information is successfully saved, the CDF Editor window closes and the custom defined field is listed in the Data Inventory Manager window.
| |
If you would like to add the custom defined field to existing data entry form templates, you will need to update and republish the data entry form template. |
- To discard the custom defined field and close the CDF Editor window, click the Cancel button.
| ||||||||||||||||

