Difference between revisions of "Using the Tasking Tool in IMSMANG"
(Created page with "__FORCETOC__ {{TOC right}} The tasking tool allows operations staff to create task ''dossiers'' by grouping useful information for planning and monitoring a ''task''. The tas...") |
|||
| Line 13: | Line 13: | ||
|align="left" style="padding: 5px 10px 5px 10px"|[[Image:SopIcon.png|25px]] | |align="left" style="padding: 5px 10px 5px 10px"|[[Image:SopIcon.png|25px]] | ||
|align="left" style="padding: 5px 10px 5px 10px"| Windows Vista and Windows 7 users, this sign next to a step is a reminder for you that you must right-click executables and choose Run as administrator from the context menu. | |align="left" style="padding: 5px 10px 5px 10px"| Windows Vista and Windows 7 users, this sign next to a step is a reminder for you that you must right-click executables and choose Run as administrator from the context menu. | ||
| − | |||
| − | |||
|} | |} | ||
| Line 25: | Line 23: | ||
|align="left" style="padding: 5px 10px 5px 10px"|[[Image:bulb2.png|25px|Represents a tip or note for using IMSMA Mobile.]] | |align="left" style="padding: 5px 10px 5px 10px"|[[Image:bulb2.png|25px|Represents a tip or note for using IMSMA Mobile.]] | ||
|align="left" style="padding: 5px 10px 5px 10px"| Tasks can be displayed in the items pane by selecting a specific country structure area. | |align="left" style="padding: 5px 10px 5px 10px"| Tasks can be displayed in the items pane by selecting a specific country structure area. | ||
| + | |- | ||
| + | |align="center" colspan="2"|[[Image:utT02.png|500px]] | ||
|} | |} | ||
| − | |||
| − | |||
:*Viewing the associated task(s) of a specific item in the items pane | :*Viewing the associated task(s) of a specific item in the items pane | ||
| Line 56: | Line 54: | ||
|align="left" style="padding: 5px 10px 5px 10px"| Only hazards, hazard reductions, MREs and QCs can have associated tasks. | |align="left" style="padding: 5px 10px 5px 10px"| Only hazards, hazard reductions, MREs and QCs can have associated tasks. | ||
|- | |- | ||
| − | |align="center" colspan="2"|[[Image: | + | |align="center" colspan="2"|[[Image:utT06.png|500px]] |
|} | |} | ||
====Completing General Information Details====[[Image:SopIcon.png|25px]] | ====Completing General Information Details====[[Image:SopIcon.png|25px]] | ||
| − | [[Image: | + | [[Image:utT07.png|500px]] |
====Associating Objectives====[[Image:SopIcon.png|25px]] | ====Associating Objectives====[[Image:SopIcon.png|25px]] | ||
| Line 76: | Line 74: | ||
<li>Click '''Assign'''.</li> | <li>Click '''Assign'''.</li> | ||
| − | [[Image: | + | [[Image:utT08.png|500px]] |
</ol> | </ol> | ||
| Line 82: | Line 80: | ||
====Associating work items====[[Image:SopIcon.png|25px]] | ====Associating work items====[[Image:SopIcon.png|25px]] | ||
#Select the '''Planning & Monitoring''' tab in the Task Editor window. | #Select the '''Planning & Monitoring''' tab in the Task Editor window. | ||
| + | |||
| + | [[Image:utT09.png|500px]] | ||
| + | |||
====Adding Work Items==== | ====Adding Work Items==== | ||
#Click [[Image:FieldTemplateIcon.png]]. | #Click [[Image:FieldTemplateIcon.png]]. | ||
| − | :[[Image: | + | :[[Image:utT10.png|500px]] |
{| style="border:2px solid lightgray; float:center; margin:10px;" | {| style="border:2px solid lightgray; float:center; margin:10px;" | ||
| Line 98: | Line 99: | ||
<li>Enter general information about the work item.</li> | <li>Enter general information about the work item.</li> | ||
| − | :[[Image: | + | :[[Image:utT11.png|500px]] |
| − | :[[Image: | + | :[[Image:utT12.png|500px]] |
</ol> | </ol> | ||
| Line 108: | Line 109: | ||
|align="left" style="padding: 5px 10px 5px 10px"| After associating new objectives and work items, refresh the Statistics tab. | |align="left" style="padding: 5px 10px 5px 10px"| After associating new objectives and work items, refresh the Statistics tab. | ||
|- | |- | ||
| − | |align="center" colspan="2"|[[Image: | + | |align="center" colspan="2"|[[Image:utT13.png|500px]] |
|} | |} | ||
| Line 115: | Line 116: | ||
#Select auxiliary data, a field report item or a task. | #Select auxiliary data, a field report item or a task. | ||
| − | :[[Image: | + | :[[Image:utT14.png|500px]] |
[[Category:Quick Reference Guide]] | [[Category:Quick Reference Guide]] | ||
Revision as of 21:08, 12 July 2012
The tasking tool allows operations staff to create task dossiers by grouping useful information for planning and monitoring a task. The tasking tool includes hazards to be addressed (that is, the objective of the task) and work items such as surveys, clearances, MREs and QCs. Any other related information can be included in the binder.
Depending on local standard operating procedures (SOPs), the tasking tool can be used to manage activities for one hazard or several hazards, or for monitoring a specific organisation that was tasked.
The tasking tool automatically retrieves data from the associated work items to produce statistics. This includes cleared area size, devices found and hours spent.
All the compiled information related to the specified task can be viewed and printed from the task manager or the Task Editor window.
| Windows Vista and Windows 7 users, this sign next to a step is a reminder for you that you must right-click executables and choose Run as administrator from the context menu. |
VIEWING TASKS
- Browsing tasks from the IMSMA Navigation window.
| Represents a tip or note for using IMSMA Mobile. | Tasks can be displayed in the items pane by selecting a specific country structure area. |

| |
- Viewing the associated task(s) of a specific item in the items pane

| Represents a tip or note for using IMSMA Mobile. | Only hazards, hazard reductions, MREs and QCs can have associated tasks. |
PRINTING A TASK SUMMARY
- Click
 in the Task Editor window.
- Click

===ENTERING NEW TASKS===![]()
- Select Data Entry > Tasks.
- Click
 .
.

| Represents a tip or note for using IMSMA Mobile. | Only hazards, hazard reductions, MREs and QCs can have associated tasks. |
| 500px | |
====Completing General Information Details====![]()

====Associating Objectives====![]()
| Represents a tip or note for using IMSMA Mobile. | The objective refers to a single or to several hazards that have the same task. |
- Select the Objective tab in the Task Editor window.
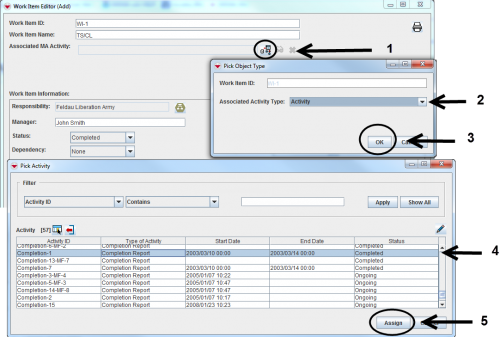
- Click .
- Select a hazard.
- Click Assign.

====Associating work items====![]()
- Select the Planning & Monitoring tab in the Task Editor window.

Adding Work Items
- Click .

| Represents a tip or note for using IMSMA Mobile. | Work items can be updates or progress reports, planned or completed hazard reductions or QC/QA or MRE activities reporting on indicators that automatically update the Statistics tab. |
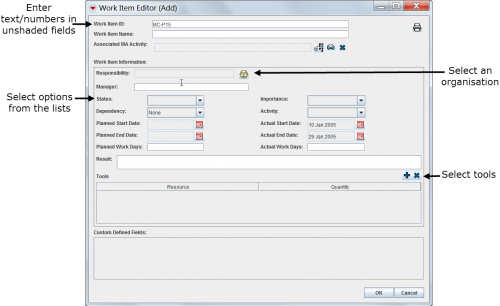
- Enter a work item ID or work item name to enable the OK button.
- Associate an MA activity field report.
- Enter general information about the work item.


| Represents a tip or note for using IMSMA Mobile. | After associating new objectives and work items, refresh the Statistics tab. |
| 500px | |
====Adding Related Information====![]()
- Select the Related Information tab in the Task Editor window.
- Select auxiliary data, a field report item or a task.
