Importing and Exporting Data with IMSMANG
Several windows in IMSMA allow you to export selected rows from the window to either XML or to a comma-separated values (CSV) file (Figure 107).
Several windows in IMSMA allow you to import a variety of data into the system. Such data includes, but is not limited to: field reports, geospatial points, auxiliary data, map data, and translation files. The list below describes the type of data you can import from each window.
File Menu Import Options
Importing Map Data from the File Menu
Importing Field Reports from the File Menu
Importing Translations from the File Menu
Importing Auxiliary Data from the File Menu
Workbench Import Options
Importing Field Reports from the Workbench
Field Report Import Options
Importing Geospatial Data from the Point and Polygon/Polyline List Window
Figure 107. Export to File Icon
Importing Field Reports to IMSMA
- HowTo:Import Field Reports
- HowTo:Export Approved Field Reports
- HowTo:Import a Field Report from an MDML File to the Workbench
- HowTo:Export a Field Report to an MDML File from the Workbench
- HowTo:Import a Field Report from a MaXML File
- HowTo:Export a Field Report to a MaXML File
Importing Maps to IMSMA
Importing Auxiliary Data to IMSMA
The XLS Import feature allows you to import field report data or auxiliary data (organisations, explosive ordnance, places, and country structure levels) into IMSMA using a Microsoft Excel file. This allows mine action personnel without IMSMA access to collect data in a format that can be entered into the system. The XLS Import feature also aids in data migration activities.
| Represents a tip or note for using IMSMA Mobile. | Before you can import data in XLS format, system administrators must set up mapping files that specify how the data fields contained in the XLS files are be mapped to the data fields in IMSMA, the import order, import logic, and business rules, and any data normalization required for import.
To import auxiliary data or field report data in an XLS-file format, you must have the XLS Import permission. |
To import auxiliary data or field report data using an XLS file:
- From the File menu, select Import.
- From the Export menu, select XLS File.
- The XLS Import window displays (XLS Import window).
- Click the Browse button next to the Import Ordering File field.
- The Open window displays.
- From the Open window:
- Navigate to the directory where the file that you would like to import is located.
- Select the file name.
- Click the Open button.
- In the XLS Import window, the location of the XLS file is displayed in the Processing Directory section of the window. The location of the import mapping files is displayed in the Import Data Directory section.
- Click the Import button.
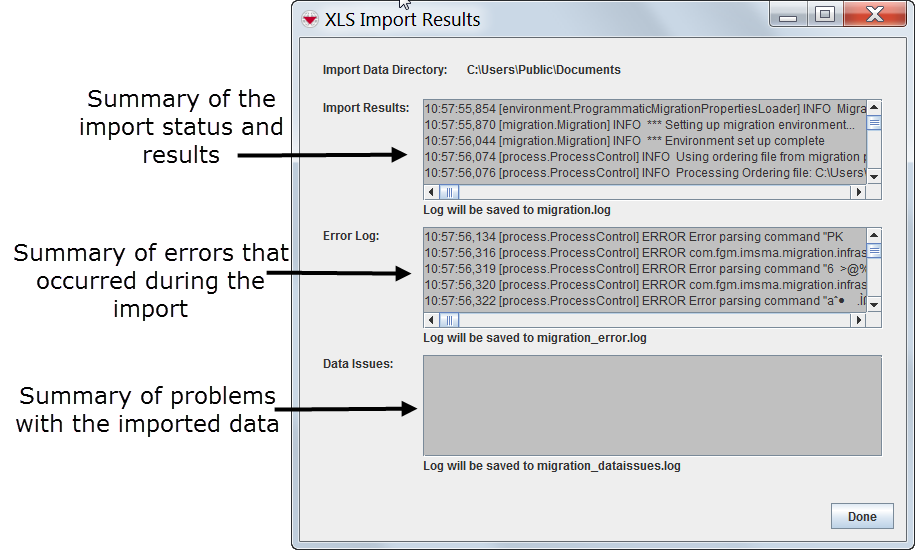
- The Import Results window displays with the contents of the migration.log, migration_errors.log, and migration_dataissues.log (XLS/CSV Import Results window). In addition, log files are generated and can be found in the IMSMA_HOME\migration directory.
- Verify that the import was successful, and click the Done button.
XLS Import window
XLS/CSV Import Results window
Translations
The XLS Import feature allows you to import field report data or auxiliary data (organisations, explosive ordnance, places, and country structure levels) into IMSMA using a Microsoft Excel file. This allows mine action personnel without IMSMA access to collect data in a format that can be entered into the system. The XLS Import feature also aids in data migration activities.
The following windows allow you to export selected row(s) to a file by clicking the button:
- Explosive Ordnance List
- Explosive Ordnance Selection
- Field Report Templates
- Handheld Template List
- Organisation List
- Organisation Selection
- Place List
- Place Selection
- Reports
- Report Templates
- Search Manager
- User List
- Workbench
| How To |
|---|
To export data from the selected row(s) to a file: 1. Select the row(s) that you would like to export to a file. 2. Click the button. The Export Options window displays. By default the XML Export option is selected (Figure 108).
Figure 108. Export Options Window
3. Select one of the following options:
- XML Export – exports the file in XML format. You can also select the MaXML or MDML (on select windows) option.
- Text Export – exports the file in CSV format. If you select the Text Export option, you can select the columns that you would like to include in the export file (Figure 109).
Figure 109. Export Options Window – Text Export
4. Click the OK button.

