 |
To Approve Data Entry Forms, your IMSMANG user account must belong to a User Role that has Data Entry Form Approval permission. Contact your IMSMANG Administrator if you have questions on permissions.
|
From the Workbench window, you can Approve a single Data Entry Form or multiple Data Entry Forms at one time.
To Approve Data Entry Forms from the Workbench:
- Locate the row associated with the Data Entry Form you want to Approve and determine if the report is ready to be Approved . See the following table for additional information.
 |
The Import Issues column is not being updated in version 6.0.
|
| Determining if a Data Entry Form Can Be Approved
|
| If you see this…
|
It means…
|
 |
The Data Entry Form can be Approved.
- Continue to next step to Approve the Data Entry Form.
|
 |
The Data Entry Form cannot be Approved.
- The reconciliation information is incomplete on the Reconciliation tab of the Data Entry Form Editor window. See the Data Entry Forms – Reconcile for which Actions there are to chose from.
- Continue to next step to Approve the Data Entry Form.
|
 |
The Data Entry Form cannot be Approved.
- Resolve the import issue on the Import Issues tab of the Data Entry Form Editor window.
- Check the All Import Issues have been resolved checkbox on the Import Issues tab and click the Save button.
- Continue to next step in to Approve the Data Entry Form.
|
 |
The Data Entry Form cannot be Spproved.
- The reconciliation information is incomplete on the Reconciliation tab of the Data Entry Form Editor window. See the Data Entry Forms – Reconcile for which Actions there are to chose from.
- Resolve the import issue on the Import Issues tab of the Data Entry Form Editor window.
- Check the All Import Issues have been resolved checkbox on the Import Issues tab and click the Save button.
- Continue to next step to Approve the Data Entry Form.
|
- Click the row(s) associated with the Data Entry Form(s) you want to approve.
 |
To select multiple Data Entry Forms that are listed one after another, hold down the [Shift] key and click the range of rows for the Data Entry Forms that you would like to select.
To select multiple Data Entry Forms that are not listed after another, hold down the [Ctrl] key and click the rows for the Data Entry Forms that you would like to select.
To deselect a Data Entry Form, hold down the [Ctrl] key and click the row that you would like to deselect.
|
- Click the Approve button.
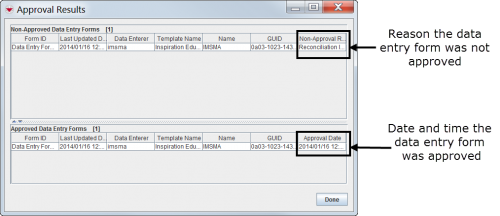
- The Approval Results window displays.
Data Entry Forms that were not Approved appear in the Non-Approved Data Entry Forms section of the Approval Results window. The Non-Approval column lists the reasons they were not approved. Possible reasons include Reconciliation Incomplete, Required fields Incomplete, Import Error, and Unknown Error.
 |
In order to Approve a Data Entry Form, you should fill in the required fields.
|
Data Entry Forms that were approved appear in the Approved Data Entry Forms section of window. The Approval Date column lists the date and time the Data Entry Forms were Approved.
- Click the Done button.
- If a Data Entry Form was not approved,
- Double-click the row associated with the non-approved Data Entry Form in the Workbench window.
- The Data Entry Form Editor window displays.
- Resolve the error on the Reconciliation tab if applicable. See Data Entry Forms – Reconcile for additional information.
- Resolve the error on the Import Issues tab if applicable. When complete, check the All Import Issues have been resolved checkbox.
- Click the Approve button.
- The Information window displays confirming the Data Entry Form was approved.
