Difference between revisions of "Add a Data Entry Form"
| (52 intermediate revisions by 6 users not shown) | |||
| Line 1: | Line 1: | ||
| − | + | {{Note | To add data entry forms, your {{IMSMANG}} user account must belong to a User Role that has permission ''Data Entry Form''. Contact your {{IMSMANG}} Administrator if you have questions on permissions. }} | |
| − | + | {{HowTo's | |
| − | + | |[[Add a Data Entry Form from the Summary Window|Add a Data Entry Form from the Summary Window]] | |
| − | + | |[[Add a Data Entry Form from the Workbench|Add a Data Entry Form from the Workbench]] | |
| − | + | }} | |
| − | + | There are different methods to Add a Data Entry Form and the '''recommended''' method for Data Entry of all items except a new Location is to use the '''[[Add a Data Entry Form from the Summary Window | Add]]''' function in the Summary window. | |
| − | |||
| − | [[ | ||
| − | |||
| − | |||
| − | [[ | ||
| − | |||
| − | |||
| − | |||
| − | |||
| − | |||
| − | |||
| − | |||
| − | |||
| − | |||
| − | |||
| − | |||
| − | |||
| − | |||
| − | |||
| − | |||
| − | |||
| − | |||
| − | |||
| − | [[ | ||
| − | |||
| − | |||
| − | |||
| − | |||
| − | |||
| − | |||
| − | |||
| − | + | For a '''new Location''' there are different methods to start from: | |
| − | + | # the [[Image:MapToolbarAddDataEntryForm.png|Add Data Entry Forms]] in the Main Navigation window | |
| − | + | # the '''Data Entry''' menu → '''Data Entry Forms''' → '''Add Data Entry Forms''' | |
| + | # the [[Image:FieldTemplateIcon.png]] button in the ''Workbench'' window. | ||
| − | + | Updates of existing Locations should as well be [[Add a Data Entry Form from the Summary Window|started from buttons]] in the Summary window. | |
| − | |||
| − | |||
| − | |||
| − | + | ==Steps==__NOEDITSECTION__ | |
| − | + | Independent of which method you will use, follow these steps: | |
| − | + | <ol> | |
| − | + | <li>Click on the relevant button.</li> | |
| − | [[ | + | [[Image:Select Template2.png|600px|center]] |
| − | [[ | + | <div align="center"> |
| − | + | '' Data Entry Form Templates'' | |
| − | [[Category: | + | </div> |
| + | |||
| + | <li>Select which template that you would like to use by selecting the row in the Data Entry Form Templates window. </li> | ||
| + | <li> | ||
| + | * Click the '''OK''' button OR | ||
| + | * Double-click the row associated with the template you would like to use.</li> | ||
| + | <li>The [[Use the Data Entry Form Editor Window|Data Entry Form Editor Window]] displays the selected template.</li></ol> | ||
| + | |||
| + | {{NavBox HowTo Enter Data}} | ||
| + | |||
| + | [[Category:CRI]] | ||
Latest revision as of 18:18, 15 June 2017
| |
To add data entry forms, your IMSMANG user account must belong to a User Role that has permission Data Entry Form. Contact your IMSMANG Administrator if you have questions on permissions. |
| How To |
|---|
There are different methods to Add a Data Entry Form and the recommended method for Data Entry of all items except a new Location is to use the Add function in the Summary window.
For a new Location there are different methods to start from:
- the
 in the Main Navigation window
 - the Data Entry menu → Data Entry Forms → Add Data Entry Forms
- the
 button in the Workbench window.
Updates of existing Locations should as well be started from buttons in the Summary window.
Steps
Independent of which method you will use, follow these steps:
- Click on the relevant button.
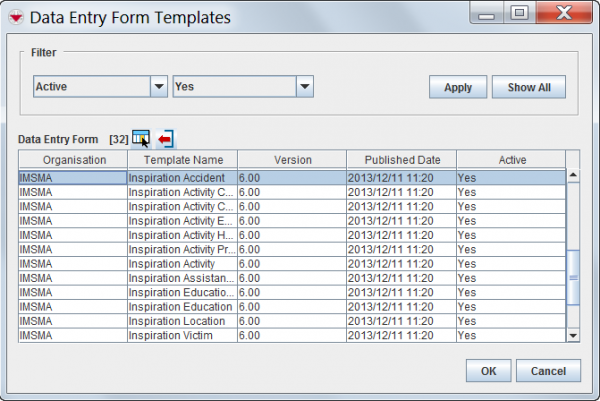
- Select which template that you would like to use by selecting the row in the Data Entry Form Templates window.
-
- Click the OK button OR
- Double-click the row associated with the template you would like to use.
- The Data Entry Form Editor Window displays the selected template.
Data Entry Form Templates
