Difference between revisions of "Create a Basic iReport Template"
| (34 intermediate revisions by 5 users not shown) | |||
| Line 1: | Line 1: | ||
__FORCETOC__ | __FORCETOC__ | ||
{{TOC right}} | {{TOC right}} | ||
| − | |||
| − | + | ==Creating a Basic iReport Template Using the Wizard==__NOEDITSECTION__ | |
| − | + | There is a wizard in iReport to help in the process of creating new iReport templates. To create an iReport template using the Wizard: | |
| − | |||
| − | |||
| − | |||
| − | |||
| − | |||
| − | |||
| − | |||
| − | |||
| − | |||
<ol> | <ol> | ||
| − | <li> | + | <li>In the '''File''' menu → '''New...'''. </li> |
| − | + | <li>Select the template you would like to use for your report. Blank A4 or an IMSMA specific template are preferrable</li> | |
| − | <li> | ||
</ol> | </ol> | ||
| − | + | {{note|At iReport startup, it can take several seconds to load the window with the templates. The next time you click on '''New...''' however, the templates appear instantaneously.}} | |
| − | |||
| − | |||
<div align="center"> | <div align="center"> | ||
| − | '' | + | [[Image:iReport Wizard1.png|center|500px|''iReport Wizard – Step 1'']] |
| + | ''iReport Wizard – Step 1'' | ||
</div> | </div> | ||
<ol start="3"> | <ol start="3"> | ||
| − | <li>Click the ''' | + | <li>Click the '''Launch Report Wizard''' button.</li> |
| − | |||
</ol> | </ol> | ||
| − | [[Image: | + | <div align="center"> |
| − | + | [[Image:iReport Wizard2.png|center|500px|''iReport Wizard - Step 2'']] | |
| − | '' | + | ''iReport Wizard - Step 2'' |
</div> | </div> | ||
<ol start="4"> | <ol start="4"> | ||
| − | + | <li>Select the desired Data Source for the report and choose '''Next'''</li> | |
| − | |||
| − | <li>Select the | ||
</ol> | </ol> | ||
| + | <div align="center"> | ||
| + | [[Image:iReport Wizard3.png|center|500px|''iReport Wizard - Step 3'']] | ||
| + | ''iReport Wizard - Step 3'' | ||
| + | </div> | ||
| + | |||
| + | <ol start="5"> | ||
| + | <li>Select the desired data fields for the report and choose '''Next'''</li> | ||
</ol> | </ol> | ||
| + | <div align="center"> | ||
| + | [[Image:iReport Wizard4.png|center|500px|''iReport Wizard - Step 4'']] | ||
| + | ''iReport Wizard - Step 4'' | ||
| + | |||
| + | |||
| − | |||
{| class="wikitable" width="500" | {| class="wikitable" width="500" | ||
|- | |- | ||
| − | | align="center" colspan="2" | ''' | + | | align="center" colspan="2" | '''iReport Wizard – Buttons for selecting fields''' |
|- | |- | ||
| width="125pt" | '''Button''' | | width="125pt" | '''Button''' | ||
| Line 56: | Line 52: | ||
| align="center" | [[Image:iRepDRA.png]] || Includes data for all fields in the report. | | align="center" | [[Image:iRepDRA.png]] || Includes data for all fields in the report. | ||
|- | |- | ||
| − | | align="center" | [[Image:iRepLA.png]] || | + | | align="center" | [[Image:iRepLA.png]] || Deletes the selected field from the report. |
|- | |- | ||
| − | | align="center" | [[Image:iRepDLA.png]] || | + | | align="center" | [[Image:iRepDLA.png]] || Deletes all fields from the report. |
|} | |} | ||
| − | </ | + | </div> |
| − | |||
| − | |||
| − | |||
| − | |||
| − | |||
| − | |||
| − | |||
| − | |||
| − | |||
| − | |||
| − | |||
| − | |||
| − | + | {{note|It is recommended to always include the ''guid'' field when designing a report}} | |
<ol start="6"> | <ol start="6"> | ||
| − | <li>If you would like to group the report data, select the attribute on which you would like to group the data from the Group list.</li> | + | <li>Click the '''Next''' button. |
| + | The [[Modify an iReport Template#Sorting_and_Grouping|group by]] step allows you to list item records that have the same value for the selected group by field together in the report. If you would like to group the report data, select the attribute on which you would like to group the data from the Group list.</li> | ||
</ol> | </ol> | ||
| + | <div align="center"> | ||
| + | [[Image:iReport Wizard5.png|center|500px|''iReport Wizard - Step 5'']] | ||
| − | + | ''iReport Wizard - Step 5'' | |
| − | + | </div> | |
<ol start="7"> | <ol start="7"> | ||
| − | <li>Click the '''Next''' button | + | <li>Click the '''Next''' button and then '''Finish'''</li> |
| − | The window | + | The Wizard is complete and the iReport template designer window is open. Depending on your selections your template will look different from the example below. |
</ol> | </ol> | ||
| − | + | ||
<div align="center"> | <div align="center"> | ||
| − | '' | + | [[Image:iReportHome1.png|center|500px|''iReport Wizard - Final Step'']] |
| + | ''iReport Wizard - Final Step'' | ||
</div> | </div> | ||
| − | + | ==iReport Designer Orientation==__NOEDITSECTION__ | |
| + | Once your initial iReport template has been created you can begin adding data elements to the template, modifying the layout and formatting, and other aspects of [[Modify an iReport Template|modifying an iReport Template]]. Below is a brief orientation to the panes and functions available in the iReport Designer. If any of the panes or windows are unavailable they can be added back by selecting the relevant item from the '''Window''' menu. | ||
| + | |||
| + | ===Report Inspector === __NOEDITSECTION__ | ||
| + | The Report Inspector pane displays a hierarchical structure of the iReport template and provides access to the available fields, parameters, and variables as well as all formatting elements of the report. Each node can be expanded for more details about the elements contained in it. | ||
| − | + | ===Report Canvas ===__NOEDITSECTION__ | |
| − | + | The middle area of the iReport Designer displays a graphical representation of the iReport template that corresponds to the hierarchical structure in the Report Inspector. In this pane you move elements around on the canvas as well as select individual elements for editing. | |
| − | |||
| − | |||
| − | + | ===Properties Pane ===__NOEDITSECTION__ | |
| − | + | This pane will display all of the properties of items selected in the Report Inspector or Report Canvas. The Properties Pane displays a context-senstive list of properties for any selected item for editing. | |
| − | |||
| − | |||
| − | |||
| − | |||
| − | |||
| − | |||
| − | |||
| − | |||
| − | |||
| − | + | ===Palette===__NOEDITSECTION__ | |
| − | + | The Palette is the area where individual graphic elements can be selected and dragged onto the canvas. This includes subreports and crosstab elements. | |
| − | |||
| − | |||
| − | + | ===Formatting Tools ===__NOEDITSECTION__ | |
| − | + | The Formatting Tools pane provides access to various formatting functions designed to manage the size and space between elements on the report. | |
| − | |||
| − | |||
| − | |||
| − | |||
| − | |||
| − | === | + | ===iReport Output ===__NOEDITSECTION__ |
| − | + | This pane displays any problems or output from the reports. | |
| − | |||
| − | + | ==XML and Preview Views==__NOEDITSECTION__ | |
| + | In addition to the Designer View, iReport Designer provides 2 additional views, the XML View and the Preview. Using the XML View you can get an editable version of the .jrxml file created by iReport Designer. This is useful for troubleshooting specific problems with a report but is generally only for advanced users. | ||
<div align="center"> | <div align="center"> | ||
| − | '' | + | [[Image:iReportXMLView.png|center|500px|''XML View'']] |
| − | </div> | + | ''XML View'' |
| − | + | </div>. | |
| − | |||
| − | + | The Preview view runs the current version of the iReport template and generates an output file with the results of the report. This is useful for ensuring that the report is functioning as desired prior to importing into {{IMSMANG}}. This is the primary method for running iReport templates within the iReport Designer. | |
<div align="center"> | <div align="center"> | ||
| − | '' | + | [[Image:IReportPreview.png|center|500px|''Preview View'']] |
| − | </div> | + | ''Preview View'' |
| − | + | </div>. | |
| − | {{NavBox HowTo | + | {{NavBox HowTo Standardizing Data Analysis and Information Reporting}} |
| + | [[Category:NAA]] | ||
Latest revision as of 21:32, 20 February 2020
Creating a Basic iReport Template Using the Wizard
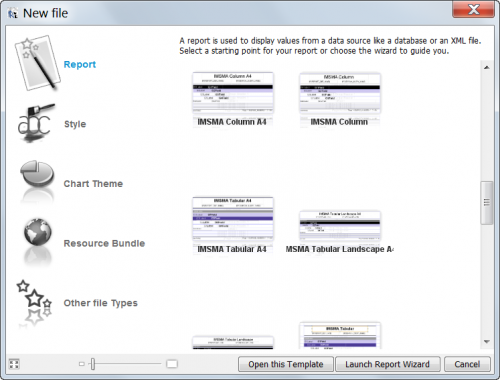
There is a wizard in iReport to help in the process of creating new iReport templates. To create an iReport template using the Wizard:
- In the File menu → New....
- Select the template you would like to use for your report. Blank A4 or an IMSMA specific template are preferrable
| |
At iReport startup, it can take several seconds to load the window with the templates. The next time you click on New... however, the templates appear instantaneously. |
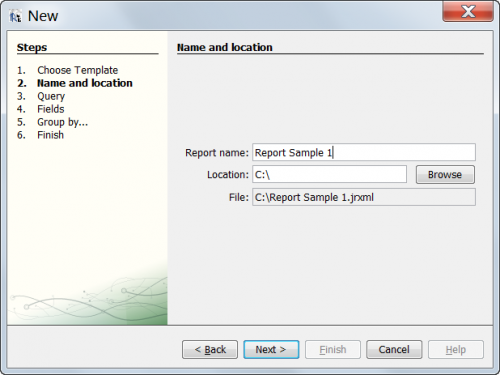
- Click the Launch Report Wizard button.
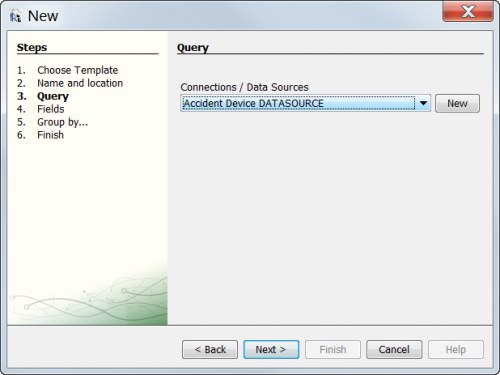
- Select the desired Data Source for the report and choose Next
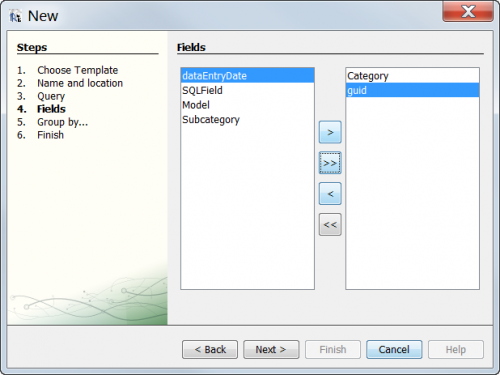
- Select the desired data fields for the report and choose Next
iReport Wizard - Step 4
| |
It is recommended to always include the guid field when designing a report |
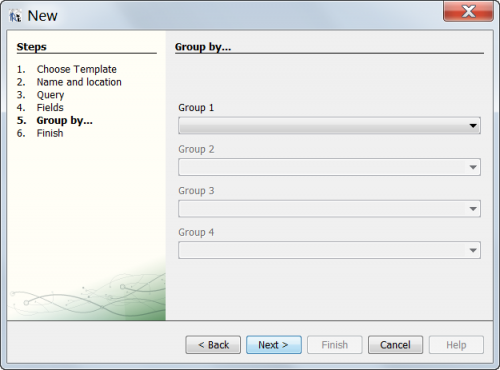
- Click the Next button. The group by step allows you to list item records that have the same value for the selected group by field together in the report. If you would like to group the report data, select the attribute on which you would like to group the data from the Group list.
- Click the Next button and then Finish
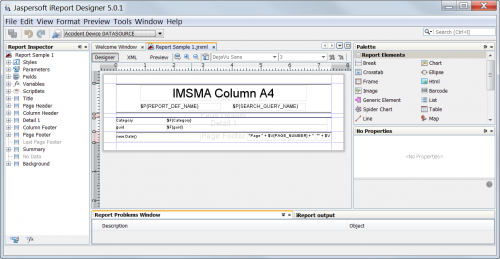
The Wizard is complete and the iReport template designer window is open. Depending on your selections your template will look different from the example below.
iReport Designer Orientation
Once your initial iReport template has been created you can begin adding data elements to the template, modifying the layout and formatting, and other aspects of modifying an iReport Template. Below is a brief orientation to the panes and functions available in the iReport Designer. If any of the panes or windows are unavailable they can be added back by selecting the relevant item from the Window menu.
Report Inspector
The Report Inspector pane displays a hierarchical structure of the iReport template and provides access to the available fields, parameters, and variables as well as all formatting elements of the report. Each node can be expanded for more details about the elements contained in it.
Report Canvas
The middle area of the iReport Designer displays a graphical representation of the iReport template that corresponds to the hierarchical structure in the Report Inspector. In this pane you move elements around on the canvas as well as select individual elements for editing.
Properties Pane
This pane will display all of the properties of items selected in the Report Inspector or Report Canvas. The Properties Pane displays a context-senstive list of properties for any selected item for editing.
Palette
The Palette is the area where individual graphic elements can be selected and dragged onto the canvas. This includes subreports and crosstab elements.
Formatting Tools
The Formatting Tools pane provides access to various formatting functions designed to manage the size and space between elements on the report.
iReport Output
This pane displays any problems or output from the reports.
XML and Preview Views
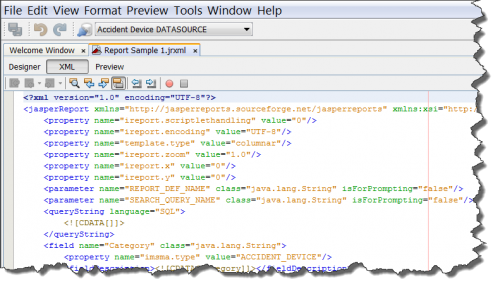
In addition to the Designer View, iReport Designer provides 2 additional views, the XML View and the Preview. Using the XML View you can get an editable version of the .jrxml file created by iReport Designer. This is useful for troubleshooting specific problems with a report but is generally only for advanced users.
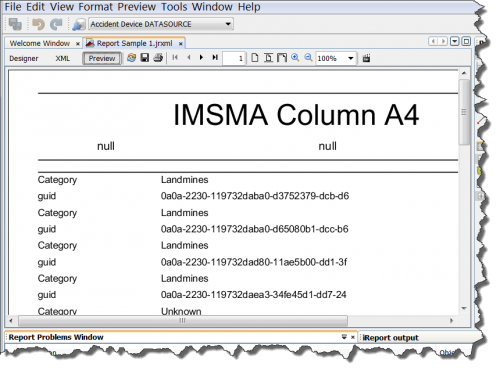
.The Preview view runs the current version of the iReport template and generates an output file with the results of the report. This is useful for ensuring that the report is functioning as desired prior to importing into IMSMANG. This is the primary method for running iReport templates within the iReport Designer.
.
| ||||||||||
