Difference between revisions of "Change the Scoring Ranges in the Impact Scoring Template"
| Line 45: | Line 45: | ||
</ol> | </ol> | ||
{{HowTo NavBox Impact Scoring Tool}} | {{HowTo NavBox Impact Scoring Tool}} | ||
| + | [[Category:NAA]] | ||
Revision as of 09:58, 4 October 2016
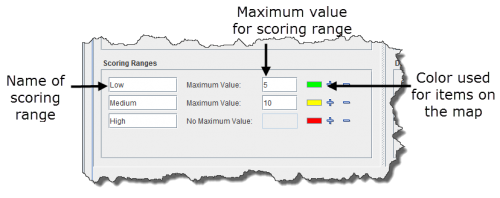
Scoring ranges allow you to categorise the results of the impact scoring analysis into named groupings. All the scenarios in the template will use the scoring ranges to group locations together based on their impact score. You can change the default scoring ranges or define new scoring ranges for the current template. Each scoring range has an associated label, maximum score value, and map display colour.
For example, the default scoring ranges are as follows:
| Default Scoring Ranges | |
| Scoring range | Maximum value |
| Low | 5 |
| Medium | 10 |
| High | None |
In the example scheme above, locations with a score of 5 or below (including 0 or negative scores) would be labelled as the “Low” impact group. Locations with a score of 6 to 10 would fall into the “Medium” impact group, and those locations with a score above 10 would fall into the “High” impact group.
To change a scoring range for an impact scoring template:
- From the Impact Scoring Template window, select the Settings tab.
- In the Scoring Ranges section of the window, click the
 button until you have a sufficient number of rows for each of your scoring ranges.
| |
To remove a row, click the |
- Enter the name of the scoring range in the field on the left.
- Enter the maximum value for the scoring range in the field to the right.
Scoring Ranges
- Click the colour icon to change the colour that is used to highlight items in the scoring range on the map.
