Difference between revisions of "Change existing symbol in IMSMA.mxd"
From IMSMA Wiki
| (8 intermediate revisions by one other user not shown) | |||
| Line 1: | Line 1: | ||
| + | If you would like to change the existing symbols, you need to use [http://desktop.arcgis.com/en/desktop/ ArcGIS software] to update '''[[IMSMA.mxd]]''' which is located in ''C:\IMSMAng\server\gis\maps'' folder. | ||
| + | |||
| + | ==Steps== __NOEDITSECTION__ | ||
| + | As an example, Land by Type theme will be used. The use case could be that the users found it difficult to distinguish between Indication, SHA and CHA, therefore they wanted to have different colors for each of them. | ||
| + | |||
| + | <ol><li>This is how the [[Map Display Window]] inside IMSMA looks like before any changes on the .mxd file: | ||
| + | |||
[[Image:Existing_symbol0.png|300px|center]] | [[Image:Existing_symbol0.png|300px|center]] | ||
<div align="center"> | <div align="center"> | ||
'' Map Display - Before changes'' | '' Map Display - Before changes'' | ||
| − | </div> | + | </div></li> |
| − | + | <li>Open IMSMA.mxd with ArcMap and go to Land by Type layer. Double-click on the symbol that you would like to change (SHA). | |
| − | |||
| − | |||
| − | |||
[[Image:Existing_symbol1.png|250px|center]] | [[Image:Existing_symbol1.png|250px|center]] | ||
<div align="center"> | <div align="center"> | ||
'' IMSMA layer Land - by Type'' | '' IMSMA layer Land - by Type'' | ||
| − | </div> | + | </div></li> |
| − | |||
| − | |||
<li>The following window displays.</li> | <li>The following window displays.</li> | ||
[[Image:Existing_symbol2.png|350px|center]] | [[Image:Existing_symbol2.png|350px|center]] | ||
| Line 18: | Line 20: | ||
'' Marker properties'' | '' Marker properties'' | ||
</div> | </div> | ||
| − | <li>You can change a form, colour, angle, mask etc. For Advanced editing, click on the symbol. | + | <li>You can change a form, colour, angle, mask etc. For Advanced editing, click on the symbol. |
| − | + | {{note|The size should be the same or bigger than the symbol size for the second Marker layer which is used to display Land which values are not included in the value list.}}</li> | |
<li>The following window displays.</li> | <li>The following window displays.</li> | ||
[[Image:Existing_symbol3.png|500px|center]] | [[Image:Existing_symbol3.png|500px|center]] | ||
| Line 34: | Line 36: | ||
<li>Click on OK to close the Symbol editor.</li> | <li>Click on OK to close the Symbol editor.</li> | ||
<li>Click on OK to close the Marker property window.</li> | <li>Click on OK to close the Marker property window.</li> | ||
| + | <li>Apply the same change to the other layers in the same group. | ||
[[Image:Existing_symbol5.png|250px|center]] | [[Image:Existing_symbol5.png|250px|center]] | ||
<div align="center"> | <div align="center"> | ||
'' IMSMA layer Land - by Type'' | '' IMSMA layer Land - by Type'' | ||
| − | </div> | + | </div></li> |
| − | |||
<li>Save the IMSMA.mxd and close ArcMap.</li> | <li>Save the IMSMA.mxd and close ArcMap.</li> | ||
<li>Rename your background mxd. This mxd must '''not''' previously been merged/imported into {{IMSMANG}}. </li> | <li>Rename your background mxd. This mxd must '''not''' previously been merged/imported into {{IMSMANG}}. </li> | ||
| Line 44: | Line 46: | ||
<li>Import the background map which will be merged with the updated IMSMA.mxd. </li> | <li>Import the background map which will be merged with the updated IMSMA.mxd. </li> | ||
<li>Close the IMSMA client and open it again in order to be sure that the Map pane is refreshed. | <li>Close the IMSMA client and open it again in order to be sure that the Map pane is refreshed. | ||
| + | <li>Verify in Map Display that the changes are applied. Apply the new theme and verify that it looks OK in the Map Pane. | ||
[[Image:Existing_symbol6.png|300px|center]] | [[Image:Existing_symbol6.png|300px|center]] | ||
<div align="center"> | <div align="center"> | ||
'' Map Display - After changes'' | '' Map Display - After changes'' | ||
| − | </div> | + | </div></li></ol> |
| − | + | ||
| − | </ol> | ||
{{NavBox HowTo Setting up Maps}} | {{NavBox HowTo Setting up Maps}} | ||
[[Category:CRI]] | [[Category:CRI]] | ||
Latest revision as of 18:11, 31 July 2016
If you would like to change the existing symbols, you need to use ArcGIS software to update IMSMA.mxd which is located in C:\IMSMAng\server\gis\maps folder.
Steps
As an example, Land by Type theme will be used. The use case could be that the users found it difficult to distinguish between Indication, SHA and CHA, therefore they wanted to have different colors for each of them.
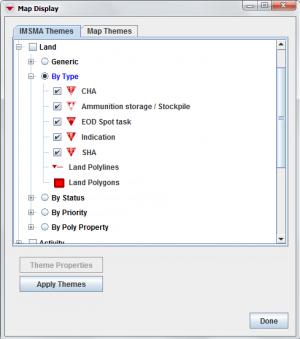
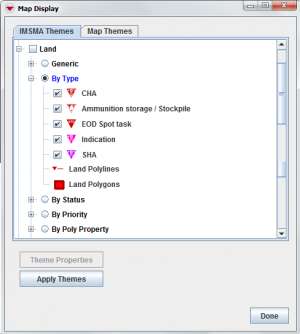
- This is how the Map Display Window inside IMSMA looks like before any changes on the .mxd file:
Map Display - Before changes
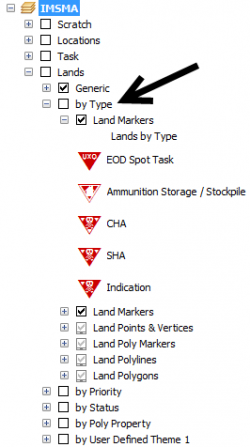
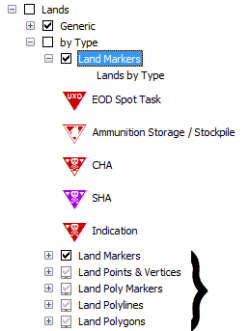
- Open IMSMA.mxd with ArcMap and go to Land by Type layer. Double-click on the symbol that you would like to change (SHA).
IMSMA layer Land - by Type
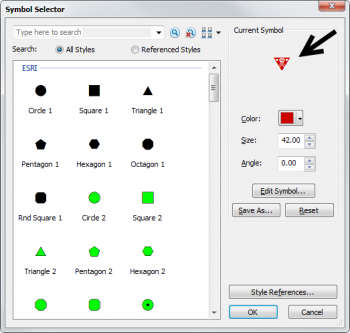
- The following window displays.
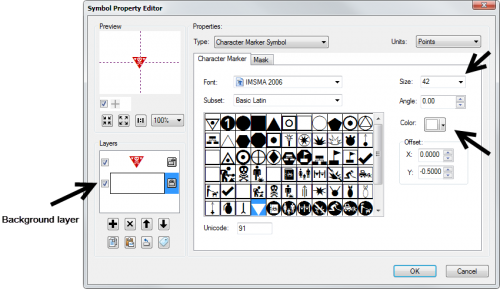
- You can change a form, colour, angle, mask etc. For Advanced editing, click on the symbol.

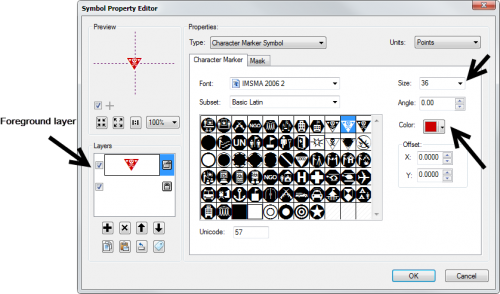
The size should be the same or bigger than the symbol size for the second Marker layer which is used to display Land which values are not included in the value list. - The following window displays.
- If you would like to change the colour of the symbol then select the foreground layer and a colour.
- If you would like to change the background colour then select the background layer and a colour.
- Click on OK to close the Symbol editor.
- Click on OK to close the Marker property window.
- Apply the same change to the other layers in the same group.
IMSMA layer Land - by Type
- Save the IMSMA.mxd and close ArcMap.
- Rename your background mxd. This mxd must not previously been merged/imported into IMSMANG.
- In the IMSMA client (if your configuration is client/server then start the IMSMA client on the server computer) go to File, Import, Map.
- Import the background map which will be merged with the updated IMSMA.mxd.
- Close the IMSMA client and open it again in order to be sure that the Map pane is refreshed.
- Verify in Map Display that the changes are applied. Apply the new theme and verify that it looks OK in the Map Pane.
Map Display - After changes
Marker properties
Symbol editor - Foreground
Symbol editor - Background
| |
The size is different in the foreground and background layers of the symbol. |
| |||||||||||||
