Difference between revisions of "Sharing an IMSMA Staging Area"
| Line 14: | Line 14: | ||
{{Note|On a computer with IMSMA V6 installed, the executable for starting pgAdmin3 is C:\IMSMAng\pgsql\bin\pgAdmin3.exe}} | {{Note|On a computer with IMSMA V6 installed, the executable for starting pgAdmin3 is C:\IMSMAng\pgsql\bin\pgAdmin3.exe}} | ||
In order to create a backup of the staging area database, these steps are required: | In order to create a backup of the staging area database, these steps are required: | ||
| − | + | <ol> | |
| − | + | <li> In pgAdmin3, connect to the PostgreSQL server hosting the staging area -- typically, this server will be localhost, and the port is 5432.</li> | |
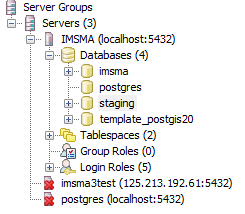
| − | + | <li> Open the staging area database by clicking on it | |
| − | + | [[Image:backup_staging_area_step1.png|center]]</li> | |
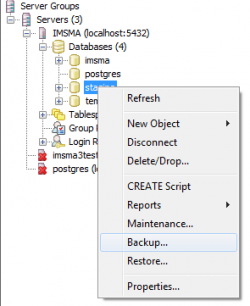
| − | + | <li>Right-click on the database (e.g. staging) and choose '''Backup...'''</li> | |
| − | + | [[Image:backup_staging_area_step2.png|center|250px]]</li> | |
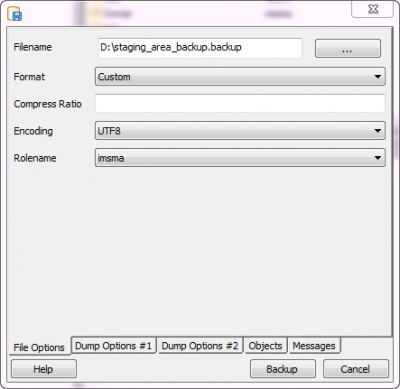
| − | + | <li>In the backup window, choose a destination folder and a filename, and the other options as shown in the screenshot below.</li> | |
| − | + | [[Image:backup_staging_area_step3.png|center|400px]]</li> | |
| + | <li>Click on '''Backup''' and wait for the backup to finish. Depending on the size of the database, this can take some time. When finished, click '''Done'''.</li> | ||
| + | <li>In the chosen destination folder, there is now a file with the chosen name and the extension .backup (e.g. staging_area_backup.backup).</li> | ||
| + | <li>This file can now be sent to whoever should receive it.</li> | ||
| + | </ol> | ||
=== Restore of the staging area ===__NOEDITSECTION__ | === Restore of the staging area ===__NOEDITSECTION__ | ||
Revision as of 10:30, 16 July 2014
It can be useful to share an IMSMA staging area between different actors as a way to share IMSMA data. For example, in a setup where each actor/operator enters its own data into IMSMA (and thus has a subset of the provincial or national data), sharing the global staging area is a way of giving each actor access to the global dataset, without compromising their own IMSMA database.
Contents
[hide]Overview
There are several options for sharing the staging area:
- Create a backup, send it to the organisations that should have it, and restore the backup there
- Host the staging area on a server and allow access from the outside
- Host IMSMA on a server and allow remote Staging Area Generators to connect to it
Each option is detailed step-by-step.
Sharing via backup and restore
Backup of the staging area
The first step of option 1 is to create a backup of the staging area database. This is different from taking a backup of IMSMA, because the staging area is not part of the IMSMA application, but a stand-alone PostgreSQL database. A backup can be created using any tool that can connect to the PostgreSQL database (e.g. Navicat). The guide below details the steps using pgAdmin3, a tool that comes for free with every PostgreSQL installation, thus also with an IMSMA installation.
| |
On a computer with IMSMA V6 installed, the executable for starting pgAdmin3 is C:\IMSMAng\pgsql\bin\pgAdmin3.exe |
In order to create a backup of the staging area database, these steps are required:
- In pgAdmin3, connect to the PostgreSQL server hosting the staging area -- typically, this server will be localhost, and the port is 5432.
- Open the staging area database by clicking on it
- Right-click on the database (e.g. staging) and choose Backup...
- In the backup window, choose a destination folder and a filename, and the other options as shown in the screenshot below.
- Click on Backup and wait for the backup to finish. Depending on the size of the database, this can take some time. When finished, click Done.
- In the chosen destination folder, there is now a file with the chosen name and the extension .backup (e.g. staging_area_backup.backup).
- This file can now be sent to whoever should receive it.
Restore of the staging area
Hosting the staging area on a server
Hosting IMSMA on a server and allow remote staging area generators to connect
| ||||||||||||||


